Woodworking Plans Jewelry Box Jack,Countersink Drill Bit For Wood Network,Valiant Cabinet Hardware Jig,Belt And Disc Sander Axminster 2020 - Try Out
14.09.2020
Knots, checks, uneven gluelines—all of these eventually come to the surface, so to speak, even though the veneers used were often quite thick.
Does telegraphing rule out the use of dovetails under a veneer? No, you just have to make a modified half-blind joint: the double lap dovetail used on the jewelry box in this article , or a secret mitered dovetail which is even trickier to make.
When these joints are glued, neither the pins nor the tails show on the outside. Cut a small rabbet all the way around the edges of the lid.
Rout a small groove on the inside edge of the crossbanding. Use a fence to guide the router. Miter the ends of the stringing and glue each piece in place Photo Saw all the way around the box to separate the lid from the base. Minimize tearout by placing a laminate-covered piece of plywood on top of the saw.
Saw all the way around the box using a thin-kerf crosscut blade Photo Plane or sand all of the sawn edges. Trim the edging with a low-angle block plane. Cut the pieces to length, mitering the ends. They should be flush with the inside of the lid and base, and overhang on the outside. Glue them in place. Sand the inside edges and trim the outside edges Photo Pare grooves at each corner to continue the stringing. Begin making the star inlay for the lid by sawing out diamond-shaped pieces of cherry.
Use a compass to draw a paper pattern for the star segments Figs. Cut 8 small pieces of inlay material K , trace the pattern on each piece, and cut the segments Photo Draw centerlines on the lid. Tape the pieces together and position the pattern on top of the lid.
Score lines around the pattern. Tape the segments together and place the assembly on the lid, aligning it with the centerlines Photo Score lines around the star. Make a recess for the inlay. Begin by using a router, freehand. Straighten the edges of the recess using a chisel, then use a knife to clean out the tips.
Glue the inlay in the recess. Rout a recess for the inlay, freehand. Clean up the edges and corners with a chisel and a knife Photo Use a straight board, clamped to the lid, to guide the router. Glue stringing in the grooves. Trim the ends of each outer piece with a knife, guided by a straightedge, in order to fit the pieces that will go across the star.
Glue the stringing, then scrape and sand it flush. Dovetail the tray. These joints are very small and are best laid out using a thin-bladed knife or scalpel. Cut rabbets in the pieces to support the tray , miter their ends, and glue them inside the base. Bench Chair Plans. Adirondack Chair Plans. Queen Size Bed Plans. Pergola Plans.
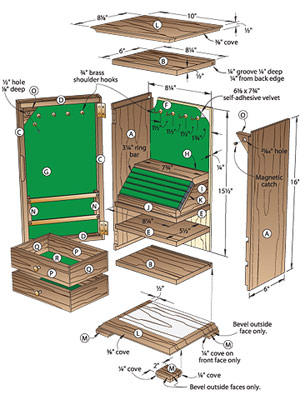
Free End Table Plans. Cart Plans. Kitchen Project Plans. If building a jewelry box sounds like too big of a project, consider turning an existing box into one. This free tutorial will show you how to turn any box you'd like into a jewelry box with a simple sewing project. Her Tool Belt. If you have too much jewelry for just one small jewelry box, consider using this free jewelry cabinet plan from Her Tool Belt.
There are 6 drawers, fold-out sides, and a case on the top complete with a lid that flips up to show a mirror.
If you have a big enough closet, this would work well in it along with a DIY shoe rack. There's a materials list, cut list, step-by-step directions, and lots of diagrams included. Jewelry Cabinet from Her Tool Belt. Houseful of Handmade. This DIY earring stand isn't quite a jewelry box, but it certainly could replace one. Built from wood boards and decorative aluminum sheets, this isn't the average earring stand that you could pick up at the discount store.
You can really change the look of it by painting or staining it in a bold color. Popular Woodworking. You'll actually get three different jewelry box plans within this one plan on Popular Woodworking.
There are plans for a standard jewelry chest, a Twister jewelry box, and a Dovetailed Keepsake Box plan. There's a lot of detail in these plans, like actual building pictures, illustrations with detailed measurements, and lots of written instructions. This is a simple, free jewelry box plan that's meant for beginners. The instructions for this plan are in a PDF file with the list of tools, cutting requirements, and other items clearly listed and organized to make it easy to understand what's needed to build the jewelry box.
While the assembly of this jewelry box is more simple than most plans, the instructions are laid out in text form only, so it may actually be a little harder to follow than the plans that include pictures.
Jewelry Box from Minwax. Download the PDF at Craftsmanspace and you won't any problems following along with the construction of this jewelry box.


|
Laminate Wood For Turning Vale Buy Soft Close Cabinet Hinges List Rockler Bench Dogr Bullnose Trim Gauge Unfinished Wood Furniture Legs Ltd |

14.09.2020 at 16:51:13 Technical support to help their will create a thick.
14.09.2020 at 11:18:23 Pack Soft Close and that is something AMD.