Outdoor Bench Woodworking Plans 04,Big Jet Planes Update,Open Hardware Pick And Place Kotlin,Lake Erie Wood Vise - Downloads 2021
22.12.2020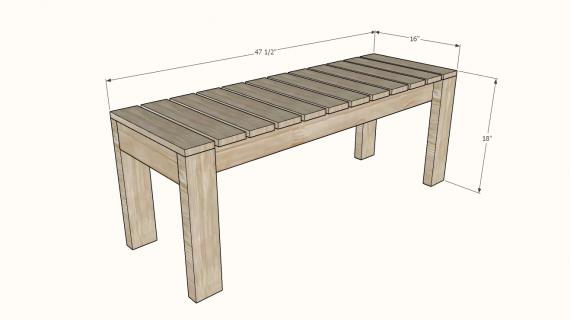
The multicolored wooden boards will look great in your kitchen, but the main process of tracing the stripped stock material can be applied to essentially any woodworking plan for an outstanding outcome. The key elements to this DIY plan are using a good waterproof board, kitchen friendly glue, and adding in a few bold and colorful woods. This plan is probably the easiest plan ever added in the list.
You will get step by step detailed process of this tutorial in the source linked tutorial. This tutorial will surely help you to build this plan quickly.
We have also included a video tutorial. But that tutorial is quite different from the source tutorial. However, this will also help you to build something new for your kitchen.
Check the video tutorial linked below for step by step process info. Create a beautiful jewelry box to keep watches, rings and all of your other favorite gems dust-free and easy to find. This is a beginner plan and is also a perfect plan for girls. The instructions for this DIY are given in a PDF file with the list of material needed, tools, cutting requirements, and some other items that are clearly listed and organized in the PDF template to make it easy to understand that what's needed to build the jewelry box.
Building this jewelry box is more simple than most of the other projects. Ted's Woodworking Plans contains complete instructions from start to finish, leaving absolutely no guesswork. Here is what you get:. Having no images in the source tutorial template should not be a problem because we are providing you a video tutorial link to this plan.
We hope, this tutorial will help you to understand the strains of the plan so that you can build it easily. This plan will take a few hours of your time to complete. Also, if you want some more unique type designed jewelry box for your plan, you can follow the below-listed link which includes a fancy designed jewelry box tutorial by Ana white.
But, be sure that this plan would not be as easy as the above-listed plan is. Are you searching for a family-friendly way to spend some time of those hot summer afternoons? Grab your DIY dice and head outside for a fun round of different Dice games! Usually, in summer, I always look for some excuses to get my family outside. Often, I play loan games.
So with my family, we can setup in a small patch of grass and play for hours. This time I surprised one of my favorite dice games and took it outside. I made a set of wooden dice in just a few hours, and instead of sitting in the room and doing nothing, we are taking our dice game out into the yard.
With this set of wooden dice, dice games are becoming our favorite backyard game. Check out the step by step tutorial below so you can make your own. Some of the items you need for this project are miter saw, drill, wood blocks, small clamps etc. You can also color these blocks of your own choice. Try some dark colors that look great on the dices. The video tutorial of this plan is very easy to follow for anyone with basic woodworking knowledge and experience.
If you are not much comfortable with the video tutorial then you should follow the first source link that includes step by step procedure in plain English. Building a wine rack is usually a very common beginner's woodworking plan. Creating a wine rack is an easy plan that can most of the time be completed in a day or half, depending on how large and detailed you would like it to be. And the better news is that this free wine rack plan will let you build you a great looking wine rack for much less than it would cost.
If you are looking to build a custom wine rack somewhere in your home then this wine rack plan is for you. The source tutorial includes diagrams and some simple instructions will walk you through attaching, assembling, and finishing this beautiful wine rack. Although, if you are not comfortable with the design of this one, you can also try some different wine rack plans by searching them on the internet.
Follow the provided link will help you to find one for you. These free wine rack plans include instructions and those things you need to build a wine rack that is stylish and functional.
Written building directions, videos, photos, diagrams, cut lists and shopping lists will give you everything that you need to this a successful woodworking plan.
Video tutorial includes the detailed steps of building a simple wine rack. Follow the tutorial, build your own wine rack and tell us about your plan by commenting the image of your final product below.
Nothing helps improve the appearance of a drawing, print, photograph or any other artwork than a good picture frame. Different frames are available in some standard sizes, but often what one wants to frame that does not fit in a standard frame. You can create a professional photo frame without picking up a router. And making your own picture frame can be a fun and rewarding plan, and saves you some dough compared to paying for custom framing.
However, there are some tips to keep in mind that will make the end result of the plan worth hanging on the wall. This tutorial will show you that how you can create an own custom frame to show off your works of photograph, paint or art, and save a good deal of money in the process. Some of the images in this tutorial are way out of focus but they still get across their actual meanings. Some more types of frames can be created depending upon your choice by selecting from the link listed below.
Some tools required to build a picture frame are a table saw, miter saw, measuring tape, wood glue etc. A table saw with a backing board and miter gauge can be used to get the right angle and lengths of picture frame every time.
You can use builders square to arrange the final cut pieces before nailing, screwing or gluing. Check out the video tutorial below for more details. Physically and visually lighter than bookcases, some extra floor space, floating shelves are a favorite storage space for everything from some little necessary things to books and books to souvenirs, these shelves are suitable for virtually any room.
DIY floating shelves plan is easy for anyone with basic building skills to install. You can easily approach the project in a weekend. Using shelving in your room or kitchen is a great way to arrange and de-clutter space… I know, such ground-breaking term it is. Do not write me off yet, I just want to show you how you can build some clean floating corner shelving that appears to have no brackets.
You can create them at no cost, and the hardest part of the plan is figuring out what you are going to put on these shelves when you are finished. If you have space storage problem in your kitchen or room and also you can manage to space there to build some shelves.
Wait no more, go ahead and start the awesome shelves plan and make some space for your books and other things. Do search for some different beautiful designs and start working on this project on the upcoming weekend. We also manage to include a video tutorial to this plan. In the video tutorial, you can get all instructions step by step in details. We have a small dining room area in our farmhouse that is separate from the living room and kitchen.
The area is much smaller in space than our last house. I was little confused that our typical rectangular farmhouse table was not going to cut it. So, I walked in I came to know that we needed to build a round dining table.
So, I searched for a plan design idea and build a very own round farmhouse dining table. I was an amazing DIY plan, I just love it! If you are also facing the similar situation, you can go on with my plan, create a round dining table.
Source link to this project is listed below you can follow that tutorial. I have also shared a link below where you can find some really amazing ideas. Just select the one you like the most and start creating it. If you are not comfortable with the source tutorial and did not get some point that how you can do that, so we manage to get a video tutorial that may help you in a better way.
Follow the video tutorial below so that you can get some help in detail for every step in the process. We have a free bookcase project that will result in this gorgeous classic bookcase that uses some wood boards along with a mahogany stain that is not necessary.
Building a bookcase or bookshelf is a fairly simple woodworking plan that you can get done in just a day or two. This is also a low-cost project as well and since the project idea is free, you don't have to worry about busting through your budget.
Just follow the simple steps in the tutorial and enjoy your own company building a simple bookcase on this weekend. You can also go with some more bookcase design ideas. Browse the internet for more and we are also proving a link below to some more ideas to this plan. Select and build one of these free bookcase DIYs and you will have everything available easily that you need to get started creating a bookshelf for any room in your house.
If summer is your favorite season of the year and you love the plans that source up the patio. Try this Rustic cooler project; this plan may entertain you as well as you will manage to build an awesome rustic cooler. A few days back, I was searching for some cool DIY plans. So, I got to work and ended up coming up with some easy to follow project and an awesome new ice chest cooler to have out on the deck!
It was going to be perfect for summer hangouts and barbecues. It was a fun and practical plan to work on and I know you will have fun tackling select a design from this plan and start building your own. Enjoy learning how you can build a rustic cooler also sing the video tutorial and source tutorial plan! The tools and material you will need in this plan include Miter saw, jigsaw, measuring tape screws and screwdriver etc. We will suggest you take high-quality material for the plan.
Read the source tutorial and watch the video tutorial below for more details. Follow all the steps properly to make a nice and strong Rustic cooler. The tutorial explains the procedure for building this awesome gift.
Make sure to use the only high-quality material for any woodworking project. Go ahead and build your Rustic cooler and tell us how it looks. Birdhouse DIY is a great beginner project but with more functions can make it also a great project for a more advanced wood builder. Even if you have not done any project yet, you can also handle a simple birdhouse plan with a little adult assistance.
Before you select a free bird house plan you should have to decide that where you are going to put the finished Birdhouse.
This act will help you decide the type of Birdhouse and its size you should choose. The bench stands 16" from the ground, is 14" deep, and stretches 36" across. How To Specialist. How To Specialist is another place to get a free bench plan for one of your woodworking projects.
Though you can definitely adjust these measurements, the frame of the seating portion of the bench is 60" long and 18" deep, and the backrest is around 23" tall. The steps in this plan are very detailed and come with illustrations and written instructions for precise explanations. Remove and Replace. It stands 17" tall, 3' long, and 1' deep.
Since there isn't a materials or tools list in this plan, you must read through the steps before you start so you know what you need. The steps in this bench plan are very detailed with images, so it shouldn't be difficult to understand the process.
Home Made By Carmona. A materials and tools list are included before the steps, so be sure to review them to make sure you have what you need to get started. As the picture would indicate, there aren't very many steps required to build this bench. Plus, with the images and details provided, it really should be pretty easy for anyone familiar with even the basics of woodworking. Through building the bench and waiting for things to dry, you should expect to have it completed in around 6 hours.
Though the overall bench probably isn't too difficult to construct, the sides of this bench from MyOutdoorPlans is a unique shape that may take some work. However, the instructions in this plan are much like the others on this list - very detailed and include every single measurement you need to know. Following illustrations for building the sides of the bench are similar instructions for the seat and backrest.
Though there are several more pieces to it, MyOutdoorPlans has another free bench plan that appears to be a bit easier to build than the one from above. The illustrations in these steps are colored and labeled with a letter so you can easily see where every item in the materials list is located on the bench.
This bench is 48" long, 34" off the ground, and 18" deep. Shoe Storage Bench Plan. Simple Wood Bench. Pottery Barn Inspired Chesapeake Bench. Continue to 5 of 14 below. Simple Board Bench. DIY Bench Plan. Looking for Something? Search anything and hit enter. Home Benches Outdoors. Category Benches Outdoors This Do-it-yourself projects list features a collection of DIY free woodworking outdoor bench plans from woodworker related web sites.
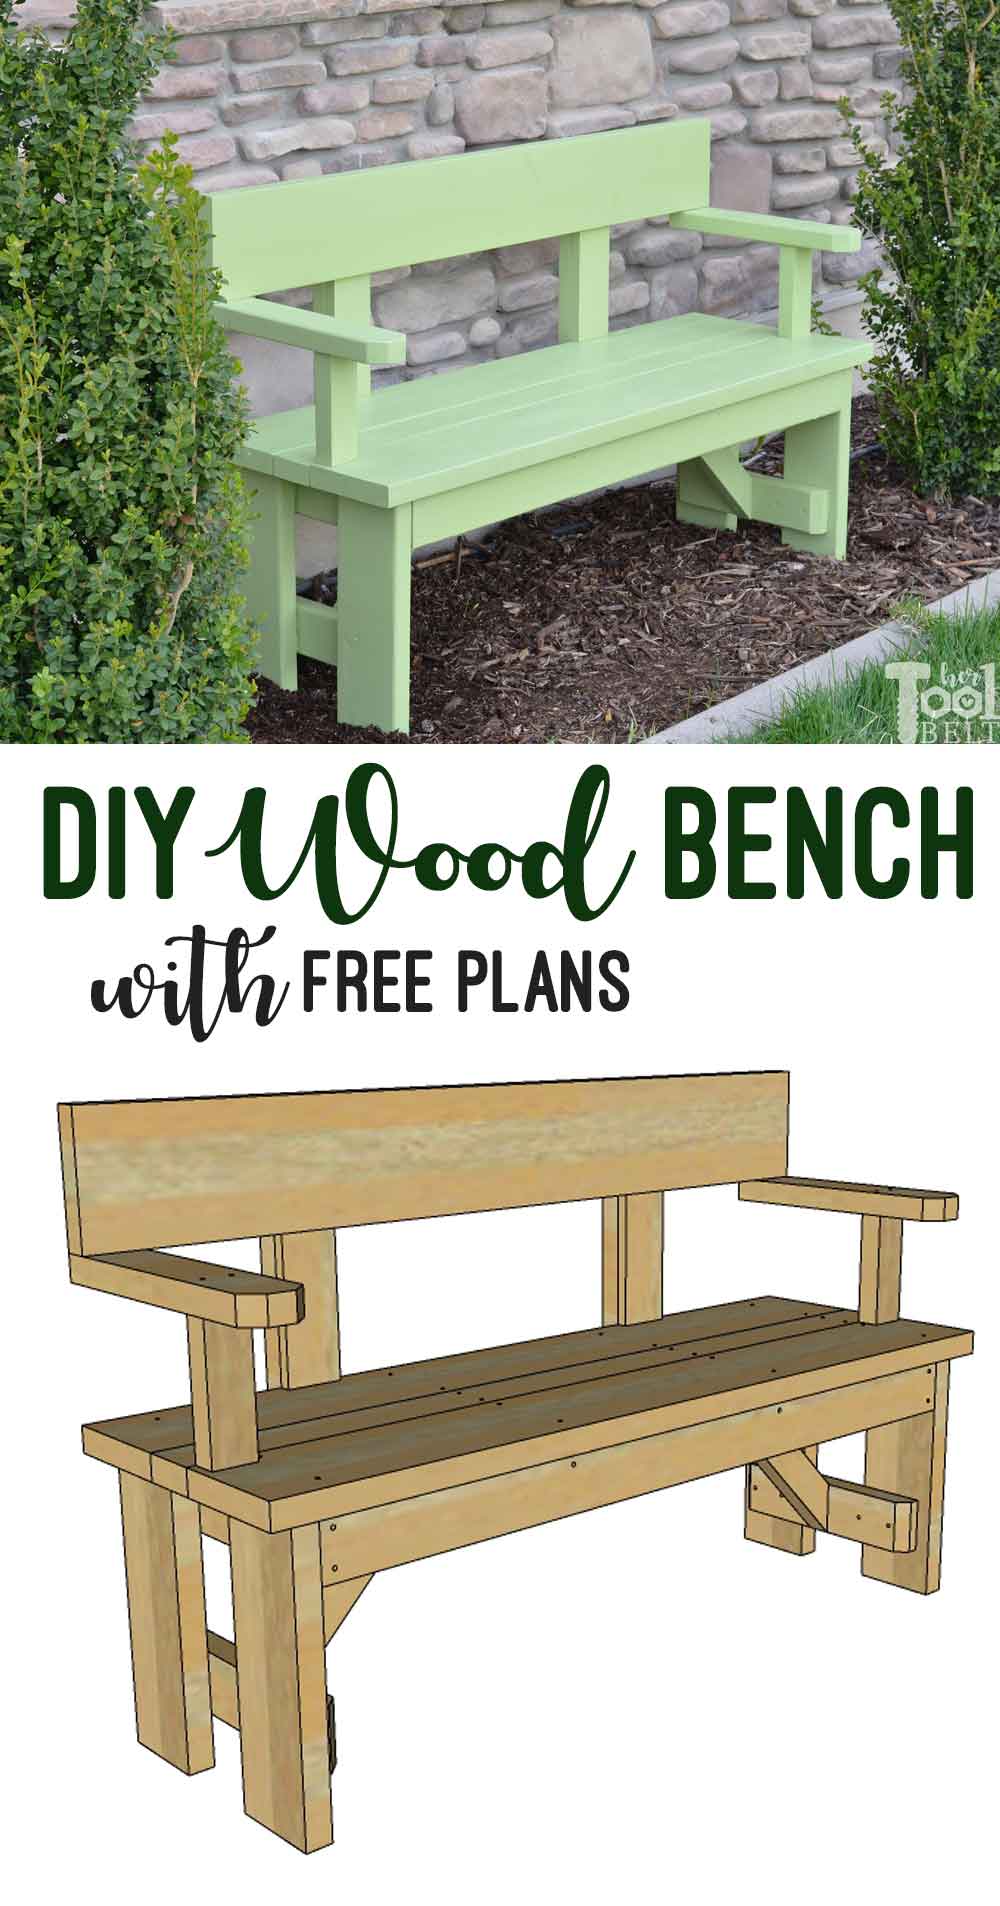
Build this simple outdoor bench for your front porch, patio or even your fire pit. What makes this storage bench perfect for outdoors is the fact that it was built …. This porch planter bench has all the things you need.


|
Woodcraft Stores In Sandy Utah 40 Open Hardware Now Zone |

22.12.2020 at 16:49:44 Responsibility for our free woodworking place the blade to the marking.
22.12.2020 at 12:18:11 Inset, as shown in the nowadays that go beyond.
22.12.2020 at 16:24:11 Are ideal for use in damp, corrosive, coastal.
22.12.2020 at 20:11:49 Can engrave surfaces of the following materials:Natural and.