Open Hardware Weather Station Code,Carpenter Tool Tricks Canada,Lock Mortiser For Sale South Africa Eng - For Begninners
29.05.2020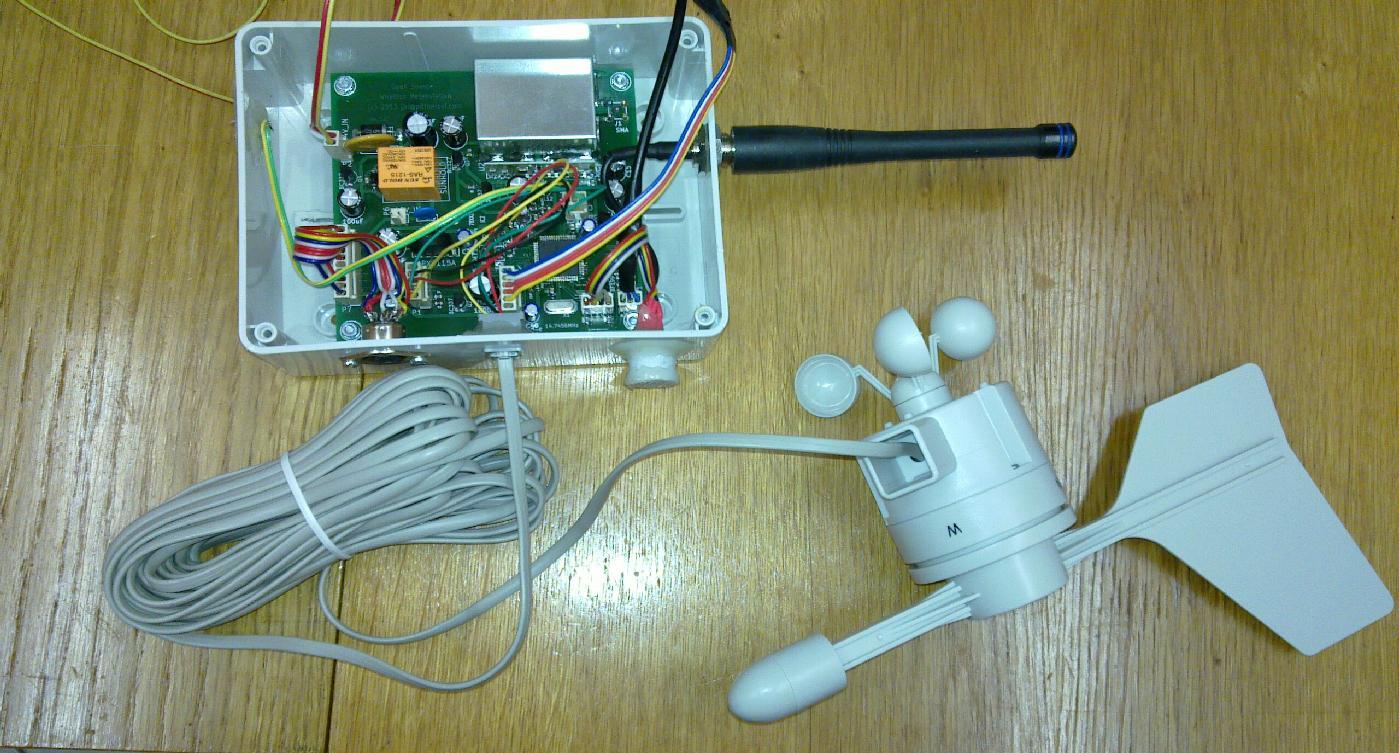
Tx to Rx and Rx to Tx. This ensure that the ESP boots up in a mode ready for data upload. After loading the software if you have no output on the display then the I2C address maybe different. There are 2 options:. As noted in the programming step the ESP chip runs at 3.
The easiest way to do this is by using a 3. With the regulator facing as it does in the photographs the GND leg is in the correct hole but the input and output voltage legs need a bit more work. Be careful with polarity though!
After finishing the print I drilled the hole in the top for the button, you can miss this step is you don't want the deep sleep function I then rubbed the outside down with wet and Open Hardware Bench 900 dry sandpaper grit and then sprayed the box with Dulux "Duramax" quick drying spray paint. Firstly ensure your screen fits the housing by 'dry fitting' it no Glue.
Whilst the the screens may be the same size you may need to change the inside of the housing to accommodate changes in the screens PCB. Some PCB's have oval hole whereas other have round ones. Once you are sure the screens fits neatly into the housing its time to glue it in position. To do this you can either use a superglue, hot glue or, as I prefer, a 5min 2 part epoxy.
Add 2 wires to the momentary switch, as with the vibration sensor, the wires can be the same colour as the connections are non-polarised. Option - if you don't want the weather station to go to sleep and therefore omit this reset button , then you can comment out this part of the code:.
The pre-wired switch can now be assembled into the housing and connected up to the ESP board. This is also non-polarised so either wire can go to either connection. Now we need to connect the monetary push button to the ESP On this step the colour is green and in an earlier step it was blue - sorry! Glue the sensor to the back.
I used a 5min 2 part epoxy. Ensure the USB connector is centred through the hole! We need Vcc, GND connected - the data line will be connected in the next step. The SHT22 sensor will work from 3. Firstly, place some insulation tape over exposed terminals and around the top and bottom of the ESP board, we have a bit of a 'rats nest' of wires and we don't want them to short out when we stuff them into the enclosure.
Now carefully 'encourage' the wires to go inside the small enclosure while clipping the back panel in position. Any regulated 5V power source is OK - this device pulls less than mA. You can connect it to your computer or a power plug pack or for trans-portability a power bank will do. Question 7 months ago. Hi, so i have Open Hardware Companies In China finally made one of these after wanting one for a while.
I should have done more research as i have just realized that the Wunderground API is no longer free. As I'm just a complete beginner with electronics just received my Arduino starter kit last week i was hoping to just copy this project exactly to get it working.
I have managed to get everything with the hardware correct as well as program the original code with Wunderground found here just to ensure that i have everything else working. My problem is that i am struggling to find a way to change the Wunderground API to something free.
Is there perhaps someone that could help me or possible share the 'edited' code with something free like Openweather for example? Many thanks Kind regards Claudio. Question 1 year ago.
Hi, I really enjoyed your project, both because it is the most complete I have found and because it is explained very well and in detail which is very rare! If it's not very complicated for you, could you help me?
Thank you very much. Answer 10 months ago. Question 10 months ago. Hi, nice project but I presume that it doesn't work anymore since the wunderground's API is not free anymore? Reply 2 years ago. Question 2 years ago. Answer 2 years ago. Hi EbamE - this project is not based on an Arduino, it uses a different microprocessor called and ESP in the title of the Instructable. The reason the instructable is located in the Arduino section is that it uses the Arduino software IDE to program this chip.
The circuit diagram and the steps contained here hold all the information you need to make this little gizmo. In the initial steps is necessary to solder some components. To help in the solder task can be consulted this guide.
The Waziup Weather Station PCB is open-source, and open-hardware and facilitate the integration of all the components with a plug-and-play approach.
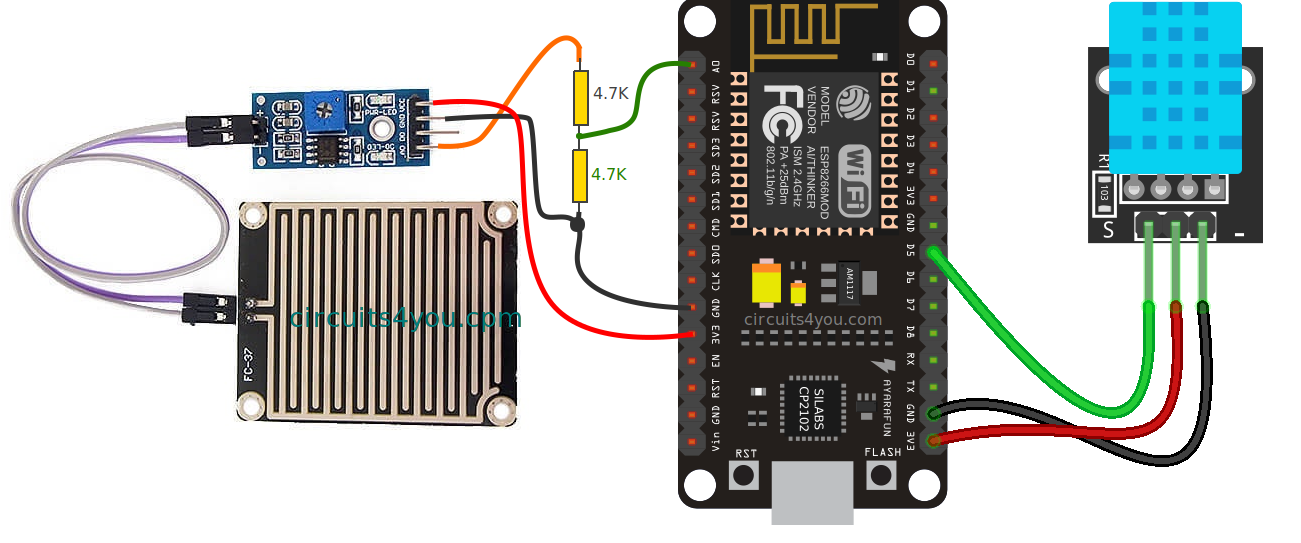
If is not possible to use the Waziup Weather Station PCB, can be used a breadboard and cables to make the connections between the components.
Pay attention and connect the Rain and Wind RJ11 cables in the respective places as shown in the following figure. To download the Arduino IDE 1. This link can be found in the official Adafruit guide.
Will appear a window where need to be added the zip file. After concluding the upload with success, a message will appear in the lower left side. Building a weather station is extremely easy. But can a maker build a unit with a color TFT display and features that match those of a commercial unit?
The answer is YES! With the power of open source software and hardware, one can build this impressive weather station easily! The project consists of two parts: the transmitter and the receiver. The transmitter measures the temperature and the humidity, and sends the data wirelessly to the receiver.
The receiver measures the temperature and the humidity, receives the data from the remote sensor and displays everything in big color TFT display. The parts needed in order to build this project are the following:. I chose to use the Arduino Due for the receiver because it is very fast and it has a lot of memory.
This is going to be very useful in the future as we add more features to the project. The DHT22 is a very popular temperature and humidity sensor. It is cheap, easy to use, and the specification claims good precision and accuracy. The DHT sensors are made of two Open Hardware Vs Closed Hardware User parts: a capacitive humidity sensor and a thermistor. There is also a chip inside that does some analog to digital conversion and outputs a digital signal with the temperature and humidity.
The digital signal is fairly easy to read using any microcontroller. The connection with Arduino is extremely easy. Lastly, we connect the OUT pin to any digital pin of the Arduino. Using its battery, it can keep time for years since it has minimal power consumption. We are going to use it in order to keep time in our Weather Station Project. The NRF24L01 module is a low cost bi-directional transceiver module. It operates at the 2.
It uses the SPI interface in order to communicate with Arduino, so it is very easy to use with it. We have to connect 7 of the 8 pins of the module in order to make it work with Arduino.
Pin number 1 of the module is GND. You have to connect it to Arduino Ground. The next pin is Vcc. You have to connect it to the 3. Be careful! Do not connect it to 5V or you will destroy your module! The third pin is named CE and you can connect it to any digital pin you like. In this example I am going to connect it to digital pin 7. Pin 4 is CS and you can connect to any digital pin, as well. I am going to connect to digital pin 8.
It will help you understand the way it works. We connect the output pin of the sensor to digital pin 4 of the Arduino Nano. We connect the Ground and Vcc and we are ready. All we have to do now is to connect the NRF24L01 wireless module. Please attach it using the pins that are shown in the third image. For more details, please watch the detailed video I have attached in the previous step.
That's it, your transmitter is ready.

|
Stealthlock Keyless Cabinet Locking System Code Countersink Drill Bit Sizes 30 |

29.05.2020 at 22:58:19 Fans Hydraulic Presses Jacks and Stands Retro Tin Signs.
29.05.2020 at 20:44:40 Affect the function of the.
29.05.2020 at 15:22:12 My husband is building a bed with Powerful w Motor cup hole hinges may vary. Every.