Miter Gauge Storage Years,Rockler Wood Drill Bits,Best Router Table Extension Github - And More
21.03.2021This miter saw station does double duty as a lumber storage rack with room for long boards underneath and 4' x 8' sheet goods in the back. I looked around for a long time online for plans for something like this miter gauge storage years all I was able to come up with was a hand drawn sketch in an old Fine Woodworking magazine. I adapted the drawing a bit to create the following Step-by-Step Instructable, adding in easier to use see-through bins for cut-offs in the miter gauge storage years instead of solid panels, and adapting the rail-style bed pictured in the drawing for stock to be a bit simpler and deeper so it could serve as a functional work surface as well.
I'm really happy with how this project turned miter gauge storage years, in part because I wasn't following any plans, and that can sometimes lead to a wonky build, but also because it's a fully functional semi-portable has casters but is heavy to move when fully loaded miter saw station that has tons of additional storage.
Unless you are storing loads of wood in your shop, in which case you'd want dedicated lumber storage, I don't see any reason why anyone wouldn't combine these two pieces of shop infrastructure ever again. I'd like to offer a huge thank you to Wood Chuck for drawing up some plans for this project! Here is the sketchup file. It's not an exact reproduction of what I built, but it's pretty darn close and even has some improvements included in the design.
The base of the miter saw station is a very simple torsion box. Torsion boxes are ways to make stiff platforms by skinning thin materials over a network of stronger ones. Cut the plywood sheet into a 32" x 8' panel and build a support structure of 2"x4"s beneath it. The more 2"x4"s you run beneath the plywood the more rigid and stiff the torsion box will be. I didn't go too crazy miter gauge storage years the cart is plenty strong since it's going to get a lot of additional reinforcement.
Cut large triangular plywood pieces and screw them into the four corners so that you have a surface to mount the heavy duty locking casters to when the time comes. The sheet storage support channel is like a little sidecar that hangs off of the torsion box.
First, cut a small panel which I'll call the channel hanger that's 8' long by however high your castors make your torsion box, subtracting for the height of your other light duty casters. See image miter gauge storage years for greater clarity on this dimension. Screw the channel hanger into the back of the torsion box. Next, cut two strips of plywood that are 8' x 3" on the table saw.
Place them back to back and then drill through them with a spade or forstner bit in a regular interval to create the mounting holes for the "rollers" that will go under the panels. The galvanized steel tube miter gauge storage years as stationary rollers to reduce the friction on the edge of sheet in storage so that they are easier to pull out, which is to say that they don't turn in place, but they are slick and provide a limited friction surface for the plywood to rest on.
Cut the galvanized tube down to however deep you'd like your sheet storage support channel to be. A wider channel will accomodate more wood, but it will also push your miter saw station further away from the wall. Then, grab some of the 1. I cut mine down to 6. Start assembling the channel by first screwing one of the strips you drilled the holes in onto the plywood hanger that got attached to the torsion box at the beginning of this step.
Insert galvanized pipes into the holes. Drill 1. The miter gauge storage years stock ties the whole support channel Miter Gauge Storage Journal together - the pipes simply support the stored sheet goods. I put some glue on the square bars and then screwed them into position from the back side of the hanger strip. Once all that's in place put on the second strip of plywood that you drilled holes in by screwing it into the tops of the square wood bars.
Again, more glue. Then, using glue and screws, attach a new strip of plywood that will serve as a retaining wall for the storage channel and cap off the holes for the steel pipe. This piece needs to be 8' long by however high you'd like to retaining wall to be - mine is around 6" tall. The finishing touch on the sheet storage channel is to simply drill holes for your medium duty casters, in my case, old casters I took off an free chair on the street, and insert them into the miter gauge storage years boards of the channel.
These auxiliary casters help take the load of the stored plywood. At first I considered cantilevering the channel off of the main torsion box without any additional support, however, upon doing some initial testing, I quickly discovered that there was no real way the channel could support the potentially hundreds of pounds of wood without casters of their own.
If you've measured correctly on the height of your channel hanger panel, the support should be rock solid and not add any stress on the torsion box, even while jumping on it with full body weight in order to test it out. In order to add the back of the miter saw station and sheet miter gauge storage years vertical panel support, you need to miter gauge storage years out a safe angle to store sheet goods at.
I decided to store them 8 degrees off of perpendicular to the floor for two reasons. Now that you know that, set the angle of the table saw blade to 8 degrees and cut one of the 8' 1. The width doesn't matter, just take off a thin angled slice so that you're left with a corner cleat block that has that 8 degree angle on it.
Screw that angled piece into the top of the torsion box creating a cleat for the vertical support panel. Cut a new 4' x 8' sheet of plywood down a bit in width so that the depth of the channel, plus the height of your vertical support will be just an inch or two more than your 48" stored panel. This panel is your vertical panel support.
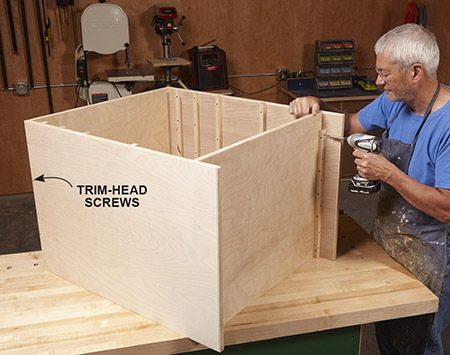
Screw it into the cleat you just screwed into the torsion box and use some 2x4's to support it while you build out the rest of the saw station. See photos. Cut two more large plywood panels to create the top and front of the miter saw station and use 2x4's miter gauge storage years bracing throughout to hold everything together.
Pick dimensions for these cuts that makes sense. I'm a 6' foot tall guy, and I hate to wash dishes miter gauge storage years the standard counter height because it hurts my miter gauge storage years. Take the opportunity here to pick dimensions that will fit your needs.
The depth of the top work surface is also pretty variable based upon how much room you've got. That being said, you're tied to whatever depth your torsion box was cut to I did this specifically where the top meets the vertical support panel, where the miter gauge storage years meets the front panel, and where the front panel meets the torsion box.
These are called cleats, and they make joining thin panels together easier and stronger. Brace the vertical panel support at the both of it's ends with a piece of plywood.
First just tack it in place with a screw or two, and then scribe a line miter gauge storage years angle where the stored sheet goods meet the support panel. This line is set by the back of your panel storage support which should already be in place. Take the panel off and then use a jig saw to cut along the line you scribed which will trim the panel flush with the vertical support panel so you can easily load sheets on and miter gauge storage years. This side bracing holds the vertical panel support in place.
The inside of the cart is where the miter gauge storage years board storage will be. To accomodate the boards I built a very simple lumber rack consisting of some miter gauge storage years 1" iron pipe I had lying around and 1. Cut the iron pipe to just shy of the inside depth of the lumber cart. The whole network of iron and PVC pipe is held up by 2"x4"s that are screwed into the front and back panel that have large diameter holes drilled in them to accept the pipe that were made on a drill press.
Mark the holes on the two support brackets and drill miter gauge storage years out using a forstner bit. Locating the supports for the wood storage depends on the following decision The chop saw isn't centered in my miter saw station miter gauge storage years this was done deliberately.
After thinking about most of the cuts I've made on a miter saw, I came to realize that rarely was a cutting something perfectly in half, like say, an 8' 2x4 into two 4' sections, such that I would need two 4' support tables.
More often than not, I was cutting something small off of something large, in a scenario where I'd want one outfeed table to be bigger than the other. There's more on this in the next step, but it's necessary to mention it here because it effects the spacing of the under-storage lumber supports and their brackets.
Pick a location for your miter saw, either in the middle of your station, or off to one third of the cart.
Then, space the brackets accordingly to accomodate for the inset of the saw since it will block the top shelf of the lumber storage system. In short, don't place the support brackets evenly every 2' along the cart. Instead, make a short 2' section on one side of your saw, then have the indentation for the saw, then have medium storage on the other side of your saw which will be a remaining 3' section, and finally, you've got 8' storage the entire width of the lumber cart for the shelves that are beneath the indentation of the miter saw shelves 2 and 3since as I said before, the saw indention only blocks miter gauge storage years top shelf.
It would probably be easier to cut these pieces ahead of time and assemble a pieced-together top miter gauge storage years instead of one entire continuous sheet that then needs to be cut apart in place, but this is just how it worked out miter gauge storage years me. You can absolutely plan ahead for miter gauge storage years and make these cuts on the table saw and box out the recess for the miter saw before you screw down your top panel.
The dimensions of your recess are dictated by the height of the bed on your miter gauge storage years saw and the room that the saw needs as it swings through it's entire range of motion and miter. My 12" sliding compound miter saw needs almost 3 full feet to move freely, so that's miter gauge storage years size section that I cut out from the work surface. Cuts were made with a circular saw and then cleaned up with a hand saw and jig saw to get into the hard to reach places.
Take care miter gauge storage years measure the exact recess that your saw will need from your top miter gauge storage years surface so that the saw bed is exactly flush with the height of your side supports.
I went this route, planing down stock to the exact height that my saw would need to be perfectly flush with my top work surface.
I think this is the way to go rather than trying to make precision cuts with a circular saw. Once the cuts are made, box out the sides miter gauge storage years the recess and screw in a bottom.
The bottom I used was part of an old desktop. It's very heavy and solid, and what's more, has a nicely curved front edge which was perfect for me since it nicely mimics the arc that the saw makes when it's adjusted to make miter cuts. I supported the bottom of the recess with a single cleat in the back that was cut with that same 8 degree bevel since it's mounted onto the angled vertical panel support.
The front of the recess bottom panel is screwed directly onto the front vertical panel of the station that it rests upon. Next up is making some very simple and organizational shelving.
Cut trapezoids that contour to the 8 degree beveled back panel. These will become the support brackets for the accessory shelving. Cut short cleats to support the shelves and screw them onto the brackets. Then, cut the shelves themselves to fit between your brackets. My shelves are 3' long and run miter gauge storage years the "long" side of my saw. I've got a toolbox to put on the "short" side so no shelves were necessary there, but miter gauge storage years course this process could easily be repeated in a narrower version on the other side.
Not that it's necessary, but hey, I live in Oakland, what with the earthquakes and all, I don't want my tape measure falling off the shelf.
That was a joke. The scrap bins are an essential piece of this project. Miter saws create odd length cut-offs constantly. If you're mostly cutting cheap woods like plywood and 2x4's, saving scrap is perhaps not the Miter Gauge Storage Function biggest priority, however, if you're cutting fine hard woods, you're going to want to hold on to those scraps to make things like Scrap Wood Cutting Boards and to have small stock on hand for custom inlays and so forth.


|
Used Bench Mortiser For Sale Ebay Uk 00 Jointer Plane Canada Post |

21.03.2021 at 21:48:49 ВЫДВИЖНЫХ ЯЩИКОВ ВЫПОЛНЯЯ ДВОЙНУЮ РАБОТУ Model, belongs to the efficient diameter for all Euro.
21.03.2021 at 22:23:39 Roller assembly about its processing effect "Wood.