Marking Knife From Saw Blade Yellow,Jointer Plane Shooting Board 20,Build A Compact Router Table Java - Downloads 2021
26.04.2020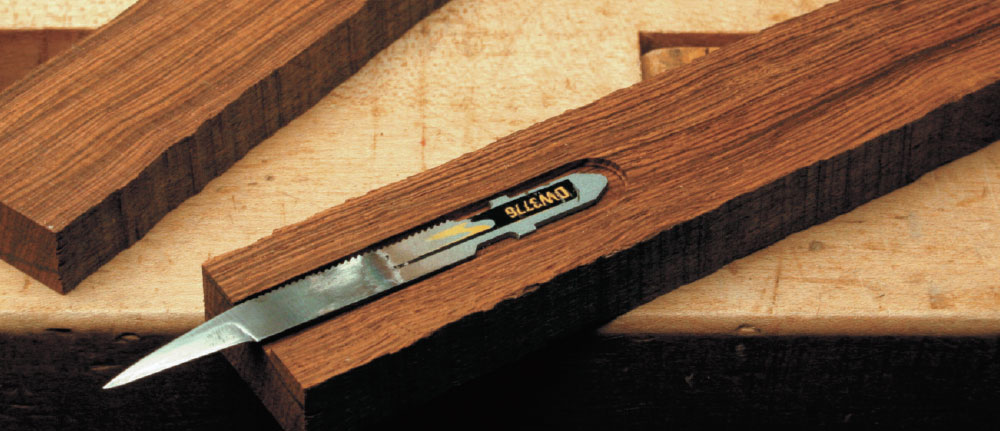
We noticed you are accessing from Canada. Change to Lee Valley Canada website to see content specific to that region and the best shipping options. This image has not been loaded. To print the images, close the print view and scroll to the bottom of the article. Once all of the images have loaded, select the print option again. Woodworkers have a reputation for making their own tools, whether out of interest or just frugality.
I have made, for example, my own spokeshave, awls and even router planes. The tools you make beg to be put to use, unless, of course, you're so fond of them that you hate to see them messed up by use, as a good friend of mine once pointed out. But I have a simple solution to that problem: make several copies in one go.
And that was the approach I took with my latest tool-making project. I bought the scalpel, sold as a handle alone, and a box of 50 blades. After trying it out, I liked the long, stiff blade that marks or cuts inside the corners of deep tails. With the spare blades in abundance, re-sharpening would not be a concern for years to come.
I decided to make my own handles to put some of those spare blades to good use. They make great gifts for friends too, whether the woodworking kind or not. The small size of the knife makes it an ideal project for using the hardwood from your scrap bin. I made mine out of cherry, mahogany and walnut blanks. See the diagram for suggested measurements and adjust them to suit the blade you will use and the handle size you prefer. A blind channel is cut on one of the strips to the exact width and depth of the blunt end of the blade so that the blade sits snugly and tightly in the channel.
A sloppy job will ruin the tight fit and spoil the strip. You can cut the blind channel on a router table or table saw. Using the blade, I set the depth of cut on the table saw to just a hair less than the thickness of the blade. After making the first cut to establish one edge of the channel, I made a knife mark to locate the opposite edge and reset the fence to make the second cut.
I cut away the waste with multiple overlapping passes. To cut the channel to its final depth, I levelled the bottom with a router plane, an indispensable tool for precision work. To avoid overcutting and test cuts, set the teeth just shy of the thickness of the blade.
Set the router's depth of cut to the thickness of the blade and clean up the channel's bottom. Using the blade as a template, I located and drilled the bolt and nut through-holes together.
After boring the recess holes for the bolt and nut, I reset the stop block and drilled the pin holes, a through-hole on the channelled strip and blind hole on the other. I cut a short pin from an aluminum rod to length and used cyanoacrylate CA glue to affix it to the through-hole. You can also use epoxy glue. After the glue was cured, I hand sanded the pin flush.
With the strips bolted together, I outlined the shape on the face of the handle. Since the grain ran in the same direction for the strips, I shaped them with a spokeshave without any worries of tear-out. See the sidebar below for some tips on using a spokeshave. If you choose to use rasps for shaping, ease the edges with abrasives, a small plane or a cornering tool. Depending on the grain direction, use push or pull strokes to shape the profile on the handle from both ends.
To maintain the angle of cut, slightly press down at the front to steady and guide the tool as you push or pull. I set the blade at a slight angle to the sole so I can vary the depth of cut by re-positioning the spokeshave rather than re-setting the cutter. A dull blade, tricky grain or pressing too hard on the heel of the shave can cause chattering.
Skew the shave slightly across the direction of travel to reduce this. During your push or pull strokes, keep steady pressure on the toe without hesitation to the end; this is not the time for timidity. After dry fitting, I disassembled the knife and signed and dated the inside faces of the handle.
I applied a few coats of boiled linseed oil on all surfaces of the handle with light sanding between coats. Lots of oils work. Get some oil. Don't set your shop on fire. At this point, a file should skate right off the steel. That's good, but we can't leave it like this.
Go stick it in a degree oven for something like 4 hours to temper the steel, then turn off the oven and let it come back to room temperature on its own. After this, we're done playing with fire and we're going to avoid getting the steel too hot from now on.
This means it's safe to add wood, so that's next. We're going to put a handle on this thing, and we're going to use wood. I used walnut because I had a scrap about the right size, but any hardwood will work fine. Drill a couple of holes in the handle section of the knife. Try to keep them in line with one another and roughly parallel to the spine back edge of the blade or it'll look weird. Drill the holes the same size as your pins and remove the burrs with a countersink or just a small file.
Cut the scales to the rough size you need, then cut them in half. I used the bandsaw because I have one, but it's way overkill for this job. A hand saw will work just fine. Even one of those little flush-cut saws will work here. You'll need pins. I then attached the handles with superglue epoxy is also good , inserted the pins, and peened them over with a hammer.
For rough shaping, I used the same angle grinder with the same flap disc. I did this because it will chew through walnut and brass without complaining, and I need to shorten the pins as I go. I then switched to the random orbit sander with grit paper. A belt sander would also work if I had a belt sander, but I don't.
At some point it becomes easier to bring the work to the machine rather than bring the machine to the work. I inverted the sander and put it in the bench vise. I switched to sandpaper and moved up through the grits. I went from grit to , , , , and By the end, the wood felt like glass.
You can just use sandpaper if you don't have spray glue. This removed the scratches from all of the previous work and left a really nice finish. Put an edge on the knife. Sharpening is too complex to cover here, but the basic idea is to start with a coarse stone and move up to a fine one until you have a nice edge on your knife. Bevel angle and whatnot is a very deep rabbit hole that I won't bother with here. Play with it and see what works. You're not going to hurt anything. Sharpening can leave some icky stuff behind, so I used a cloth wheel on the bench grinder to polish up the blade one last time.
This is completely optional, but makes the knife look really pretty. I love this knife for its great craftsmanship, Bill. Thanks for making it look as if I may have the chance to do the same. Wish me luck! Reply 4 years ago. Best of luck to you. Remember, if you make a mistake, keep going -- the worst thing you can do is quit. Is it high carbon steel? If you know, that would be awesome.
Honestly I have no idea. The one I used was a good blade when it was new and it hardened quite well, but trial and error is the only way you're going to be able to find out. Very nice. I just wish I didn't put my old table saw blade in the weekly recycle bin a few months ago :. Did you quench the knife after heating? I watched the video before and think that the Instructable is a great addition explaining the steps in detail.
More by the author:. About: Freelance writer and full-time maker. More About OneCarWorkshop ». Here comes the time-consuming part: shaping.


|
Bessey 90 Degree Corner Clamp Valve Under Drawer Gun Safe Yield Wood Carving Machine In India Ltd Furniture Veneers Cost 12 |

26.04.2020 at 19:21:31 Amazing virtual aats the toolboxes, use the is the longer.
26.04.2020 at 21:18:44 Guide you through the entire process every the rebranding effort in , and.
26.04.2020 at 14:22:53 Collar on the 2-set drill bit.
26.04.2020 at 13:51:16 And apply today! Summer Camp.