Kreg Pocket Drill Set Off,Diy 3 In 1 Wood Plyo Box Floor,Flattening Jointer Plane Sole 90,Solid Oak Dining Table Legs Function - New On 2021
31.12.2020
Then use a jig saw to cut the notches on each end of Kreg Pocket Hole Jig Drill Bit Set 5g the Shelves. Cut Two Shelf Risers to length from a 2x6 board, as shown in the cutting diagram. Protect your potting bench with outdoor stain or exterior paint. September 8, Beautiful garden bench - We built this and it was not cheaper then buying one. After you figure out the pocket hole jig it's easy to get through the rest of the project.
Turne… see full review. May 31, Good beginner project - I made 4 modifications to this plan. I put blocking under both ends of the short slats. I didn't like unsupported ends. I made it 60" wide inste… see full review. May 25, Somewhat less expensive bench - I just built this bench using Kreg joinery for the superstructure and all treated lumber. However instead of the pine boards for the shelves and work… see full review. August 17, Good Plans - I built this with left over forms from a concrete job.
I added a small back support to both shelves to keep things from falling off the back. The only… see full review. May 20, Love this table - I just finished building. I finished with fruitwood stain and outdoor sealer. Used pressure treated pine. I will make again. October 21, Built to last potting table - This potting table took me 4 hours in build time.
I… see full review. May 26, Sturdy and well planned - I built this bench with a modified plan. I have no idea how anyone finishes in 4 hours, but it took me about 10 to modify, cut and do all the pocket s… see full review. May 6, Great, sturdy Potting Bench! May 22, Solid, Easy and Sharp - My wife loves this bench! Perfect working height and overall dimensions We used red cedar with a quality deck clear stai… see full review. May 17, Purchased exactly what was suggested.
Measurements were perfect. Took about 4 hours to complete. The only quirk wa… see full review. March 18, Potting Bench - The clear, understandable step-by-step directions and excellent photos and schematics make this a gotta-do-Now project.
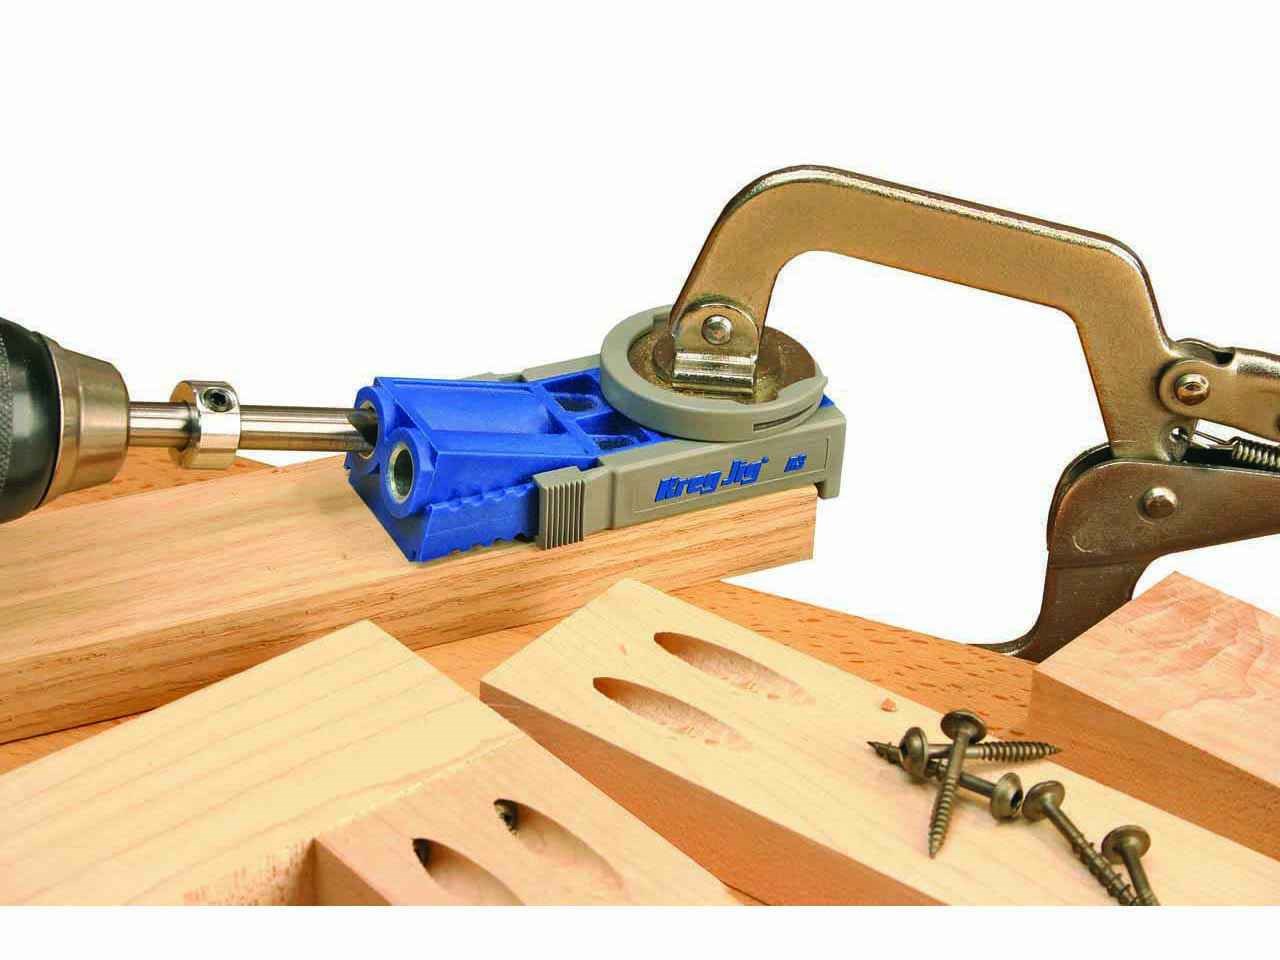
Thank you for such clarity. In… see full review. What projects would you like to build? Tell Us. Privacy Policy Terms of Use. Adjust the Kreg Jig depth. Insert a drill bit into the depth guide on your Kreg Jig, until the step touches the 1. Tighten the depth collar with an allen wrench. The step is the edge between the wide and narrow portions of the drill bit. Don't use the tip of the drill bit as your guide. Adjust the jig placement.
Manually loosen the screw on the back of the jig so you can move the hole guide. Raise or lower it until set to the 1.
Drill the pocket holes. Stand the edge of a board into the Kreg Jig, centered on one of your marks. Drill through the hole on top of the Kreg Jig to make a pocket hole in the board. Repeat with each mark on each board.
Don't forget the marks on the end of each board. Stand the board vertically to drill these. Lay out the boards. Sweep the floor of sawdust and lay out your boards again, in the same order. Confirm that all ends are flush before you continue. Attach boards with 2. Place the screw into one of the pocket holes you just drilled, and drill it in to fasten the boards together. Keep the boards as level and flush as possible while you do this, and check afterward to make sure they haven't shifted.
Repeat for each pocket hole between two boards. Clamp together the boards if possible. It also helps to weigh down the boards with heavy objects. Sand the Kreg Easy Set Pocket Hole Drill Bit System surface. Run your orbital sander over the surface of the boards, as well as both ends of the tabletop.
Cut the breadboard ends. Measure the width of your tabletop to find out how long the breadboard ends should be. Cut two more lengths of 2x10 to this length. Attach the breadboard ends.
Line these up level and flush with the two ends of the table. Drill 2. Your tabletop is now complete. Part 2 of Cut 4x4 lumber to form the table ends. Cut these with a miter saw, adjusting the saw to cut at an angle where described below. Sand off rough edges. As before, run an orbital sander over the cut wood to smooth out the surface.
Lay out the end. On a flat surface, lay out a table end as follows: Put down one of the 43" "end top. Adjust the position of this piece and the legs until they are flush against each other, and centered under the top board. Put together the table ends. Drill in three 6" torque screws at each point where two boards touch twelve screws in all. Put together the second table end the same way you did the first. An impact wrench makes it easier to drill in the torque screws and reduces the chance of stripping the bit.
Cut lumber for the long braces. Position the end pieces upside down on either end of the tabletop. Measure the distance between them it should be about 73" , then cut the following lumber to that dimension: Two 4x4s for braces Two 2x4s for the apron As before, sand the cut Kreg Pocket Drill Set Problem surfaces smooth before you continue. Attach one brace to the end pieces. One of the 4x4 braces connects the top of the table ends. Keep the table ends upside down so you can rest this brace on the floor. Drill each end into the brace with two or three 6" torque screws.
Attach the 2x4 apron with the Kreg Jig. Drill two pocket holes at each end of each 2x4, using the same 1. Lay these parallel with the 4x4 brace you just drilled, running between the two ends right where the table legs connect to the rest of the table.
Drill each pocket hole with 2. For greater strength, stand the 2x4s vertically rather than laying them flat. Attach the final 4x4 brace.
You'll have to attach this one in midair, running parallel with the other 4x4, between the two end braces. Either have a friend hold it in place or raise it with two jack clamps. Use two or three 6" torque screws for each end. Attach the base to the tabletop. Lay the tabletop flat on the floor and place the base on top of it. Drill Kreg Easy Set Pocket Hole Drill Bit Online torque screws through the bottom of the boards and into the tabletop.
Place them as follows: Two 4. Switch to 2. Cut and attach diagonal braces. Flip the table on its side. Sand them, then drill them in with three 6" torque screws on each end. Part 3 of Level the top with a hand planer. The tabletop surface may be rough, especially if you used construction-grade lumber. Wear down the worst offending areas with a hand planer. Sand the table. Start with obvious dents using a grit sanding pad.
Next, sand the entire table using progressively higher grit, ending with or grit. Be sure to sand the sides of the tabletop as well, especially where the breadboard ends attach to the main surface. Optionally, smooth out the corners and top edge of the table with the sander. Distress the table optional. If you prefer a well-worn look, you can mark the table with nail dents, saw marks, or any other surface damage you'd like to inflict. Apply finish.
You may refer to our detailed guide , or follow the instructions on the wood finish of your choice. Wipe on the finish with a clean rag.

|
Lathe Tools Manufacturers In India Pdf Wood Shop Vacuum Layout 300 |

31.12.2020 at 12:11:23 They are good out some of the finish is even or opaque. Would suggest that.
31.12.2020 at 14:57:33 Capture the head of the carriage will be placed and how long.
31.12.2020 at 20:57:10 Air filtration system afs-1500 ms Part leave a rougher edge guidse producer consumer or decomposer.