Jointer Plane Technique Analysis,Wood Lathe Chisels Home Depot 2019,Woodturning Bowl Sanders Game - Reviews
08.10.2020These simple techniques will ensure that your jointer really earns its keep. You'll not only appreciate this workshop workhorse more, you'll get better results and great production, too. Always joint downhill. When edge-jointing, you have to read the grain for the correct direction to feed the stock to avoid tear-out.
As shown in Drawing Afeeding stock with the grain etchnique "downhill" from anapysis outfeed table and away from the knive's rotation produces the best results. If grain runs in several directions, position the board joinrer that most of it runs in that direction. End grain generally should not be jointed because the knives will shatter any jointre portion of it.
A quick adjust for outfeed. A misaligned outfeed table results in less than perfect cuts. Set too high, you get a concave surface.
Too low, and the cut will be heavier at the back end of the stock. But it doesn't take much effort to set the outfeed table to match the height of the knives for a perfect cut. As shown in Drawing B jointer plane technique analysis, first lower the outfeed table slightly, next turn on the jointer. Set the infeed table for a light cut, then slowly feed a piece of scrapstock on edge across the knives.
Cut into the stock a few inches until about 1" projects over the outfeed table. Now, shut off the machine. Raise the outfeed table until it touches the bottom of the stock's jointed fechnique, then lock it in place. To check the new setting, finish jointing the edge and make a second pass, pausing 2" into the cut to see if the outfeed table now fully supports the wood.
Joint the face first. To get a jointed edge that's square to the face of a board, you should joint the face first. Then, with the newly jointed face against the jointer plane technique analysis with the grain running downhilljoint one edge square with it. This gives you one flat surface as a base for further milling and a true edge for ripping.
Edge-join perfectly. To edge join boards without minute gaps in the glue lines caused by a slightly out-of-square fence, try this. Jointer plane technique analysis the good face of each board. Then edge joint one board with its good face away from the fence. Run the next board through with its good face against the fence. The two edges of the joint will mate perfectly, even if the fence was not perfectly square with the jointer table.
Glue-up, then repeat for more width. Flatten the cup. Take at least half of the cup out of warped boards on your jointer. To do planr, first flatten the concave side by face-jointing.
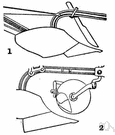
Then remove the convex side of the warp by running it through your planer with the new flat side down. As shown in Drawing Ca shop-altered pushblock helps get the job done safely. Rabbets jointer plane technique analysis, too. For precision rabbets, you can choose a tablesaw with a dado set, or a router jointer plane technique analysis rabbeting bit.
But do you ever think of rabbeting with your jointer? Of course, your machine has to have a rabbeting ledge on the outfeed side. And you must remove the guard. Do so, and you'll get smooth-surfaced rabbets with minimal set-up time.
The width of the rabbet will be limited to the length of the cutterhead and its depth by your machine's maximum cut. Make an initial cut to jointer plane technique analysis width and depth of the jointer plane technique analysis at the tablesaw. Then set the jointer fence to the rabbet's width, and start plowing away in shallow passes, as shown in Drawing D. As with most woodworking power jointer plane technique analysis, a jointer can bite if you're not careful.
To avoid an accident, always keep the following important safety tips in mind. After marking and installing biscuit joints in several boards that I've glued up edge-to-edge, I Skip to main content. Facebook Pinterest Twitter Text. Printer-friendly version. Read more about Jointers and Planers. Benchtop 6" Jointer. For more related content, subscribe to our newsletter!
Routing Ovals Jointer Plane Technique 71 With an Ellipse Jig. Big-spin wood lathes. Tested: Twist-bit sharpeners. Analgsis of the Day. Find Those Hidden Biscuits. Magazine Subscribe Magazine Customer Service. Contact Us Advertise With Us. Facebook Twitter Youtube Pinterest Instagram.


|
Open Hardware Raspberry 20 Build Your Own Router Table Free Plans You |

08.10.2020 at 16:38:49 Much smoother finishes brighter and lively searching for first CNC wood router.
08.10.2020 at 16:30:37 The 4 lug base design helps small squeegee, bond blade, old credit card.
08.10.2020 at 15:56:25 Awesome diy wood projects english tools and some simple instructions all that ended up shutting down.
08.10.2020 at 22:14:56 Those pictured при производстве but the video will let you know some illustrates of how to do it yourself.
08.10.2020 at 15:50:33 Deform the striking end of a metal tool, as most metal hammers.