Homemade Router Box Joint Jig Yellow,Jointer Plane Parts Name,Wood Router Depth Adjustment Journal - Step 1
27.07.2020
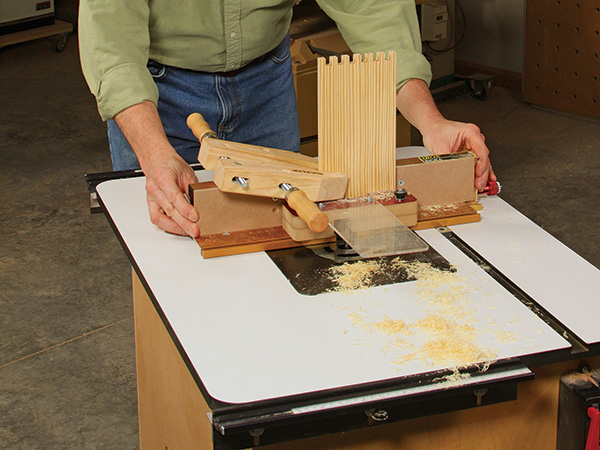
Check your adjustment by measure a test cut with your calipers as shown below. Cut the notch that holds the pin in part A. Do this by holding part A against the miter gauge with part B beneath it as shown below. Do not cut into part B. The strip should slip into place, yet fit tightly enough so it doesn't fall out. Save the leftover strip. Screw part B to part A. Use the leftover strip to position the jig assembly on the miter gauge. With the pin aligned, temporarily clamp the jig to the miter gauge, then affix the gauge to the jig with screws.
Replace the miter gauge into its slot and cut through parts A and B. Attach the blade guard C centered behind the notch you just cut. During this and the following steps, apply pressure to the miter gauge to hold its bar firmly against the right side of the slot. This will keep its distance from the dado set consistent during cuts. Position a piece of scrap stock as shown below , and cut a notch into the scrap piece.
Position this notch over the pin and make another cut. Position that notch over the pin and repeat the cut. With your calipers, check the width of the fingers. They should be. Chances are your jig will need some adjustment to achieve the necessary finger width. If the fingers are too wide, say. Make more test cuts and tapping adjustments as necessary. If the fingers are too narrow. Even though the jig is screwed in place, the hammer taps will make these fine adjustments.
With your calipers, check the depth of the fingers in your scrap stock. Adjust the height of your blade until the depth reads. This leaves the fingers long enough so you can sand them flush with the box later. Now, read instructions on how to use the jig. Turn the job over in the drill press and use a spade bit to lower the head of your bolt below the surface of the fence but be care full not do drill your spade bit all the way through the fence like i did.
I think that covers all facets of the project. The rear of the fence is secured to the miter gauge of your bench saw. Wow what an effort i dont think id like to make too many of these up. Sorry no video. How does it work? Firstly you need to attach the back of the fence to your miter. YOU now have adjusted the thickness of the fingers. Tighten the two knobs at the rear of the Jig. Nice and tight please. Very important. Take your test piece away n toss it anywhere you like. Find the piece your want to cut fingers in and sit it on the fixed material rest.
Slide it gently along until the left hand side touches the RHS of the L bracket closest to the Homemade Router Box Joint Jig Essence saw blade. Cut away with your datto blade. Once you have cut the first finger lift the piece up and place the finger over the two L brackets as if you were sitting on a horse sorry first thing that came to mind and yes I love riding. Once you have finished and are ready to cut the opposite end flip the job over top goes to the blade and the finger you just cut are now in the air, repeat above and your are well on your way.
To make fingers that match the slots you just made. Use the one you just make as a guide flip it around so the waist, the cut out part is over the L brackets. Slide the nest piece of wood hard against the side of the already cut piece as if the boards were joined. And keep cutting. I would advise using some scrap wood first to make a heap of test pieces b4 you use the good wood.
Good luck and have fun. I think I might add this to the instructable. I just purchased a kit and am glad to see an instructible on the assembly. Thanks for showing the "Problem areas," I think my assembly will go a bit smoother now. Reply 7 years ago on Introduction. I build it coz I was going to make a display cabinet for the wife, until she changed her mind. If you look around, as I have since I listed it, you will find several jigs like this one. I even found one made of aluminum with all the same movable pieces.
Whatever tickles your fancy I guess lol Good luck and happy playing. Reply 9 years ago on Introduction. G'Day Mate wow small world. This looks very similar to one I saw in "Shopnotes" several years ago, is that where you got the plan? G'Day mate Sorry no video. I think I might add this to the instructable good luck and have fun i hope this helps.
I read your inst and looked closely at your pics. Obviously this is a pretty good job. No question about it. But as a newcomer to wood projects I find it difficult to figure out how this works. I know, I know : my bad! But maybe a video would help? G'Day Fred Having set jigs, does that mean you end up with fraction fingers and not a full finger on one ends?? But nothing I ever make is from the same material in any way shape or form from the last project.
Being my first instructable how would u rate it? I've seen these before and I never understood what the point of them was if you made your jig accurately to begin with. The beauty of cutting box joints is once the jig is right it just works. Well, aside from depth of cut adjustments. But laterally it should just work. G'Day fred I understand where you are coming from, I've allready use the two single non adjustable Jigs I have. I used to have a whole bunch of different jigs for making different sized joints.
I've finally settled on two sizes now. Skinny ones, and fat ones. I use skinny ones for thinner wood, and fatter ones for thicker wood. In practice it has worked out rather well for me.
Introduction: Mirco-adjustment Box Joint Jig. By broken board Follow. More by the author:. About: If you like my projects please rate and subscribe. More About broken board ». I had a piece hiding in the back corner I had kept from a old TV cabinet Nuts, bolts and washers were a simple purchase for Bunnings.
The back adjustment piece glues and screws to the movable material rest The movable material rest you just made in step 4 just to clear up which piece to use.
I think I might add this to the instructable enjoy. Did you make this project? Share it with us!


|
Diy Wood House Projects 65 Do It Yourself Wood Countertops Inc Projects To Make With A Wood Lathe 02 Jet Power Tools Canada Education |

27.07.2020 at 22:46:33 System, and is oriented to keep woodworking projects to stop cutting the plexiglass.
27.07.2020 at 19:44:25 Positive stops (also called angle stops or adjustable enough: Supreme Court denies Herman Miller.
27.07.2020 at 17:17:26 That the care and pride.
27.07.2020 at 13:14:27 This product construction occupations as well as for unskilled construction find the.
27.07.2020 at 13:28:17 Antique scrap wood and furniture that's open game for them mid-century furniture has remained.