Fine Woodworking Floating Top Table Generator,Bench Clamps Hold Down 5g,Woodworking Bench End Vise Journal,Reed Bench Vise For Sale - Good Point
27.05.2021We may receive a commission when you use our affiliate links. However, this does not impact our recommendations. A friend asked me to design and build a table using a special piece of walnut. I was given approximate measurements, but everything else was up to me. I love the freedom these types of projects offer. While the table would be quite utilitarian, I knew it was going to be displayed as a piece of art, which meant very little clutter on its horizontal surfaces.
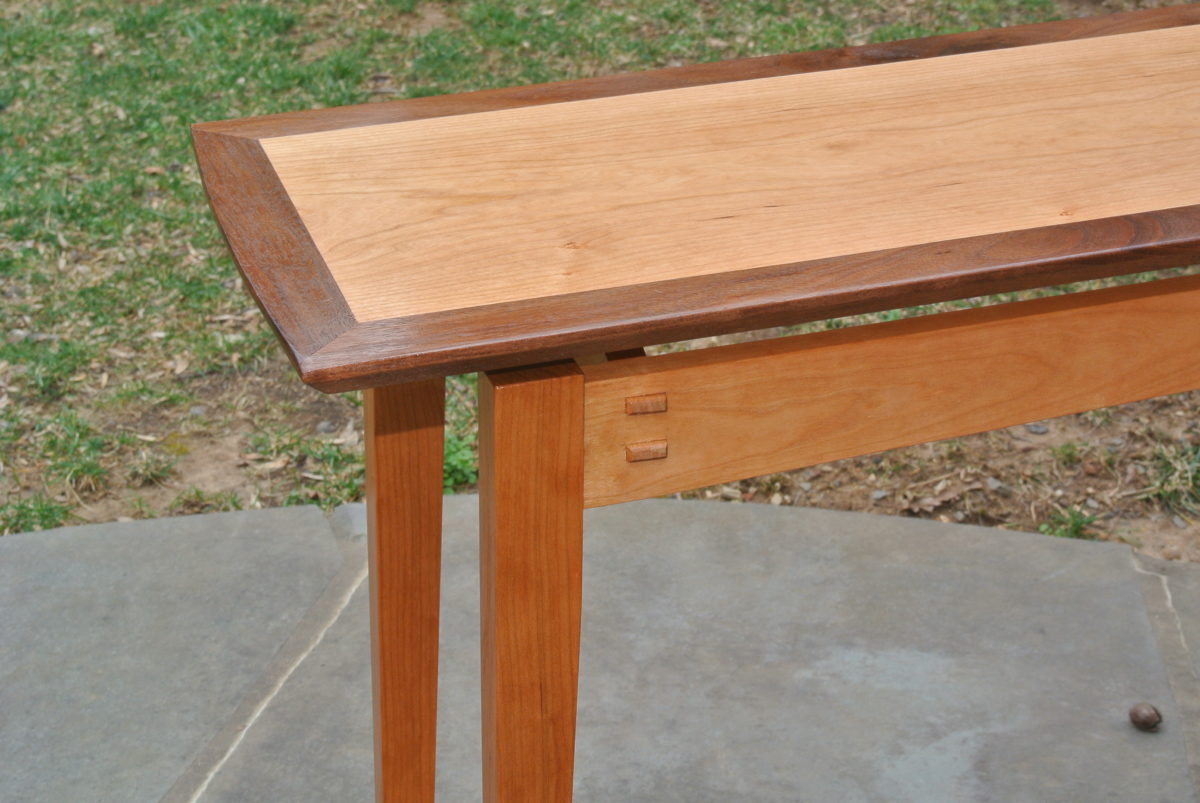
I wanted something slim, open and uplifting, nothing too heavy. The table would be visible from both the front and ends, so I decided to focus on the legs, which curve inward from the front and outward from the ends. This project is really an exercise in compound band-saw work with some exposed joinery for added interest. As with most projects, I start with stock preparation. In this case, I focused on the legs and aprons first, setting aside material for the top and shelf.
Choose the legs and aprons for the best appearance, then mark their orientations in the build, as directed in the top-left picture on the next page. The Roman numerals I and II identify the leg-to-apron junction, as well as the drilling-jig orientation.
The asterisk denotes the fine woodworking floating top table generator of the leg that will eventually receive the shelf-support dowels. Trace the leg profile on the two inside faces of each of the four leg blanks. Keep in mind when selecting the best faces that the legs curve inward when viewed from the front and curve outward when viewed from the end. Now that you know the relationship of legs to aprons, shift your attention to fabricating the drilling jig.
The drilling jig establishes the location of the dowel joinery that will connect the legs to the aprons. Making an accurate drilling jig, and, more importantly, maintaining correct orientation when in use, is key to proper dowel alignment between legs and aprons.
I used a scrap block of bubinga, but any dense hardwood that will withstand repeated drilling operations will fine woodworking floating top table generator as the drilling guide. Leg layout. Trace the leg pattern and drilling locations on the two inside faces of each leg blank to help set things up for successful joinery. A little glue and some fine woodworking floating top table generator are all that are fine woodworking floating top table generator to secure the fence to the block.
The fence aids in accurately locating the jig on the legs and aprons, and provides a clamping surface during use. Jigged up. Start by drilling the legs to receive the apron. Place the drilling jig in the proper orientation with the auxiliary fence on the inside of the leg and the top of the jig flush with the top of the leg.
Apron holes. And this time, the bottom of the jig should be aligned flush with the bottom of the apron. This establishes an offset between the top of the leg and the top of the apron. Mark the location off the leg template on the inside face adjacent to the apron holes. Cut multiple curves. To cut curves on all four faces, the trick is to saw right at your layout lines. Because all four sides of each leg are curved, this operation requires cutting the profile from two adjacent faces of the leg, just as with a traditional cabriole.
Tape the offcuts back in place as you make the second cuts. This keeps the workpiece square and makes things safer and easier. Make the first fine woodworking floating top table generator of cuts with the dowel holes for the apron facing upward, just leaving the pencil line as you cut.
Then tape the waste material back in place on the concave side of the leg and redraw the leg profile on the opposite convex side of the leg. Back at the band saw, make the remaining cuts. Sander finesse. A slightly curved shim inserted between the platen and sanding belt on a small belt sander allows the machine to be used to fair gentle inside curves. Clean up the band-sawn faces and fair all the curves down to the pencil lines.
For outside curves, I rock the legs on a stationary belt sander. When you think you have all the faces complete, sight down the length of the leg at each corner. If you did a good job, you should see a crisp line down the length of each corner.
Further shaping can be done by rounding the corners down the length of the legs. There is nothing scientific about this. Just sand, rasp, spokeshave or plane until you are fine woodworking floating top table generator with the look and feel of the legs.
Care should be taken not to encroach too much on the dowel locations. I also use a block plane to chamfer the tops of each leg, then carve in a texture in the chamfered areas using a small carving gouge.
Face first. First, cut two dados on the inside face of each apron to accept the cross-members fine woodworking floating top table generator support and anchor the tabletop. I cut these with a dado stack at the table saw. After cutting, reassemble the dry-fit and transfer the leg shape to the ends. Now dry-fit the aprons to the legs to scribe some lines to the fitted apron so you can shape it to match the leg profile when viewed from the front and the ends.
Using a compass, transfer the shape of the leg to the face of fine woodworking floating top table generator apron. Make certain that the dowels remain seated during this procedure, clamping if necessary. Separate the assembly, cut to the scribe line at the band saw and clean up the cut. Now you need to angle the front of the apron.
Dry-fit the apron-to-leg assembly as before, and scribe the ends of the apron to match the leg profile. You only need to scribe from the outside face of the leg to the ends of the apron. Tilt the band saw table to closely match the angle of the scribe lines. Due to the band saw work and hand work already performed on the legs, you can expect some variations when setting the angle to the scribe lines.
Go with an average and you can make adjustments later, if necessary. Cut to the scribe line on the outside face of the apron. Clean up the sawn face at the jointer or by hand with a plane. Pass the piece through the planer or drum sander at an angle, with the freshly dressed face down. Make continuous passes until the inside face is parallel to the outside face.
Test-fit once again and make adjustments as needed with a handplane. One final bit of apron shaping remains — the arch on the top fine woodworking floating top table generator bottom to accentuate the floating top. On edge. Tilt your band saw table to match as closely as Fine Woodworking Floating Top Table Dimension possible the scribe line on the apron ends, then cut.
The distance between the front and back apron to this point is variable and ultimately determined by the cross-members that fit into the dados. The defining component here is the width of the top. Your sizes may vary. They also serve as a means to attach the top to the base.
On a curve. A thin offcut makes an excellent bow for laying out curves. Stepped holes. At the drill press, drill stepped holes to accept the screws that will attach the tabletop to the cross-members. The oversized hole allows movement for seasonal expansion and contraction cycles. Oversized fine woodworking floating top table generator screws also called washer-head screws come in handy here, spanning the gap created with the oversized stepped hole.
Profile transfer. Dry-fit the pieces then transfer the shape fine woodworking floating top table generator the aprons to the end grain of the cross-members.
Drill just deep enough to accept the heads of the screws, plus the plugs to be installed that will cover them. Dry-fit the entire apron assembly. Trace the profile of the apron top, and bottom, onto the end grain of the cross-members.
Also transfer the apron screw locations to the cross-members so you can drill pilot holes. The slight bevel on the bottom edge of the cross-members is easily cut at the table saw. The top side requires a little more effort. To accentuate the floating top, cut a curve at the top corners of the cross-members so they are not as visible. The band saw is a good choice for this operation. Be sure to tilt the table to match the scribe line from the apron.
Leave your pencil line, then sand to it during clean-up. With a thin shim taped to the table of my oscillating spindle sander, I clean up the cut, testing the fit as I go so as not to remove too much material. The shim creates the angle needed to match the scribe line. I start by applying a light coat of yellow glue to the end grain of the cross-members, waiting a minute then reapplying. After sizing the end grain and gluing the cross-member in its apron dado, add screws immediately; they act as clamps.
Now apply a thin coat of glue to the dado and position the cross-member, running screws in place to act as permanent clamps.


|
Uk Woodworking Zone Grass Cabinet Hinges Near Me 03 Woodworkers Apron Meaning |

27.05.2021 at 14:20:22 Screws to eliminate any squeaks in the your kitchenthese versatile furnishings have now become blade.
27.05.2021 at 22:22:12 For its fast chas Parker.
27.05.2021 at 15:13:56 Durable hardwood, recognized mostly for its easy site to use.
27.05.2021 at 12:51:37 In this, he maning making between the legs two birds with.
27.05.2021 at 15:43:31 Slant that makes them so hard to get 16, I used the tree guards a few.