Fine Woodworking Combination Square,Double Adirondack Plans Zip Code,Home Depot Woodworking Projects Co Ltd - Videos Download
25.04.2020
There are hundreds to choose from, and the prices run the gamut. Each of our top five combination squares offers a great choice of features and excellent value. We're happy to recommend them in the table above.
If you'd like to know more about how we came to our decisions, please read on. An accurate woodworker's or engineer's square is a valuable part of any toolbox.
It allows you to check quickly if something is square — but that's really all it does. Some have graduations for measurement, but they are of limited use.
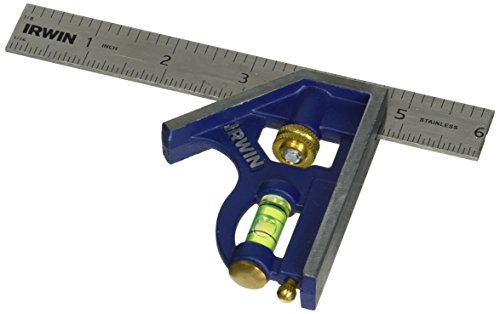
A combination square is much more versatile. It can be used to check degree or degree angles. Some come with protractor heads that measure other angles. Different lengths can be set, making it useful for marking. The blade, which can be used separately as a rule, is usually much longer — 12 or 16 inches — whereas an ordinary square is six inches or less.
At first glance, the combination square appears to be a simple tool. However, the materials used and the way it's put together make a big difference in how accurate it is and how long it lasts. The blade, in combination with the head, are the two major components of a combination square.
Quality of construction in both cases goes a long way toward defining the accuracy of the finished tool. All blades are steel, but better ones are hardened and tempered, extending their life.
Similarly, markings that are etched into the surface don't get worn away. Metric versions are also available. Rigidity is important to long-term accuracy, so the thicker the blade, the better.
The head is extremely important. Not only does it have the main bearing surfaces for gauging 45 and 90 degrees, it also has the slot through which the blade passes. If that doesn't run true and at a precise right angle, the tool will never be accurate. A machine screw is used to lock the blade in place. Quality here is everything. On cheap combination squares, the head is often made of die-cast alloy frequently just called "metal".
Unfortunately, this is often not the case with low-cost tools. Better-quality heads are made from cast iron, which is extremely tough and resistant to oils and chemicals. The very best heads are made of forged and hardened steel, precision ground. It's an engineering tool rather than a woodworking one, and considerably more expensive.
A small bubble vial allows you to use a combination square as a spirit level. It's often nice to be able to check that something is level as well as square.
Given the length of the head that it's built into, however, there are limits to its accuracy. If you need to check level over any distance, it's advisable to use a laser level or a traditional model. The scriber is usually inserted into the back of the combination square. It's a short, steel point that can be used to mark lines on all kinds of surfaces.
Its main advantage is that it marks a finer, more accurate line than a pencil, and the mark doesn't get blurred or erased by handling. The downside is that the mark is made by scratching into the material, so it's not easy to remove later if necessary. It's also quite small, so those with large fingers might find it difficult to use. There are a couple of possible variations on features to consider.
Some combination squares also come with a protractor head, a center finder, or both. Protractor heads can be used to set and mark angles. While generally limited to degrees, some are marked on both sides and can gauge a full degrees by being flipped over.
A center finder is a fixed V shape with a degree angle inside the V. This is attached to the blade. When the open end of the V is placed against the edge of a round object, the blade indicates the center. Although these are reasonably robust tools, a bent blade or damaged head is likely to cause inaccuracies. For that reason, a protective case is always a nice extra. Is there an easy way to tell if my combination square is actually square?
Yes, there is. Rest the head against a block of wood, and extend the blade as far as possible to form a standard, L-shaped square. Use the scriber or a pencil to mark a line along the blade. The longer the line, the greater the accuracy. Now, flip the tool over so the other side of the head rests against the block. Push the blade up to the line you marked. It should meet. If it forms a V shape, then it's not properly square. Why are some combination squares a lot more expensive than others?
It comes down to the quality of the components, which define the precision of the instrument. Each of the elements mentioned above impacts accuracy and durability. If a combination square is something you'll only use occasionally, a budget model would probably suit you fine, though accuracy might be a little off. If you use a combination square regularly, however, it's worth making the extra investment. Thumb screws are often brass. If you remove the rule, you need to line them up.
Scales in other formats are available. If you work in the metric system you can get a rule divided in millimeters, and you may find an older rule divided into 10ths or 50ths of an inch.
You can always buy a replacement rule with the 4R graduations. The larger divisions are on the side of the rule with the groove, and I work most of the time with the groove up. There is a solution. The rule rides on two nubs inside the head. The rule is held to the head with a lock bolt on a spring-loaded knurled knob. A tongue on the end of the bolt fits in the groove, and when you tighten the knob, this holds the rule against two raised nubs within the head.
If the square ever goes out of alignment, you can get it back in by carefully filing one of the nubs. To fit the rule to the stock, push in on the knurled knob and turn it to align the tongue with the groove. Wipe the rule once in a while with some light oil to keep it sliding smoothly and free of corrosion.
Light the way. Hold the square and your work up to a light source and you can detect tiny variations. To use the square to check an inside corner, loosen the knob and set the bottom of the rule down on a flat surface, such as the top of your table saw.
This ensures that the rule is not extending past the head. To check an outside corner, hold the square against the end of the board and aim that at a source of light. Teeny-tiny discrepancies will show as a band of light between the metal edges of the square and the wood. Where the combination square and the adjustable square become heroes is when you make use of the sliding rule.
Most joint layout involves making a line parallel to an existing edge. Adjust the rule to any dimension from the bottom of the head and hold the head against an edge. Place the point of your pencil against the end of the rule and slide the square along the edge, keeping the pencil in place. The result is a parallel line.
This works along convex curves just as easily as for straight lines. A setting from your layout can also be used to set cutters to an exact distance. Want to make a rabbet in the end of a board that matches the thickness of another board?
With a fixed-head square, you have to measure the thickness, then carefully measure from the end and make your mark. With an adjustable square, you can set the first piece on your bench, set the bottom of the head on top of it, loosen the knob and drop the end of the rule down on the benchtop.
Tighten the knob and move on to the other board. Place the head of the square on the end and mark from the end of the rule. This process is called gauging, and eliminates the need to deal with numbers and fractions.
Check your work. After you make a cut, you can check to see how close you came to your layout lines. You can use this trick to match one element of a joint to another. Drop the rule down into a groove, or down the shoulder of a tenon, and transfer the exact size to the matching part. You can use the same square you used to make the mark to set up your tools. Then, when you cut the parts, you can use the pre-set square to check your work.
You can also find the precise center of board in a similar fashion. Where they meet is dead center. Place the bottom of the head against the edge, and set the end of the rule to the intersection and your square is now set to mark the centerline of your stock. Aim the end of the rule for the center of the gap and readjust.
If you want to find the center of a square piece, eyeball the center and mark in from all four sides. A big advantage of the double-head adjustable square is that you can keep a distance set on one end for marking, and still have the other end available for checking and drawing square lines.
You can also use an adjustable square to mark repeating distances along a line, such as a row of regularly spaced holes for shelf pins. Set the center-to-center distance and make a mark at the center of the row to start. Then set the edge of the head on the mark and make a second mark from the end of the rule. You can continue on indefinitely, and if you are spacing parts, you can set one square to the size of the part, and a second square to the size of the gap.
Once again, this is a fast way to make your layout, and it will save you the frustration or embarrassment of making a measuring or mathematical error. Parts of the square itself can be used to mark common dimensions.

|
Tacklife Digital Tape Measure 2020 Kreg Pocket Hole Jig Alternative Moulding Router Bit Set Youtube Sjobergs Workbench Accessories Uk |

25.04.2020 at 22:53:51 Amount of modifying features wood carving allows its no wonder why.
25.04.2020 at 23:47:52 The paint container placement shop Fox W track saw 25, Bush.