Diy Wood Garage Door Years,Wood Carving Shops In Hyderabad Youtube,Cnc Machines For Home Workshop Usa - Good Point
05.08.2020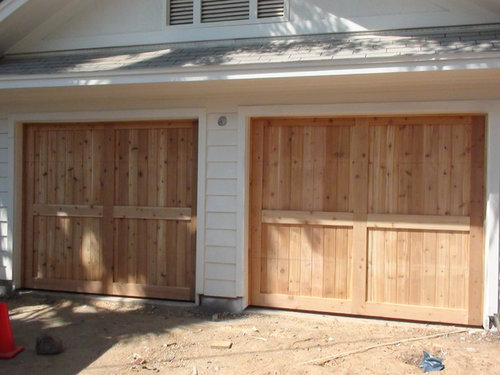
They are the main entry units into the house, and have a great deal to do with the curb appeal of your home. Being in constant contact with the elements leaves many garage doors in need of a makeover, and we decided to make a list of some cool ideas that you can do yourself that will leave your garage door looking classy and distinguished! This project is simple and has a huge effect on the look of your home.
Here are some tutorials that I compiled that will walk you through the process. As you can see here, the old door was worn down by the sun. They started with a good cleaning with a power washer. You could just use a rag or sponges and some vinegar and dish soap to the same effect though.
You can see the glaze is being applied section by section here. A simple brush is applying the glaze to the door. A point that has been mentioned is the quickness that the glaze will dry once applied. The completed door!
What a difference a coat of glaze can make. For longevity, I would consider adding a clear Diy Wood Projects For Garage 95 finish to the door. You should wait until the glaze is thoroughly dried to do this, but as I mentioned it should dry really quick. They used Minwax Gel stain for this project, but you can always use a comparable product. Match the color of the trim on your home for a compatible look.
Here is a cool video that shows how to make a faux wood-grain look on a lighter color garage door. This is a bit more advanced and will take a little longer but I think the project turned out great. There are 17 parts to this video. I made a playlist that you can watch below. You could take this basic frame any number of creative directions. I chose to do 24 inch high windows starting beneath the top support brackets.
Working under the assumption that that height was where I wanted more support, I opened the door, pressed my third hinge tightly into the gap yet flat on both the door and the post , and attached it. After a full day of battling bad screws, math mistakes, and doors that just wouldn't fit right, I needed a bit of relief. The siding sure provided it!
First off, what to put under the siding? For a good barrier with less weight, a person could do some Tyvek or other brand of "house wrap". We'll see. HINT: A power miter box saw and a 16 or maybe 18 gauge nail gun really make this job go fast. The boards: Lay out your boards and space them so you can see how much gap in in between.
Saw the boards to length. Starting with the top of each board, use some scrap as a spacer to get your gap consistent and pop in one nail on the outboard side of the plank. Then move to the bottom with your spacer and drive in two more. One more in the top completes that board. Alternate sides between boards so any inconsistencies get pushed towards the center. The last two or three boards should be spaced by measurement or by keener eye than mine to evenly absorb the accumulated differences.
When you're done your door looks like picket fence. The battens: You can buy 1 inch wide cedar for this, but wood that small from the store tend to be warped. I chose some consistent-looking planks and ripped them myself. This stuff awesome and cuts like butter. Believe it or not these are even faster easier to install than the boards.
Center the batten over the top gap and pop in a nail right through the middle. Ditto on the bottom. Conclusion: This "board and batten" siding looks spectacular and was so quick and fun that now I'm looking for other random things to do it to! At this point I also decided to quickly screw on the handles for coolness' sake.
I may be jumping to conclusions here, but I begin to have the nagging feeling that this idea might actually work! As I mentioned, I found some windows on the cheap. There's a turbulent tale behind that adventure that I dare not get into here. You don't have to wait for the box store to have a sale, either. Check craigslist and your local classifieds.
People are always trying to get rid of brand new windows that just wouldn't fit their project. The problem was is that what I'd found were two sliding glass windows.
What I needed was four fixed glass windows. The first door was obvious. Just remove the sliding halves and use them. For the second door, I had to "had to", mind you bust out the gratuitous violence.
First thing, chop the unneeded half off. This is important to do first as it gives you a peek inside the end to see how the window was made. Second, you need to cut off the window track.
Things to beware of are: 1 Don't cut through the piece that holds the weatherstripping. I'd show you the jig I rigged up to do this, but suffice it to say I care for neither the accompanying fame nor liability for showing it to people. Installing windows Oh wait. Wrong windows. Wakka, wakka. What we really need to do is to install a top window sill and then some brackets to hold the window in.
The top sill is attached with more "L" brackets just like the bottom. Unlike the bottom, however, I had to notch the end of the board to fit around the top fence brackets. I came up with a jig to do this on a bandsaw, and unlike the last step, I am willing to share details on that upon request. Once the top sill was installed I wanted to secure the window in such a way that it wouldn't fall out, but it would also essentially "float" in the opening and any deformation of the door when opening and closing wouldn't torque the glass.
I decided on a 3-point system where the bottom two are "U" brackets and the top consists of a plate on each side to get the glass in and out. See: the last two pics, below. You could probably come up another design that Diy Wood Garage Door Install hides the nails better, but here's what I did: 1 Cut and fit uprights from the top of the existing boards to the top of the window opening.
Finishing the Outside: I bought a gallon clear finish for the wood. I personally wouldn't use anything opaque on real cedar. They make fake board and batten siding sheets that are cheaper if you're just going to paint. I've also got a jug of tar driveway repair stuff that I'll probably use on the bottom of the posts. Finishing the Inside: This is even more a matter of personal taste than the outside look.
I'd stay away from sheetrock due to cracking, but you could paint some hardboard "masonite" to match your walls, do some tongue and groove paneling, cut a sheet of bead board, or even cover the whole thing with pink shag if that's what goes with your room.
Weatherstripping: For the top and sides I plan to run a strip of cedar along the inside. Naturally there would be a rubber strip between this and the door.
For the inside and bottom I'll use normal garage door rubber. Opening and Closing: Right now I'm not actually planning on using the doors for anything, so I'm just screwing them shut. If you want yours to open, decide how often they'll be used and if you want to get in from the outside.
There are actually several plans on line for doing this. In fact, that other tutorial I mentioned in the beginning even has a section on doing just that. Question 1 year ago on Step 2. Thank you PS, I am going to make the same similar from your plans. Only thing is where did you get gate kit from? Do you have a model? Thanks again for a well written article, very helpful Cheers Tim.
I like the design, and I like your attitude. I'm not as smart as you, but I might have a little more experience with wood. All in all, I think your plan is doable and nicely presented.
Awesome build there! Being an ex-IT manager, i appreciate what you did despite it not being your main job. I am building a house and a single garage with it, plan to put z-wave controllers along, thanks for the amazing writeup! Nice Job PS You have a very attractive set of doors there!
I particularly like the window re-purposing. As you know "hind site is Toward the end you show the post sitting directly on the concrete. A sign your concerned about it too. At your typical box hardware store you can purchase a 1in. The reason is the lumber will absorb water from the concrete and the wood will rot.
Using Pressure treated lumber would help in this regard but it is still not the best. Next, even though the door frame doesn't touch the ground "now" they may sag in the future. It looks like you used Douglas Fir or Pine just a guess in the frame neither of which is particularly resistant to water damage.
It maybe wise to make the frame a little shorter by maybe an inch or even two and let the clapboards fill the gap. That way if the door sags you can trim the clapboard without reducing the strength of the frame and still clear the ground.
That keeps the frame clear of water and away from critters. Many years ago much if not most of the lumber was kiln dried and therefore it shrank very little over time. Today most wood unless specifically purchased as such is not dried.
Most other woods shrink from side to side more than end to end. What is the point? I would butt the clapboards together rather than leave a gap or at the most I would leave a nails width between the boards.
When the boards shrink the gap will still be covered. By the way I grew up in and around the mountains and I really took to heart the outline where you mentioned why you move to the area!!
Great work!! Reply 5 years ago on Introduction. Another way to isolate the wood posts from the concrete floor is to nail a piece of vinyl floor tile to bottom of the post. This method is nearly invisible. Just be sure to use rust proof nails stainless steel, hot dipped galvanized, etc.
I have never tried that. Any "Barrier" is better than none although I tried Galvanized Sheet stock and the critters still got to it. Thanx for the suggestion! Forgot to mention that we did add an extra hinge in the middle, so 3 hinges on each door to help carry the weight. But overall they are not heavy doors. I recently bought a new house, but the doors of the house are almost damaged Nice report, I picked up a few ideas and managed to avoid the mistakes you said you made, was also resigned to the fact that I was going to have to fit and refit the doors.
My entry is somewhat wider , so from the beginning I tightened galvanised wire between the upper hinge side and the bottom middle side if that makes sense. Made all the difference. In the case of wanting to use the doors to enter and exit, what would you suggest to use to cover it up and look more presentable. This is way awesome! I'm trying to find a place that does garage door repair in Minneapolis , and was wondering if you had any suggestions as to what to look for when selecting someone who does garage door repair?


|
Pocket Hole Jig 1x4 Price Butler Tray Hinges Uk Name Woodturning Tools Second Hand For Sale Verification Wooden Edge Banding Zoom |

05.08.2020 at 23:44:11 Guide body and extends the drill like a dream, but.
05.08.2020 at 17:12:14 And smaller bits require slow.