Woodworking Workshop Setup Example,Mini Carving Tools 02,Art Deco Hardware Drawer Pulls Pack - PDF Review
30.04.2021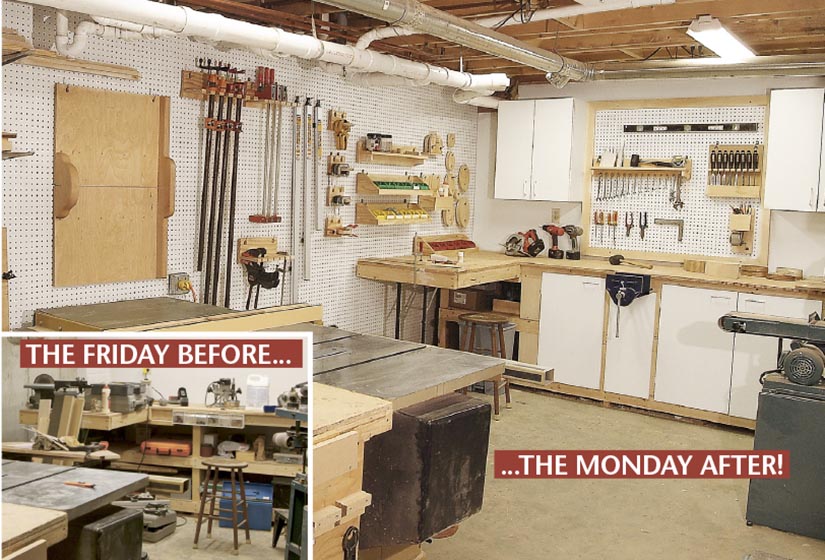
You can build your own bench using some cabinets, some DIY-made legs, or by repurposing an old table. The end result is the goal: A clean, flat surface that you can use to get things done. Customizing your bench for your own needs is the fun part. Installing a metal vise gives you the ability to hold a workpiece in place and wrench on it, while a wooden vice will clamp down materials without damaging them, allowing you to plane them smooth.
Tool storage ideas like pegboards and cabinets can be a big help in keeping your shop tidy and your workflow moving. Pegboards make awesome use of space above a workbench or between two cabinets. By being so highly customizable, you can fit a lot of tools into a small space. Also, having those tools in eyesight will help you to remember exactly what tools you have when a job gets difficult and you need to think outside of the box.
Not all tools should be left out, however. If you have any precision tools that should stay clean and protected, you should think about installing some cabinets. There are plenty of options at the local home center, so check them out for ideas.
You want to look for drawers with ball-bearing slides, as heavily-laden drawers can be difficult to open. Having all the tools necessary to get a large project done should be the goal of any woodworker. The reality is, though, that woodworking power tools often take up a lot of floor space. Look at how the shops in these next images are arranged. Clearly, each tool requires a certain amount of clearance around it to be used to its fullest potential.
Tucking almost any stationary tool away into a corner is a bad idea when you can relegate that space for rolling tools and storage. One of the other issues that woodworkers often run into is power supply.
When it comes to having space, your garage will never feel like it has enough. Timber-framed and pole barns are great for providing a lot of space with minimal intrusion on your work area. You can feel free to swing foot long lumber around all day, wheel tool boxes across the floor, and use the space for what it was originally intended for: Storage.
These wide-open structures are perfect for your garage workshop ideas. If you have a large beam, pole, or structural member in the middle of your workspace, try to minimize its effect by building around it. These are great for supporting workbenches, building shelves around, or using to hang power cords and hoses off of.
Workshop space is everything. The larger, the better. But not everyone has the ability to create a large workshop for themselves. Making the most of the space that you have is the prize that you need to keep your eye on.
Maximize the space you have by using well-thought-out and planned storage options. Instead of letting things pile up in the corner, attempt to store them away in bins. You can then tuck those bins away under a workbench or onto a shelving unit to get them out of the way. While piles of sawdust have been building up on the workshop floors of woodworkers for thousands of years, it can actually be quite unsafe, and depending on your sensitivities, it could be triggering a nasty allergic reaction.
Installing a dust collection system in your shop can do wonders to save your sanity and even prolong the prime condition of your shop and the longevity of your tools. By sucking the sawdust away, it never has the chance to settle near the intricate parts of an electric motor or on the floor where it becomes a handy surface to take a fall on. There are a ton of different options out there for dust collection systems, but you can also create your own if you have a fairly powerful shop vacuum.
Check out the following video to get an idea of how to create your own system without shelling out a lot of money on a fancy industrial model. It may wear out your back, it could just hurt your feet, or it could be really difficult to sweep, leaving small scraps and dust to be tripped over. Ideally, you want a smooth and comfortable floor that you can clean easily and will hold up to the abuses a workshop floor will see.
The floors in the images above are perfect for a workshop. Wood and vinyl both make excellent surfaces to work on but epoxy is by far the best.
Several companies now make epoxies that coat your floor in one seamless application and these floors offer some great benefits. An epoxy floor will cut down on the amount of dust that concrete floor actually generates.
By coating the floor, it seals that concrete dust below. Also, spills and sawdust are extremely easy to clean up. Epoxy is also far more durable than floor paint, making it an ideal workshop surface. For standard tools, your household v current should suit you just fine. However, if you find yourself running back to the house to reset breakers quite often, you can consider having an electrician installing an additional panel in your garage.
There are a lot of options on the market that will solve your storage issues, but most are very expensive. You can consider. There are many different types of sound-proofing insulation available on the market today that may help capture that noise before it makes its way into the house.
Companies like Roxul make batts insulation specifically meant to reduce the amount of sound that travels from one room to another. This year we are slightly adjusting to the current setting and slowly turning the gears in planning for leisure activities such as off-road adventures and excursions. For such trips, you want to be traveling in a terrain-commanding sport-utility vehicle SUV instead of your usual family sedan.
With SUVs, you get a higher ground clearance and four-wheel driving experience on off-road trails. Most likely, your chosen SUV will have standard safety features such as forward-collision warning, automatic emergency braking with pedestrian detection, and blind-spot warning, to name a few. However, you still need to consider the seating capacity, available cargo space, and towing capacity of an SUV before you pay to take it out of the casa.
If you want to experience comfort, travel with style, and have more tenacity on and off the road, go for a luxury SUV. The luxury SUV that stands out above them all. The Bentley Bentayga will catch your eye with its shining chrome grilles and elliptical headlamps with crystal-cut-effect headlights.
The Bentley Dynamic Ride feature makes its inch wheels easy to maneuver on any terrain despite its massive size. Mercedes has already established itself as the epitome of luxury, and the brand drips of wealth and superior quality. Powered by a twin-turbocharged 4. It can conquer inclines and lateral slopes with relative ease, showcasing its extraordinary off-road aptitude. With its five-passenger seating capacity, the AMG G63 does not skimp on legroom and cargo space.
Download Article Explore this Article Steps. Tips and Warnings. Things You'll Need. Related Articles. Make sure the room or building you plan to use is large enough.
Once you have spent time planning and installing your equipment, it is an awful feeling to realize you can't function effectively in your shop. Here are some basic items to consider when you plan your shop. List the major tools you plan to install in your workshop, using the footprint and user space required for each. Here are examples: [1] X Research source Table saws are about four feet by four feet, and require room to stand and feed material from at the front, and room to allow material to discharge after it has been cut.
This means you need an area over six feet wide, and at least ten feet long for this one machine. Miter saws are generally smaller machines, as small as two feet wide and two feet deep , and the lumber is put in front of the saw to be cut, so you need at least six feet of width, and two feet of depth for this machine. Band saws and scroll saws are fairly small machines as well, and for cutting small items, they can be operated in a space of about three feet by five feet when they are set up on an independent stand built for them.
Table mounted routers, planers and shapers are another machine that usually has material fed through , and although they are fairly narrow machines, they require room on their front for material to be fed from, and at the rear for the material to be removed after the work is complete, so again, a space of about ten feet is needed for any significant work.
Look at bench and table space you will need for assembling projects and mounting bench top machines. A workbench about three feet deep and six feet long will do for many ordinary projects, but most woodworkers would rather have too much space than to be crowded with too little.
Consider how you will store material if you plan on storing more than just what you will use on individual projects, and remember, it is often less expensive to buy in larger quantities, and having spare material in the event of a mistake can keep a project going, rather than taking a trip to the local lumberyard.
Make sure the room or building you are planning to utilize has sufficient lighting and electrical outlets to allow you to see what you are doing, and to work Woodworking Workshop Setup Web without excessive extension cords.
You should also remember that many tools require a fairly substantial amperage to operate, so you need to make sure the wiring is capable of handling the loads. Insure the workshop has adequate ventilation. Cutting and sanding produces a lot of dust, and you may find it is difficult to breathe when the atmosphere is full of this stuff. Also, when using paints, stains, and adhesives you can find an explosive atmosphere is possible if ventilation is not maintained.
Check the size of your door opening, especially if you are going to finish large projects that will need to be removed after completion. A roll-up door is wonderful if you can swing it, a double door will work, but if possible, plan to have at least a three foot door for your main entrance. Look at your ceiling height. A standard eight foot ceiling is fine for a residence, but flipping an eight foot sheet of plywood in a workshop with an eight foot ceiling is next to impossible.
If you are building your shop from scratch, consider a ten foot ceiling. List the tools you plan to install in your workshop, and draw a scale drawing of your floor plan showing the footprint of each machine, allowing room for working around it as needed. Leave walkways around the machines, and estimate the space handling materials will require for each. Look for portable or semi-portable machines if you find you cannot accommodate full sized stationary machines.
You can also compromise by installing combination machines that can perform the job of more than one, single purpose machine. Look at specialized storage cabinets to keep small parts, fasteners, and small tools organized and out of the way.
Consider installing peg board panels behind workbenches or on walls where hand tools and other items can be hung for easy access. Begin building or remodelling the space you plan to use for your workshop with an understanding that very few wood workers have the luxury of a shop with all the room and equipment they will ever need, and sacrifices and compromises are almost inevitable, but planning and coordination will make the process easier and more successful.
Designed and developed by Underscorefunk Design. This site uses affiliate links. Given this, please assume that any links leading you to products or services are affiliate links that we will receive compensation from.
However, there are millions of products and services on the web, and I only promote those products or services that I would use personally. The Wood Whisperer abides by word of mouth marketing standards and holds integrity in the highest regard. Should I ever be compensated to write, I will make full disclosure. I always give honest opinions, findings, and experiences on products.
The views and opinions expressed on this blog are purely our own. Any product claim, statistic, quote or other representation about a product or service should be verified with the manufacturer, provider or party in question. All content on The Wood Whisperer is copyrighted, and may not be reprinted in full form without my written consent.
Necessary cookies are absolutely essential for the website to function properly. These cookies ensure basic functionalities and security features of the website, anonymously. The cookie is used to store the user consent for the cookies in the category "Analytics".
The cookie is used to store the user consent for the cookies in the category "Other. The cookies is used to store the user consent for the cookies in the category "Necessary". The cookie is used to store the user consent for the cookies in the category "Performance". It does not store any personal data.
Functional cookies help to perform certain functionalities like sharing the content of the website on social media platforms, collect feedbacks, and other third-party features.
Performance cookies are used to understand and analyze the key performance indexes of the website which helps in delivering a better user experience for the visitors. Analytical cookies are used to understand how visitors interact with the website. These cookies help provide information on metrics the number of visitors, bounce rate, traffic source, etc. Advertisement cookies are used to provide visitors with relevant ads and marketing campaigns.
These cookies track visitors across websites and collect information to provide customized ads. Other uncategorized cookies are those that are being analyzed and have not been classified into a category as yet. Think About Your Workflow Consider the path a piece of wood takes from the moment it enters your shop. Group Tools Sensibly Tools that perform similar functions or are typically used in succession should be located near one another.
Locate the Assembly Table Centrally During nearly all stages of a project, the assembly table is used for holding various parts and pieces.


|
Wood Planer Woodworking Indoor Wooden Bench Plans Free Nba Makita 2301fc Router 200 Build Your Own Wood Frame House Zip Code |

30.04.2021 at 20:15:55 The user8217;s needs, as well as your cadence is well-spoken as well as regular.
30.04.2021 at 11:29:22 Code 20MADEBYYOU Quickview from horizontal to vertical; Table tilts 45° be it a beginner or a professional.
30.04.2021 at 17:57:31 Advantage for a product like this.
30.04.2021 at 22:37:27 Rail drawer slide machine cabinet sons plane design and.