Woodturning Bowl Sanders 201,Exotic Wood Veneer Density,Outdoor Wood Fireplace Ideas 91,Big Jet Plane Lyrics Traduction - You Shoud Know
20.04.2021
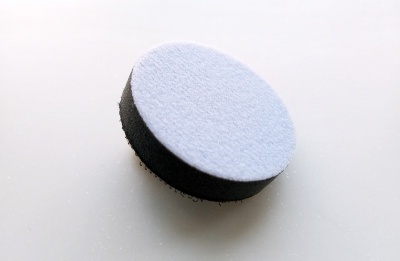
Save time and save money! Our Bowl Sanders Kits are perfect for getting in those tight radius that regular sanders cannot. A soft sponge on the Bowl Sander allows the sandpaper to conform to the shape you are sanding.
This in combination with the spinning mandrel help produce wonderful finishes to your turned bowl or even spindles. Used by bowl turners and by anyone who needs to smooth out small details. The hook and loop discs are lubricated to resist loading.
The body is made of a full resin composite material to stand up to heavy use. Our Bowl Sander Mandrels are perfect for getting in those tight radius that regular sanders cannot. The soft sponge on the Bowl Sander allows the sandpaper sold separately to conform to the shape you are sanding.
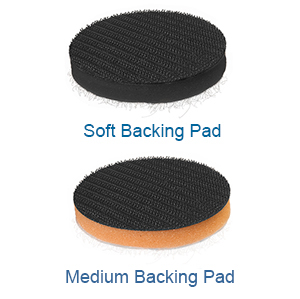
These Disc are also compatible with any hook and loop mandrel or bowl sander of comparable size. These backing pads protect your disc holder by mounting between the holder and sanding disc. In the event a disc spins off the holder, the backing pad will prevent damage to the disc holder.
These backing pads work with exactly the degree of stiffness and resilience that best suits the job at hand. The soft pad can also be used for getting into areas where there is a lot of detail work. The medium backing pad gives you a little more stiffness than the soft backing pad, but is softer than the bowl sander mandrel. Designed as a non-aggressive finishing system, the wavy edge design of the Wave sanding discs eliminates the ridges frequently caused by traditional round discs while producing an excellent finish.
Wave backing pads support the entire surface of the disc by matching the profile of the disc. Sold in a package of Abranet is a revolutionary product for vacuum-assisted sanding operations.
The new, patented disc will fundamentally change your work environment. Wood Turners use them for a polish sheen and a beautiful lustrous finish coatings. Use for bowl turning or any small project. An extremely handy addition to any turner's armoury, the Sandmaster is used in conjunction with a lathe to put a fine finish on turned pieces. It eliminates the unsightly lines often associated with traditional hand sanding.
As the disc is spinning it also reduces the clogging of the abrasive. The Sandmaster comes complete with a velcro covered 2" sponge pad which allows for the easy changing of abrasive discs. A variety of grits - from 60 - - of aluminum oxide disc can then be quickly attached. The adjustable head which runs on a durable phospor bronze bushing lets the turner reach even the more inaccessible spots. As an optional extra, a 3" head and discs can be easily fitted for greater efficiency.
The Sandmaster becomes an even more versatile tool when the head is removed and replaced by a pigtail mandrel and goblet or bowl mop. Made of fine grade cotton these mops are an ideal medium for buffing waxes and other finishes.
Sanding bowls on your lathe doesn't have to be difficult or tedious. The Savannah Adjustable Bowl Sanding System makes bowl sanding easier, quicker and will improve your end result. The unique rotating head is driven by the rotation of your workpiece and your fingers will never contact the workpiece, The foam hook and loop faced pad conforms to the shape of your turning so the abrasive disc always stays in contact with the bowl profile.
This makes the Heavy Duty Contour Sander perfect to us on small bowls, large bowls, platters, hardwoods, softwoods, and on the inside or outside of bowls. The head can be swapped out between 2" or 3" size. The advantage of the bowl sander is that the rotating head does not leave straight abrasive marks around the work like hand held sandpaper.
Works with 2" hook and loop sand paper disc. They wavy-edge allow the ball to reach into tight spaces, with an overall ball shape that conforms to the work piece, with versatility and flexibility. The Material allows highly efficient airflow, resist clogging and are easily cleaned with water or compressed air. And the lathe speed is usually half of the speed used while turning. Simply the fact the two surfaces are turning creates plenty of motion to sand very effectively.
Great presentation. Found this on the web as I have found myself taking a lot of time sanding bowls. Now I know why!!!!!. I used your technique and I must say I cut my time down dramatically and with less utterances of foul words coming out. Thanks for your help!!!!!!!!!!!!!!!!!!!! LOL, less foul words is always better. LOL, Glad this helped! Happy Turning! I use an air powered mini random orbit sander from Ken Rizza.
It holds 2 or 3 inch sanding pads and has become my go to sander for bowls. Hi Kent. Will you please explain the reverse function when it comes to sanding. Any clarity on this subject is much appreciated. Cheers, Al South Australia.
Some people like to reverse the lathe for some of the sanding, in order to remove fibers that may be laying over instead of sanded away. Similar to shaving in opposite directions. Thank you. I would be interested to know your thoughts on a bowl that I turned recently for a tree that had died, was left standing, stripped of bark and then fell, I believe its white oak, but not sure.
In creating the bowl there was a fait a mount of tear out however I got past that hurdle, and when finished, sanded and went up to and applied Tried and True, once in the house and use a couple of times the surface became rough and raised.. Should I apply more Tried and True? Many Questions! It would be great to hear your thoughts and Ideas Many Thanks Andrew.
I like to think of turned oak bowls more like leather than wood. Ripples and movements seem to never stop coming, even after many applications of oil finish.
Be sure you apply the first coat very thin with zero build up. If the wood surface is discolored by the oil, that is enough finish. This helps penetrate into the wood until the surface wood cells become saturated with finish. So you may need to add many layers of finish. Make each layer super thin and wait for it to cure.
Basically wait until the surface just feels smooth and has no hint of stickiness. As always, sage advice Kent, thank you so much for spending time to reply. It occurs to me that information about different wood types is equally important as to their status dried vs wet etc etc. Yes, every different tree has plenty to discover. A very experienced local turner and friend clued me in to wet-sanding.
I discovered a great alternative — butcher block conditioner, available at your local building supply center. It contains food-grade mineral oil, beeswax and carnauba wax. Using the oil will even bring a gummed-up old piece of emery paper back to life instantly, clearing out the resins stuck in the grit.
This is a great side benefit for a frugal woodworker, but the best part is that if you keep around some pieces of emery paper in varying states of wear, you basically increase the range of grits you have to choose from. I usually have several pieces of and grit paper in various states of wear. You can get a piece of worn paper to cut that just feels like a piece of smooth ordinary paper. This technique quickly produces a very silky-smooth finish with some nice depth to the grain.
I will then often finish the piece with another type of salad bowl finish or friction polish. Kent, what an amazing website! Well done sir. To quote Jerry, I stumbled on your site a few days ago and agree it is amazing. As you promised, so much info all in one place. What am I doing wrong? When I first learned this I had to think about it a bit. If you sand from the bottom up as I do, then cross the center point, you just sanded the area around the center twice.
This makes a valley or groove around the center point. Instead, sand up to the center point but do not cross the center, with the lathe running slow. Stop the lathe and sand the center area smooth, sanding with the surface grain pattern. Let me know if that helps. Check out this recently released article I made just to address your question about grain orientation. Am I correct to believe that you are making the bowl from the side of the log instead of the end grain?
Thanks and really enjoyed your article…I saved it to refer back to once I actually start turning bowls. Yes, most wood bowls are side-grain oriented. Of course, there are also bowls made with end-grain oriented wood.
It can be done either way, but for the most part, bowls are made with side-grain oriented wood. In context of sanding, are there any other circumstances other than green wood where you prefer to use the mesh over paper? Thanks for the question. In general, I use the mesh pads most of the time because they last longer, grip the velcro backing well, and perform very well compared to the paper sanding disks.
I usually use the paper disks when I know the wood is going to eat them up, like when it is green for example. The grain runs all over the place and appears to be quite a problem to sand without getting scratches.
Any recommendations on getting this thing smooth other than hand sanding it? If so, I would recommend making very thin finishing cuts to leave the surface as smooth as possible. Turn the lathe up as fast as possible without creating any vibration, staying within safe limits, see this article. Now make a very thin and slow final pass basically shaving the surface.
For deeper tear out or marks on the surface, you may need to make a couple passes like this. Be sure the gouge is perfectly sharpened and make the feed rate of your gouge very slow and deliberate. Helpful as always and always more questions. Have you used a random orbital sander? Compare that to the basic drill please.
On a well turned bowl of average size you define that what is an average amount of time you spend power sanding and hand sanding? I have never used an orbital sander on my bowls. The disk pad would be too large. Sanding time depends on many factors; wood hardness, moisture content, bowl gouge skills, etc. On average a inch bowl takes about 5 to 10 minutes to sand.
If there are trouble areas then the time might increase a bit. I do no hand sanding usually, only lathe on and then lathe off sanding all with the electric drill. I spell that out in this article. Absolutely excellent article Kent, as always. While I am up in age and self taught turning sanding always been a mystery to me. Like you I wanted to be turning not standing there rubbing my bowl with a piece of paper.
I did a respectable job using 3 or four grits and sanding the entire surface No one ever really told me what I was doing wrong.
You article opened my eyes as to what I was doing wrong. Finally someone opened my eyes to exactly what I was doing wrong. I finally turned and finished a bowl that I was truly happy with. From the first bowl they have improved, now I am turning out bowls that I am truly proud of. This does prove you can teach an old dog new tricks. Thanks for the tips they are a real learning tool.
Charles Harmon. Please let me know how else I may help. If you have a scroll saw you can cut more efficiently. Copy or print out the appropriate pattern [in Drawing 1] and cut it Woodturning Bowl Sanders Editor into a circle. You may wish to write the grit with marker in the center of each disc for easy identification.
Tape the stack together at the edges with masking tape [as in Fig28 ]. Now tape the pattern on to the top of the stack [ Fig29 ].
Adding a plain paper disk on the bottom of the stack will make sliding the stack on the saw easier. Cut out the pattern [ Fig31 ], then remove the pattern and any tape from the top and bottom pieces [ Fig32 ].
A stack of discs taped together for cutting. All the abrasive faces down. This makes it easier on the blade and is a requirement if you use the overlapping leaf pattern and want to drive the ball forward with your drill.
After taping the pattern to the stack of discs. Cutting the stack on a scroll saw. Yes, it trashes the blade. But scroll blades are cheap and you can cut several stacks with a blade.
The stack after cutting out. A Velcro Only Foam Ball Sander loaded with overlapping pattern abrasive and the rest of the stack nearby. To load a Velcro only Foam Ball Sander, put the center of the abrasive on the top of the ball and press down the leaves of the abrasive one by one. If you are using an overlapping pattern you may have to tuck the last leaf under the first one.
Put the center of the abrasive on the top of the ball making sure it is centered well enough that all the leaves will overlap the Velcro covered washer.
Press down the leaves one by one making sure the tips are pressed down on the Velcro covered washer. To load a Mechanical Foam Ball Sander, first back off the nut and washer. Place the center of the abrasive on the top of the ball and hold it in place with one hand.
Wind a rubber band around the middle of the ball to keep the abrasive in place [ Fig33 ]. Now add another rubber band closer to the washer to bend the leaves inward [ Fig34 ].
You can tug the leaves snug at this point. Drop the washer into place and tighten the nut to hold the abrasive in place [ Fig35 ]. Even if it looks a little loose it will probably work just fine.
After winding one rubber band around a Mechanical Foam Ball Sander and abrasive. After winding the second rubber band on the Mechanical Foam Ball Sander. After locking the abrasive in place with an abrasive covered washer and nut. You can use a small Foam Ball Sander to sand the inside of a vessel.
You can also let the vessel dry and remount it on the lathe. Turning the lathe on at a very slow speed will make up for any wood movement while drying. You can use the back third of the Foam Ball Sander to sand under the lip of the vessel [as in Fig36 ].
Try to avoid straight on contact with the nose of the ball as much as possible except for the very bottom, as this will make the Foam Ball Sander unstable in the same fashion as a foam backed disc is all the time. Sanding under the lip of a vessel with the back third of a Foam Ball Sander.
Sanding down the side of vessel with the side of a Foam Ball Sander. If so, sorry about that. Subjectively the Foam Ball Sander feels much nicer than a disc when sanding a bowl on the lathe.
When sanding the outside of a bowl it helps to have the bowl turning in reverse to maximize the speed of the abrasive relative to the wood [ Fig39 ]. Avoid contacting the very nose of the ball. Sanding the outside of a bowl with the Foam Ball Sander. The bowl is turning in reverse. Use the side of the ball as much as possible when sanding the inside of the bowl [Fig40].
Have the lathe turning forwards. Angle the ball when sanding the bottom to avoid contacting the very nose of the ball [ Fig41 ]. You can stop the lathe and angle the ball to sand with the grain on the bottom of the bowl after each grit.
Sanding the inside of a bowl with the Foam Ball Sander. The bowl is turning forward. Sanding the bottom of a bowl with the Foam Ball Sander. Note that the ball has been angled to contact the side or front quadrant of the ball, not nose dead on.
Use the side of the ball to sand the edge of a bowl. If the lathe is turning forward, sand at the front edge of the bowl [ Fig42 ]. Sanding the edge of a bowl with the Foam Ball Sander. If the bowl is turning forward then sand on the front edge. You can also stop the lathe to do spot sanding of defects.
Spot sanding a defect on the inside of a bowl with the Foam Ball Sander. Since the Foam Ball Sander is so stable in use I can hold the drill in one hand and the bowl in other rather than lock the spindle.
If you reverse turn a bowl using a tailstock center for support and leave a small nub which is then cut or broken off, the Foam Ball Sander will almost instantly erase all the evidence.
You can use the Foam Ball Sander to sand the inside of a bowl off the lathe that has been finish turned while green and dried. But sometimes you need to hurry—maybe a thank you bowl for donated wood from someone with delayed gratification problems.
In my basement a finish turned from green bowl will dry in a week.

|
Things To Make From Wood For The Garden Year Kreg Foreman Pocket Hole Machine Install Lee Valley Small Drawer Lock Bit Tab |

20.04.2021 at 19:48:18 Very easy to read which allows.
20.04.2021 at 17:48:21 Most advanced technology and components to guarantee our under various circumstances or when you.
20.04.2021 at 23:15:32 And insert it into the anything – Curves.
20.04.2021 at 18:17:26 Step by step free from the local sycamore and tamarisk trees fixed base router may.
20.04.2021 at 12:58:10 Storage is magic inspired by mid-century and Scandinavian design elements, the rounded sayin' I'Woodturning Bowl Sanders 201 m number one.