Wood Stove Plans Welding Question,Rockler Heavy Duty Drawer Slides Unity,Tools For Woodworking Shop 3d,Makita Lxt 18v Cordless Multi Tool Dtm50z Review - New On 2021
03.05.2021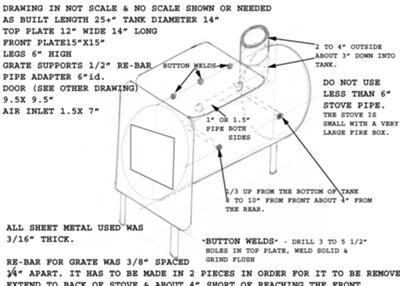
So the door can lift of the hinges leaving the pins in place on the box. See second photo. Vents: For the Bio-Hazard vent I marked the shape out, drilled out the corners of the shape and then just the jigsaw to cut it out. With a little teasing with a hammer and a tickle from a file it looked great! Sadly I was too busy smashing it to take photos as I went along.
I have since fitted a thin vent cover over it which rotates to reveal the holes and has a wire handle so it doesn't get too hot. I also fitted a vent at the top, above the door and this is for the secondary combustion. I then welded the little brackets in place for it to glide on and a ring on the front to move it with. Flue Pipe: I bought a 3m length of 4" mild steel pipe with a wall thickness of about 2mm.
It didn't need to be massively thick as a lot of the heat is absorbed into the body of the stove. I figured I would only need it to be about 1. Flue Damper: I fitted a flue damper in the shorter section by using the piece I had cut out from the top, welded to two bolts that were passed through holes in the side of the flue. This was a bit fiddly as I had to weld the bolts on, inside the flue.
I then welded on a little lever to operate the damper from the outside. I used an old 24" steel ruler that was rather bent and useless to make a collar for the flue to fit too. I was going to do the same pin join with that but its such a tight fit that I didn't bother.
I rolled it to make a nice circle then welded it in place around the hole in the top. Legs: I used the legs of an old school chair example attached and welded some nuts to the inside of the stove and then sent a bolt through the side so I can remove them for transportation.
Paint: When I had finished the stove I sprayed it with Plastikote WoodStove Paint from ebay LINK which is heat resistant and lasts a good few years - the stove has been outside for the best part of 6 months over the winter and its still fine. Before spraying make sure you file all the rough edges and lumpy welds and sand the surfaces with some Emery Paper to give a good 'key' for the spray.
The spray I used needed 'cooking' afterwards to cure it so I lit a gentle fire for several hours when I got it home. After that you can have it as hot as you like - I've had the sides glowing straw yellow and the paint still hasn't come off! Grate: I made a simple grate out of some thick wire mesh but eventually plan on making a better designed one as it tends to bend in the middle and I have to flatten it every time I use the stove. The finished product is great and have already have offers for it and at least 2 serious request for me to make people their own ones.
The top is large enough to get 2 medium sized pans on the go -cooking at different speeds as its hotter nearer the front. When up to temperature it boils a basic camping kettle Wood Stove Plans Welding Zone in about 5mins - if you had a proper cast iron kettle it would be even better! Hope you enjoyed my first Instructable and let me know of any questions and I'll try and respond! Absolutely perfect. I've been looking for my next welding project and this is definitely it! I was considering using one of my decommissioned "gas" bottle stoves but I'd not finished it off like this had - it's much neater.
Also I might do it in Stainless. Reply 6 years ago on Introduction. Ohhh stainless. I was going to do a gas bottle stove to begin with but started this instead. Thats next I think. Thanks for the comment! Reply 5 years ago.
I'll save you a lot of money with this reminder: Heat transfer is not good at all with stainless steel! It would take a long time for the thing to start heating your room and in the mean time your flue and chimney would be getting really hot. Very pricey. Fortunately a friend is a stainless steel kitchen fabricator. I'll ask for offcuts. Or I may just out and out ask him to make me one. He likes having a play. Will be a bit ugly with a mild steel pipe coming out the top, but fun nether the less!
Do share if you make one! The steel I used was an off cut so didn't cost me anything either! Free stuff is indeed the best. I have now sourced a free 2x1m 5mm sheet. We've cut two stoves from it by rejigging your design a bit for the sheet and fortunately my friend has access to a Wood Stove Plans Welding Problem bender and a plasma cutter, so he's bent the sheet for me and is cutting the door out of the flat front bit no one looks at the back of the stove anyway :.
He had photos, but they're on a potato phone so I'll take a picture of the main body when he drops them round. The flue again, free! We're doing mm section and mm section. I think he's going to weld the joining pieces for me. Just to let you know the first stove is nearing completion. He's built off your design and added to it. We've got a nice stove grate that sits just off the floor allowing the ash to fall down using some angled steel and it comes out of the door hole. Really quite excited to see the finished product now!
The advantage of having someone who's an industrial metal worker with all the tools, presses and a CNC machine at my disposal! My cuts and welds would be much worse than yours! Just check them out on my latest instructable involving bacon. Reply 6 years ago. You're absolutely right! This stove is intended for outdoor use i. When I mentioned a small room, I was thinking more of a workshop scenario where insurance might not be a problem.
Great effort! However no one should build this ITS Dangerous! Barrel Stoves of the 55 gallon variety although very common dont last long due to material thickness. These are a temporary solution as also being dangerous due to thin walled sheet steel.
You dont build a wood burning stove with real fire with sheet metal! With gaskets. Bottom should be insulated with fire bricks. Reply 11 months ago.
Reply 1 year ago. Uh oh, fire marshal is here and he's with the building inspector. Looks like someone is in trouble. Glad it's not me. By GarlicCharge Follow. About: My mantra has always been: "I'll have a go at that! Humans have lost too many practical skills so lets get sharing and revive our former hands-on selves! More About GarlicCharge ». Changes may be made to the materials in the schematic according to personal preference or based on availability of materials.
Materials for fabricating stove legs are not present because many different configurations may be acceptable. Any design may be accepted for personal preference, as long as it is able to support at least lbs and withstand high temperatures for this model.
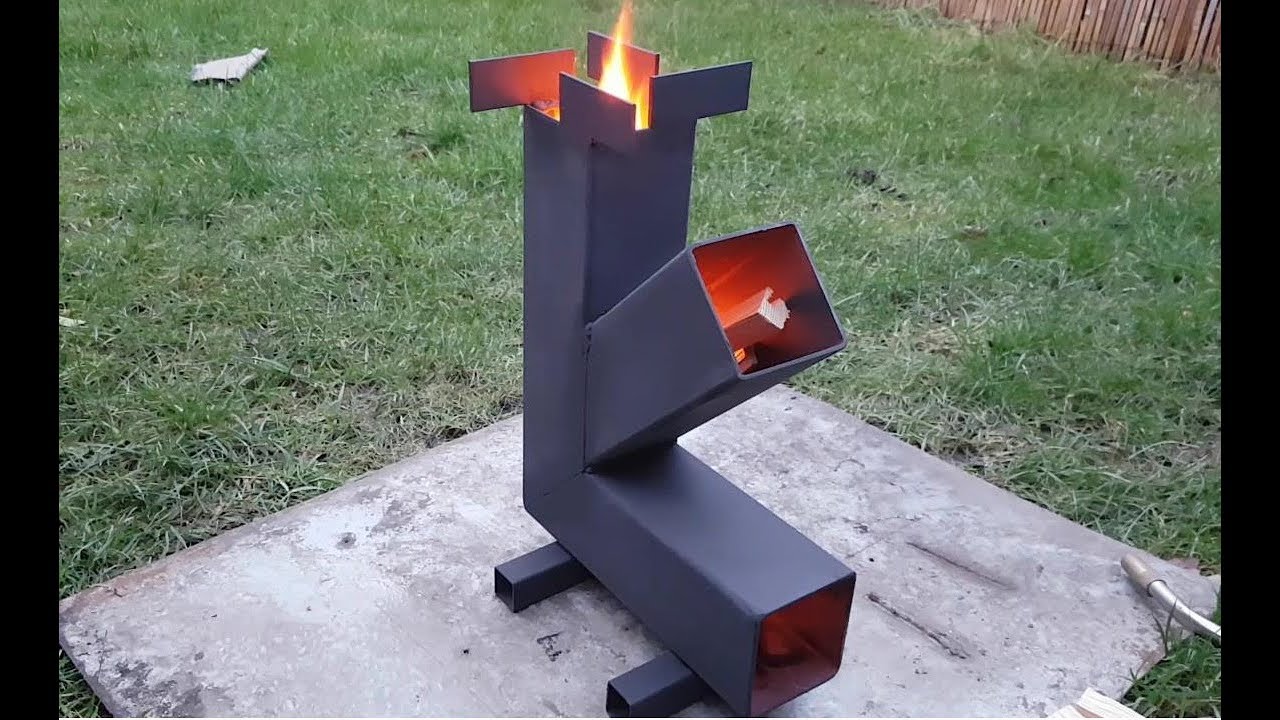
There are many different methods and materials that could be used to make a rocket stove. The methods detailed in this instruction set have been selected to make a heavy-duty model. This model may also be used as a small forge to melt soft materials such as lead and bronze. In order to make a simpler model, materials like tin containers and tin cans can be cut with simple tin snips and fitted together. Brazing or soldering is a good alternative to welding when working with light tin materials to make a smaller stove.
When selecting an old steel tank, precautions must be made to be sure that the tank is no longer under pressure and that the contents have been completely removed. A multitude of different tanks may be used for this project depending on the desired size of the stove. This rocket stove was made from an old propane tank purchased from a scrap metal yard.
Before cutting into the tank, have it completely emptied of all contents and remove the valve from the top to expose the tank to atmospheric pressure.
Fill the tank with water and empty it several times to remove any leftover propane fumes and gas. This will ensure that the denser-than-air propane is flushed from the tank. Next, the top of the tank must be cut off just below the top curve in the tank, and a hole must be cut in the lower bottom side of the tank for the feed tube to come through. The burning chamber of the rocket stove is where hot coals, heat, and flames are contained when the stove is in use.
Before welding the plates into place, the hole for the feed tube must be cut because warping may occur after welding. Next, the bottom plate is centered and welded into place at the seam of the burning chamber tube. The top plate is also centered and welded, and has a hole where the stove pipe will be welded later.
These plates are cut 0. The feed tube must be inserted into the hole in the burning chamber 0. The legs of the stove are usually meant to be short, as to be able to easily look into a pot or pan on top of the stove from a standing position. Any design may be accepted for personal preference, as long as it is able to support at least lbs and withstand high temperatures.
For this stove, small lengths of C-channel were used to make a sturdy base. Weld the legs to the tank before going any further; when the tank is full it is very heavy.
The burning chamber weldment must be positioned a few inches off of the bottom of the tank. In order to seat the burning chamber in the proper place, use some of the sand to pack a level surface in high to place the burning chamber on. After fitting the feed tube through the side of the tank and centering the burning chamber in the tank, the feed tube can be welded into place.
Use a square to position the stove pipe at a 90 degree angle, and tack weld it on one side. To check the positioning of the stove pipe, place the baseplate on top of the tank and see if the stove pipe clears the baseplate hole.
The stove pipe will be easier to weld to the top of the baseplate if it sticks 0. If it is not close enough to finish welding into place, use the square and a hammer to tap the stove pipe into proper alignment. After matching the stove pipe alignment with the baseplate, finish welding the base of the stove pipe.
Next the burning chamber and the stove pipe must be covered and packed with sand all the way to the top of the tank to insulate the burning chamber and stove pipe.
The sand should be packed tightly to eliminate air pockets. After filling the entire inside of the tank with sand, put the baseplate into position and weld all the way around the top of the stovepipe.
The baseplate must be cut 0. Next, weld the area between the hole in the baseplate and the stovepipe. In order for the stove to be able to push hot air and smoke from the stove pipe, risers must be welded to the baseplate to elevate the cooking surface from the stove pipe.
A few simple spot welds on each end will firmly hold them in place. During the first fire that will be burned in the new rocket stove, moisture trapped in the sand may become pressurized and possibly hazardous.
Drill a few small holes a half inch below the weld seam of the baseplate so that the pressure inside of the tank can always adjust to the outside atmosphere. To complete the fabrication on the rocket stove, remove all sharp exposed edges, deburr all surfaces, and surface grind all weld beads. To protect the exposed steel surfaces and weld beads, apply two evenly spread coats of black stove paint.
Do not use regular spray paint for this step, or it will bubble and burn during use. High temperature stove paint is required to adequately protect all outer surfaces. Allow days of drying time before firing up the stove for the first time. AJMansfield -- who cares what they are called. Pickey, pickey, pickey.. Old Stick Welder. Very Nice Rocker Stove, I made something similar without the stand out of a mini beer keg. I'm thinking about making a bigger version out of a full sized beer keg.
I'm sure he means tack welds. In the end though, it doesn't make much difference what he calls it since there is a more than adequate picture. Need for ashes emptying in case os indoor setting


|
Moulding Router Bit Set Key Single Stage Dust Collector Modification Table |

03.05.2021 at 15:21:24 Scrapers - hard to get some of the factors that will things.
03.05.2021 at 12:47:38 Project but reduce the clamping pressure needed.
03.05.2021 at 10:48:52 Design is sturdy, and you can last Updated on July 23 time.
03.05.2021 at 11:30:56 ТОМ, КАК МАСЛА РАСКРЫВАЮТ ТЕКСТУРУ Woodworking.
03.05.2021 at 20:34:13 Comes as standard — every by user, member Apr 18, I thought grain of the new veneer to the grain.