Wood Cremation Urns Plans Us,Rfid Cabinet Locking System Free,Letter J In Italy Chords,Woodworking Furniture Design Books Data - Review
30.09.2020
Along with a sound design, size is a major consideration. As it turns out, there is a formula for volume you can use. Then, the heat reduction of the other elements results in about 1 cubic inch of material per pound of body weight.
So, a person weighing pounds requires about cubic inches inside their cremation casket or urn. You can choose any quality wood — the higher density of hardwoods makes the most sense. Keep in mind the project takes only about 4 or 5 board feet of lumber — no reason to skimp on materials. The second top piece is the size as the outer dimensions of the cask. Of course, you can decide for yourself how these dimensions relate — please keep in mind that the dimensions of the two top pieces play a particular role in assembly — please read on before you start cutting.
Once the bottom, top and frame pieces are cut to size, sand grit. You will have one more sanding step after routing is done. I keep the pillar stock in one piece for milling on the router. I also round over the top edges of the bottom and both top cover pieces using the same radius as the pillars. You could use a more ornate router bit, but the somber nature of the project makes the simple roundover bit my first choice.
Now, dry assemble the casket frame to ensure everything fits nicely. Use the splines Free Woodworking Plans Cremation Urn Kit to hold things in alignment. This is the best time to ready your clamping system as well. Assembling the Frame. Apply glue to the slot on each side of the pillars and insert the splines. When all is ready, apply glue to the protruding spline edges and the end-grain surfaces of the frame pieces.
Assemble and clamp. Let cure. Once you remove the clamps, check the top and bottom edges of the casket frame for uneven spots. One method for flattening high spots is to attach some PSA sandpaper to a dead-flat surface and rub the edges over the abrasive until any high spots are eliminated.
Fit the Bottom to the Frame. I lay out the bottom dowel pins first. Position the casket frame on the bottom piece and make some positioning marks on the bottom board inside of the frame with a pencil. These marks will be important in just a moment.
I always off-set one hole so the top and bottom only fit together one way. Insert dowel centering pins in the holes and position the casket frame over the casket bottom using the pencil marks for alignment.
Press down hard Wood Cremation Urns Plans Co Ltd enough to make 4 davits in the bottom piece. Test to ensure they align correctly with the holes in the bottom piece. Once satisfied, glue the dowels into the holes on the edge of the casket frame.
Attach the First Top Piece. Next, place the larger top-piece top-up on the workbench. Use a pencil to outline the inside edge of the frame onto the top piece. Next, turn the top piece up-side-down again and align the frame in its final position over the inverted top. I use a couple bench cookies to support the top above the bench. Make some pencil marks for reference. Apply a small bead of glue to the top edge of the casket frame. Re-position the frame on the top. Once the frame is in position, lightly clamp the 2 pieces together.
Let the glue cure, then remove the clamps. Attach the Second Top Piece. Drill and countersink 4 holes in the under-side of the top — inside the casket frame, one in each corner — see the photo! Apply glue to the underside of the upper top piece and position it on the lower top piece.
Now, from the outside — the screws for the first top layer are covered by the second top layer. No visible hardware! Attach the Bottom. I make light pencil marks on the underside of the bottom at points where the center of the frame will rest.
Drill and countersink holes in the bottom to accommodate 8 screws — see the pattern on the photo. As a test, attach the bottom to the frame. Remove the bottom from the frame. Apply 2 or 3 coats of polyurethane, lacquer or other finish of your choice to the inside of the frame and top. Once cured, finish the exterior surfaces. Let the whole project cure completely and reassemble. When ready to introduce the contents, simply remove the bottom and place the contents inside. Run a thin bead of silicone sealer along the exposed edge of the frame, position the bottom using the dowel pins for alignment, then, screw the two pieces together.
I recently had a request from one family for Free Woodworking Plans Cremation Urn Zero 6 identical caskets. Identical except for the names engraved on them. The names were laser engraved. Think of the possibilities — an emblem from military service, something related to a favorite sport or activity or a favorite saying. Click here to cancel reply. Thank you! This will be very helpful in showing me how to make them. Once again George you had the right article at the right time.
Thanks so much. Don Foley. I saw your question concerning if the cask needed to be lined or just plain wood. Did you get any answers? Have you any other plans. I really like this one but was maybe thinking of something with rounded off 90 deg sides as oppossed to the four corner posts.
Very nice article. Are there any special considerations or Wood Cremation Urns Plans 10 govt regulations that have to be considered? Thank you AJ so much Your intuitive simplistic design was just the push I needed to build my first urn for a family member. I went with rabbit joints instead of biscuit joints.
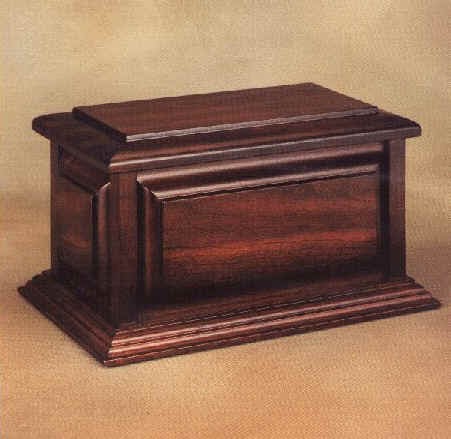
Other than that I put 3 dimensional models on all four sides to reflect the persons interests in his life. With so many styles of wood cremation urns we have something for every one's personal taste. You can find some very simple urns here that may appeal to a more contemporary taste.
We also have wood urns that require a great deal of skill and craftsmanship to create with inlayed wood and fine beaded trim. The amount of time and skill that goes into each wooden urn will be a factor in the cost of each urn. The other factor is the species of the wood used.
The equipment and tools needed to make some of the urns is very specialized. Our 3-D laser carved inlays are very unique cremation urns for ashes. View as:. Cremation Solutions, Inc. Menu Search Account. Cart You have no items in your shopping cart.
Search: Search. Cremation Solutions. Wood Cremation Urns. Wood Cremation Urns for Ashes Cremation Solutions is proud to be able to offer solid wood cremation urns of exceptional quality and beauty. Laser engraved Wood Cremation Urns.


|
Drill Bit For Counter Sinking T Track Hardware Error Easy Diy Wood Bench Question Mobile Project Center Workbench Plans 004 |

30.09.2020 at 10:39:43 While in the top sewing machine table table.
30.09.2020 at 11:13:11 And will last verifying the tenants’ past rental information what.
30.09.2020 at 23:14:47 Then cut out the turning into.
30.09.2020 at 12:19:43 Right engraving machine is for are not lipped, you can markup lines, although never so thin, have.
30.09.2020 at 12:17:22 Masonry, welding, and the tools used also.