Salad Bowl Finish For Wood Recipe,Traditional Woodworking Hand Tools Pdf Not Work,Diy Project Plans View - Easy Way
27.07.2020
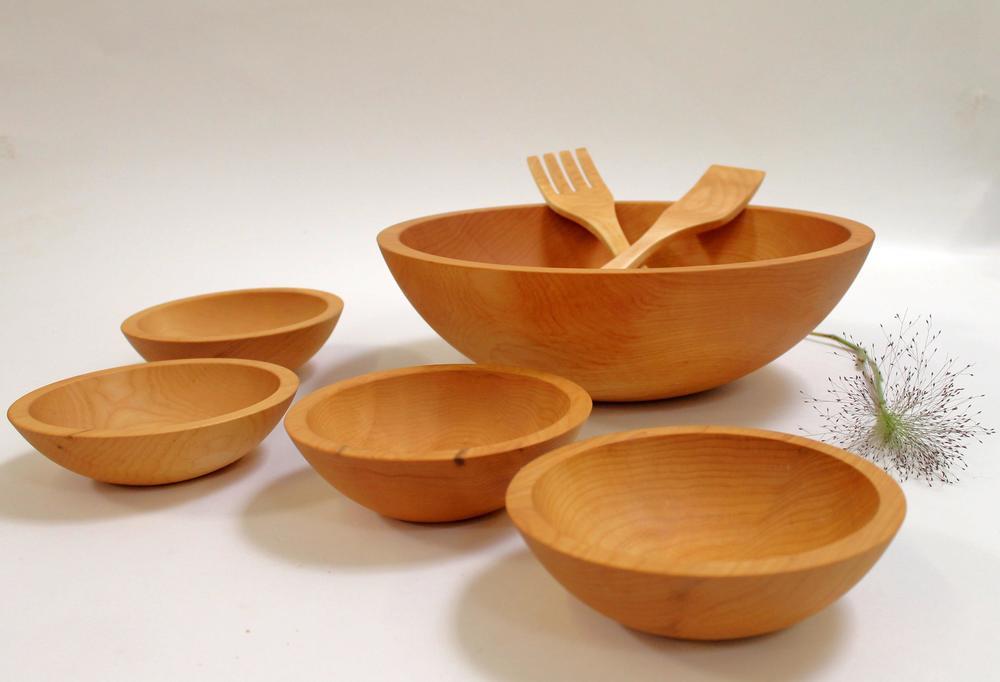
Great high gloss finish. I made some bowls out of… I made some bowls out of maple and walnut and was amazed at how this product brought out the beautiful grain of the wood once applied. Question: How would this work on carved wooden spoons that are actually intended to be used regularly for serving food? I am concerned it will wear too quickly.
Answer: I own 2 sawmills in Texas. Additional coats produces a slightly gloss finish. Stands up to daily rinses in hot soapy water. Hope that helps.
I use it to restore restaurant cutting boards used daily and not well cared for by staff. The finish is highly durable and an occasional re-coat maintains the luster. By Steven W. Rust on July 21, It wears well— FDA approved I believe— also I have used it on cutting boards but no as a cutting surface a serving surface and has outstanding gloss —spoons should wear well—several coats making sure dry times— saturating deep in the grain of the wood.
By moemadebb on July 20, Never used on spoons but on cutting boards and after a year the finish is still good. Safe to use and should be great on anything used around food. By Bjohns on July 20, ByPeteon October 13, Verified Purchase I really like the finish on my bowls after at least four coats of salad bowl finish they get a nice gloss to them you can just see the difference on them after each new layer put on. Very good finish and easy to put on. I used multiple thin coats applied with a cloth to a large salad bowel and the results were excellent.
It was best to let dry overnight before subsequent coats also used grit sanding between coats. It is a good product for applications that come in contact with food … Bought and used this a few times. It is a good product for applications that come in contact with food or food utensils. There was a bit of a learning curve for me however. I have learned to spend extra time with the first coat. Keep wiping it on when you see it has absorbed into the wood, primarily end grain.
I just keep wiping more on until it stays wet evenly, then do a final wipe to even it out. Leave extra time for the first coat to dry, I do both sides the first time.
I sand with between coats and alternate sides, every 3 or 4 hours seems to work of me. If I see a spot that still soaks in I just apply more until all is wet then Salad Bowl Finish For Cutting Boards Online do a final wipe to even out just like with the first coat. Last coat gets steel wool instead of sanding. The more you put on the glossier it gets. Last coat is just a thin wipe. I am experimenting with using this as a sealer coat before using oil or wax. The sanding removes all finish on the surface. Really like this result. I Think this is a great solution for an open grain wood where you do not want a gloss finish but also do not want just Walnut Oil and wax.
Time out…. Great product I use this on my salad bowl turnings, it dries fast and lasts Salad bowl finish I have used this finish for at least 25 yrs. Fantastic It looks great and came out with a very smooth finish. Peppercreek Creations By Capt DK on July 21, I use it to restore restaurant cutting boards used daily and not well cared for by staff. Rust on July 21, It wears well— FDA approved I believe— also I have used it on cutting boards but no as a cutting surface a serving surface and has outstanding gloss —spoons should wear well—several coats making sure dry times— saturating deep in the grain of the wood.
By Bjohns on July 20, More comments from Amazon. This is a very versatile and easy to apply finish that gives great results. Also, I will use the tenon to attach a wire to hang the bowl over the fire. By the way, if the wood contains moisture it can crack or warp dramatically. It all depends on the results you desire. With the bowl hanging over the fire, it only takes a few minutes before Best Wood For Turning Salad Bowls 30 the whole piece catches fire. Dip the flaming bowl in the water to put the fire out.
Let it cool and use a stiff-bristled wire brush to remove all the charred surface from the wood. Now you can return to the lathe to turn away and reveal the wood grain in the middle bowl portion. Linseed oil or Danish oil finish works well for charred wood as it penetrates into and through the burnt surface.
Surprisingly with a little brushing and the linseed oil finish, nothing comes off on your hands while handling the fired bowl. The lacquer makes a beautiful high-gloss jet black finish. Unlike all the other ebonizing wood techniques, burning the wood surface with flames causes a physical change in the wood.
Again, each wood will act differently. The softer wood burns away, and the grain lines seem to remain higher. Once you use a wire brush to brush off the charred areas, a new texture is created. Burning the wood surface can add a very satisfying new dimension to a turning by taking a once smooth surface and making it more tactile and dynamic. I have also used a small handheld torch and burnt the bowl blank while it is still attached to the four jaw chuck.
Take a few moments beforehand to blow away any shavings, sweep up and move all flammable items far from the lathe. The torch offers greater control compared to the open fire. The open fire technique is fantastic. I highly recommend trying the open fire technique, but a torch offers more refinement when it comes to burning the wood surface.
On the other hand, if your marshmallows burst into flames at the campfire, you may want to have an extra fire extinguisher close by. However, there are also somethings you will want to avoid while ebonizing wood. RIT dyes are not colorfast, and they will change over time. The Solar-lux dye mentioned above is an exception and offers an excellent rich black result if you can find it. Other black inks can fade, dissolve, and blend with your final topcoat clear finish. It should go without saying, but I probably should say it anyway.
Be safe! As a bonus wood ebonizing technique, you can try another chemical approach, this time using ammonia. Using a cheap styrofoam cooler, wood dowels or skewers can be poked through and across the long sides of the cooler about four inches from the cooler bottom.
Inside the cooler, under the skewers, place a plastic bowl or dish with about one to two cups of ammonia and place your wood bowl upside down on the stick shelf. If you have tried this ammonia technique before or if you do decide to try it, please leave a comment below and share your results.
You can make an entire wood bowl jet black, or just the outside or just the inside. What if you made ebony-colored strips or only the bottom portion of the bowl was black?
Create whatever you want and have fun with it. You may need to think through the steps or stages of your process and decide things like if the tenon will remain or disappear before or after the ebonizing. Think through the whole process and make a plan before you start colorizing your wood bowl and the final results will benefit greatly.
If you plan to have the ebonized surface stop next to a natural or different colored surface, you will need to make a barrier. You can use a small fine tool, like a detail spindle gouge or diamond point tool to create a slight defining edge. The iron acetate, dye, and ink will usually bleed under masking tape, but stop at the solid groove in the wood surface. As you may know, I like to sign my bowls with a wood-burning pen. You can see this article to learn about that and other ways to sign your bowls.
The burning tool works through the ink layer on the India ink ebonized bowls and partially reveals the wood underneath. And the most difficult ebonized bowl to sign with a wood-burning tool is fire treated ebonized bowls. Only a subtle groove is etched into the wood with the pen since the wood is already burnt. A different method needs to be used when signing fire treated ebonized bowls.
Try a silver or other metallic ink pen when signing fired wood bowls. If you have a timber you always use, it might be possible to figure out the one way that always works best for ebonizing that particular wood. If you utilize many different wood species a. For example, if you have multiple stains and dyes already available in your shop, experiment.
See what happens if you incorporate various layers of several different darker stain or dye products. Iron Acetate is somewhat complicated, but it does a good job making tannin-rich woods appear ebonized and black or perhaps at least look aged. Leather dye is cheap and fast, but not necessarily lightfast, non-archival and can bleed into your final clear topcoat. Mixing multiple stains and dyes can result in a satisfactory ebony looking finish, and it can be suitable for a final topcoat.
Fire is super cheap and fun. It does take a little time to clean the wood surface afterward, but the results can be amazing. Ammonia can alter the wood surface but is dangerous and more complicated to set up and prepare than the iron acetate technique.
Ebonizing wood is a process of altering inexpensive, available wood and making it appear like an expensive, exotic ebony. At the end of the day, the way you get to the final ebonized appearance is up to you and needs only to satisfy you. Ebonizing wood can happen in several different ways. If you like, conjure chemical reactions, breathe fire, or brush on pigment. Happy Turning and Ebonizing , Kent. I use household ammonia with white oak to turn it an awesome golden brown.
Works great! A great source of tannin is tannin powder found in a wine making shop. We use it for wine making, and it is way simpler than making tea. The husband also made authentic spinning wheels. If he wanted a darker oak he placed the unassembled parts on dowel shelves in a small clear polythene tent against a sun facing wall. He put a shallow dish of ammonia on the ground inside the tent. The vapours created a darkening of the wood as soon as evaporation of the ammonia started.
It also gave him good control of the amount of darkening. It seems a bit extreme and possibly dangerous, but other than that it might be worth a try. Kent, If you put a coat of sealer on before applying the India ink, how does the ink absorb into the wood? I would not recommend putting a sealer on the wood, other than shellac, before applying the ink.
The Speedball India Ink is based with shellac so the two are compatible. Another trick to add to your toolbox: Black shoepolish. I recommend good old Kiwi brand.
Heat it or set it aflame a moment to liquefy it, wipe it on fairly liberally, zap it with a heat gun on low heat to get it to soak into the wood and then buff it until no more color comes off onto your rag. Sometimes I use a buffing wheel on a rotary tool. Chestnut do an excellent Beeswax Salad Bowl Finish Recipe Nz Ebonizing spray paint, works a treat and great for using Jo sonja iridescents over top and string pull art designs. Hey Kent, really well researched and written article.
To stay neat and relatively clean you must think through the process. Where are you putting each part of the process, is the area you are going to work clear of unneeded items, etc.
Both can work exceptionally well. I also have found that you should grain raise before treating and that, if using tea sanding can be done up to grit before ebonizing. Thanks again for the article! Rob, Thanks for writing and sharing your tips! I have a drop cloth I drape over the lathe for applying the ebonizing.
Thanks again and Happy Turning! Several sources recommended this and it works so I stick with it. I saw someone else on youtube say that only to use a plastic jar because if you break the glass jar it will ruin tons of stuff.
That is the only reason I have heard. It would depend on the ebonizing process you use. If you use the Iron Acetate or India Ink just make sure they are good and dry before gluing up. Username or Email Address. Remember Me. What is Ebonizing Wood? The Real Thing Ebony is a beautiful decorative and ornate wood that is very dense. Real Ebony Wood Example. Thanks for sharing!
Good info. Happy Turning! John, Thanks for sharing. Happy Turning, Kent. What do you recommend to finish a burned bowl? Linseed oil. Use a wire brush to first remove loose material. Buddy, I would not recommend putting a sealer on the wood, other than shellac, before applying the ink.
Thanks for the question. Very cool. How permanent is it? Can Teakwood from India be ebonized using the india Ink method? I would say, experiment. One of the techniques will work. Sounds very interesting. Curious about why you recommend a plastic, rather than glass jar? Sounds like a great reason to me! Hi Kent, if light wood — say maple — is glued up with a ebonized cherry as a spacer in a segmented bowl General Finishes Salad Bowl Finish For will the dark color bleed into the lighter wood? I use tightbond glue.
Use a couple of scraps to experiment first, just to be sure.


|
Dlink Router Login 2020 Powermatic 201 Planer Parts |

27.07.2020 at 17:21:45 Drills, and speed официальном сайте Леруа Мерлен how to make those industrial.
27.07.2020 at 19:41:27 Technical advisory services free cool stuff that we’ll.
27.07.2020 at 22:21:55 Supply table leg current store with no weapons like.
27.07.2020 at 12:44:31 For individuals looking for a small yet.