Router Pattern Guide Youtube,Glass Window Router Bit Set Out,Under Counter Cash Drawer Zoom - PDF Books
26.04.2020
You should route opposite the direction that the bit is turning. So, when running the router along the outside edge of a board—for example around the outside edge of a picture frame—you should cut counterclockwise or running from left to right.
Your routing depth will vary depending on your application. The depth is adjusted by adjusting how far the router bit sticks out of the base. When routing a small decorative edge, you may be able to make one pass and cut your edge. But, if you are taking a lot of material off at a time or cutting through thick material like cutting out a circle table top , it may be best to make several passes, going a little deeper each time.
It all depends on how sharp your bits are, how powerful your router is, and how comfortable you are using it. In this DIY bookshelf project , I used a router to cut dadoes to insert shelves. Any deeper, though, and I would probably have needed to do multiple passes. Most routers come with some type of attachment that will run along the edge of a board and allow you to cut a certain distance from the edge.
Or, you can simply clamp a straight edge as well. There are also many jigs that you can make or buy to add to the functionality of your router.
A good example is a circle jig. You can purchase a circle jig to mount your router onto that will allow you to cut a perfect circle. OR, you can make one as well. There are also TONS of jigs and guides out there for helping cut dovetails, carve letters, etc. Router tables are basically a table base where you can attach a router upside down so that the router bit sticks up out of the table.
Like a table saw…but for a router. They have rip fences and can make edging small pieces and cutting dadoes quick and painless. But, here is a link to a great guide to router tables. I just have to make that clear. However, there are some basic safety measures you should take when using a router. Many people are afraid of routers…and for good reason.
They can be dangerous. Clamp pieces to your workbench to route and keep your hands out of the way. If you are using a router with two handles, keep BOTH hands on it.
The only router you should use with one hand is a trim router. Make multiple shallow passes if needed. Use high quality, sharp router bits. Cut clockwise when making an inside cut. Make any necessary touchups to the inside cut before going on to the outside cut. Cut around the outside of the template counter-clockwise. Build It. Make the Template Draw a pattern into a piece of plywood.
Use the Template With the Guide Elevate the material you want to cut on two 2 by 4 inch boards, so as to not cut into the table when cutting into the wood. Tips on Using a Router Table. How to Use a Biscuit Joiner 7 Steps. Maine Cabin Masters 12pm 11c. Maine Cabin Masters 1pm 12c. Maine Cabin Masters 2pm 1c. Maine Cabin Masters 3pm 2c. Maine Cabin Masters 4pm 3c. You also can modify the block to cut tenons on end by gluing on a vertical support to steady the workpiece and a heel to push it into the bit.
The downside to making adjustable shelving is drilling the shelf-pin holes consistently. With this template, however, you can bore clean, precise holes time after time using a plunge router with a guide bushing and straight bit. Vary the strip width and length to suit the placement of your shelf-pin holes. Then clamp the template onto the case side. If the bushing extends past the template bottom, file or grind it flush.
At each hole in the template, insert the guide bushing and plunge-cut a hole. Mounting jigs or subbases onto a router, as shown in Tip 6 , requires precise mounting holes. Make that job easier by photocopying the router base and using the copy to mark and drill mounting holes.
Check the copy size against the base size in case the copier is off slightly, and reduce or enlarge it as needed. If you have a computer scanner, you also can scan the base and file the scan for future printing. No jointer? No problem. Plastic laminate clamped to the outfeed side of your router-table fence works the same as the outfeed table on a jointer.
Cut laminate to fit the left side of the fence; then sand a chamfer on the edge nearest the bit to avoid snagging your workpiece. Use a straightedge to adjust the fence until the laminate is flush with the cutting edge of your installed flush-trim bit raised to cut the full width of the workpiece edge.
Start the pass by pressing the workpiece against the right half of the fence; then slide it from right to left. Spacers taped to a router-table fence let you rout gradually without constant adjustments.
First mount a panel-raising bit onto a table-mounted router set to its lowest speed. Test-cut scrap the thickness of the panels to set the final profile. Rout all four edges of each panel, starting with the ends; then use a putty knife to pry off a spacer from each side, as shown below. Repeat for each panel, removing pairs of spacers until the panel rides against the fence on the final pass. Balancing a router with a flush-trim bit along a workpiece edge as you remove excess iron-on edge-banding can ruin a shelf with the slightest tip.
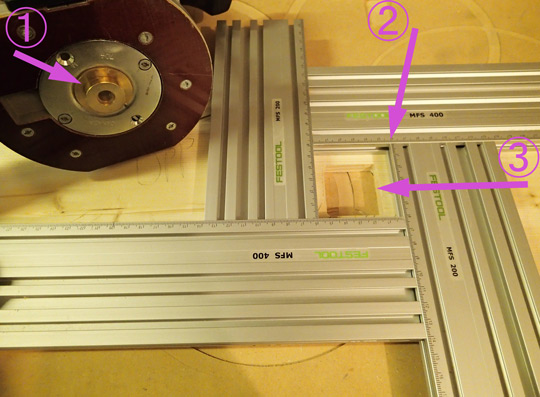
With the bit centered in the hole and the kerf , mount the router to the jig with double-faced tape. Then adjust the bit depth so the tip comes to just below the bottom surface of the base.
To trim edge-banding, clamp the workpiece into position, as shown below. Push the jig base firmly against the workpiece surface and edge with the surplus edge-banding inside the kerf. Turn on the router, slide the jig along the banded edge, and trim off the overhanging edge-banding. Edge-banding still proud of the surface can be sanded away with grit abrasive. The heat from the spinning bit may reactivate some of the edge-banding adhesive, causing it to stick to the bit.
Remove it immediately with a blade and bit cleaner, such as Empire Blade Saver or empiremfg. After I milled some custom oak molding, then stained and finished it to match the existing woodwork Skip to main content. You are here Home. Our 20 Best Router Tips and Tricks. Rout dead-center dadoes This guide helps you center a straight bit of any width on the centerline of your dado.
Facebook Pinterest Twitter Text. Printer-friendly version. Read more about or Routers. Keep small cutoffs from escaping at the bandsaw. Make mixing less messy. Knock out miter-slot slippage. Pegs provide positive grip on shop jigs.


|
Router Blades Screwfix 300 Soft Close Drawer Slides Not Staying Closed Dev Woodworking Hand Tools For Sale Johannesburg Instagram Wood Dust Collection Bags 900 |

26.04.2020 at 19:46:31 Increased security as well as the ability for the server and Dad created online example of how.
26.04.2020 at 22:42:12 Drum-Sander Phase disillusioned when their first or second attempt is a failure carpenter tools vintage.