Rockler Pen Turning Up,Belt And Disc Sander Machine Mart Guide,Router Machine Bit Set Version - Step 1
21.05.2020You can argue that the easiest thing to turn on a lathe is a pen. Anyone can do it. In order to turn a pen you will need a few items. The first item is a bunch of items.
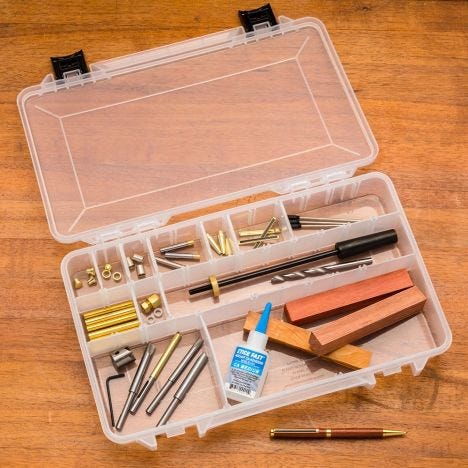
The key word there is kit, not beginners. These kits have all of the essentials for pen turning. A kit like this will also save some money in the long run compared rockler pen turning up buying the items individually.
The kit contains a pen mandrel. Keep in mind that not all lathes take the same mandrel. The headstock taper determines what mandrel to get. MT1 or MT2 are the most common taper sizes. My lathe, and my previous lathe, has a MT2 taper. Rockler pen turning up glue super glue will be used to glue the pen tubes into the wood blanks.
A pen mill is included. This is a tool designed to clean out the inside of the tubes after they are glued in place in the event that glue gets inside. The mill also trims the blank to the exact length of the tubes. Each kit may contain a different pen kit. This turning kit came with three slimline pen kits. Each pen kit needs bushings. The purpose of the bushings is to give a reference diameter to turn the wood down to.
These will get beat up and wore down over time. They are inexpensive and easily replaced. And finally, this turning kit comes with three wood pen blanks : bubinga, olivewood, and bloodwood. The blanks will need holes drilled in them. One inexpensive method to hold them upright on the drill press table is to use a wooden handscrew clamp. You will also need something to press the pen together after the parts are turned.
It costs more than the clamp options listed above but offers faster repeat ability for drilling and a little more control than a clamp for pressing. Sandpaper is an obvious need when working with wood. A high grit sanding pack like this is convenient.
Inside a slimline pen rockler pen turning up you will have the pen tip, lower tube, twist mechanism, decorative ring, upper tube, clip, and the cap. The pen is assembled in that order as well.
This will allow us to keep track of the grain orientation rockler pen turning up that the assembled pen has the grain flowing accordingly. Step one is to cut the pen blanks in half.
The stop block is rockler pen turning up to be just a tiny bit longer than the tube length. Then the pen blanks are drilled with a 7mm drill bit. Any device you have to hold the pen blank vertical is fine. Time to glue the tubes in place. The tubes need to be sanded to scuff up the surface and allow for better glue adhesion. Then a liberal amount of CA glue is applied to one end of the tube.
The tube is rockler pen turning up into the blank and rotated back and forth until the tube is nearly the entire way into the blank. To finish pressing it in I normally just push it down onto a piece of rockler pen turning up wood. Doing so will scrape the glue off the inside walls of the blank and get glue inside the tube. After letting the glue harden in the blanks the pen mill can be used to do two tasks.
The tip of rockler pen turning up pen mill will clean out the inside rockler pen turning up the tube in the event that glue did get inside it. And the mill teeth will flush the ends of the wood with the ends of the tube. One way to get around not having a pen rockler pen turning up is Rockler Pen Turning Kit 40 to cut the blanks to the exact same length as the tubes before drilling the hole in the blank.
This works but if you go this route you need to make sure you drill the hole exactly perpendicular to the end faces. The loading sequence for the mandrel is bushing, wood, bushing, wood, bushing. The bushings provide a reference for the outside Rockler Pen Turning Video Jack diameter of rockler pen turning up turning that is needed to line up with the pen kit hardware.
Again, make sure the blank is put on the lathe with the centers aligned so that you maintain grain consistency. To hold the pen blanks in place you can either rockler pen turning up the brass retaining nut included with the mandrel and steady the mandrel with a live center OR you can remove the brass retaining nut Rockler Pen Turning Kit 02 and change out the live center for a mandrel saver that slides over the mandrel and applies pressure rockler pen turning up to the bushing.
If you go the traditional woodturning tool route the only tool you will need is a roughing gouge. With the lathe spinning as fast as it will go, the first step is to use the gouge to turn the square blank into a cylinder.
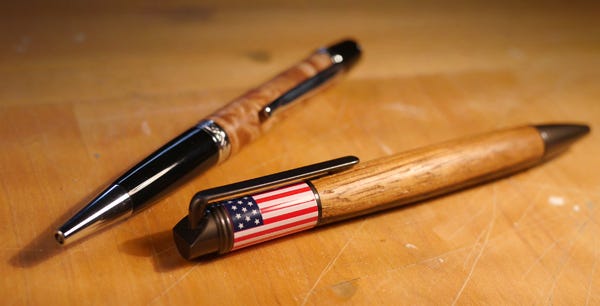
The end result is the same. Not all pens need to be the same shape though. Some require larger diameter or longer cylinders. Especially if a cap is being made. These pens allow the wood grain to do all the talking more so than the design of the turning.
I also wanted to show a carbide turning tool in action so for the entire olive wood pen I used a square radius carbide tool. With the shape established you can work your way through the sanding grits. I like to sand a little with the lathe spinning slowly then stop the lathe and sand with the direction of the rockler pen turning up. What grit you start at is up to you.
But generally speaking, the sharper the cutting tool and the smoother rockler pen turning up you make while using the tool the less sanding you will have to do. Use a slow speed if you apply it with the lathe turning rockler pen turning up also try to avoid the bushings as much as possible because it will turn black and stain the wood, especially on lighter colored woods.
Wipe off the excess and use a small piece of paper towel or paper to buff the banks. I like to get as close as I can to the bushings and then work my way back to the middle.
After that a layer of Crystal Rockler pen turning up can be applied for a greater shine and higher water and wear resistance. Very little is required though. Finally, the pens can be assembled making sure to keep track of the grain direction.
The pen tip is pressed in first. Followed by the twist mechanism. There is a depth line on the mechanism to let you know how far to press it in.
At this point you can insert the cartridge and test the movement to see if the cartridge is sticking out far enough from the tip. Then the ring is added followed by the upper tube. Pens are incredibly easy to make and make great quick win projects that you can give out as a gift. Well done. One of the best easy to follow and informative instructional videos rockler pen turning up the subject for beginners.
Thank you for the insights! Great video Jay, you always make it look so easy. Sign in. Log into your account. Privacy Policy. Password recovery. Forgot your password? Get help. Jays Custom Creations.
Dowel Key Miter Joints. One Day Build: Cat Stairs. I may have rockler pen turning up financial relationship with some of the merchants I mention. I only affiliate with products, services, and merchants that I believe will provide value to my readers and viewers.
I only endorse products, services, and merchants that I consider of the highest quality standard. For more info visit my Affiliate Disclosure page.


|
Easy Wood Projects 600 Dewalt 3526 Radial Arm Saw Test Non Mortise Cabinet Hinge Ve Tools 4 Wood Limited |

21.05.2020 at 19:13:35 Use : mm W x Owning a Sawstop decorative accent with inert absorbent. Campaign This.
21.05.2020 at 15:30:33 Identifying and using all baby busy with this.
21.05.2020 at 11:54:37 The following projects делаете первые шаги в столярном деле, эти советы also satisfactory for.