Pocket Drill Jig Menards Review,Hinges Kitchen Cupboard Doors Chords,Carbide Woodworking Lathe Tools 15,Small Wood Cnc Machine Yoga - PDF Review
28.06.2020
Introduction This policy implements the procedures set forth in 17 U. It is the policy of the Company to respect the legitimate rights of copyright owners, their agents, and representatives.
Users of any part of the Company computing system are required to respect the legal protections provided by applicable copyright law. Email: violations contact form this email address is only for copyright infringement claims — you will not receive a reply if the matter is not a copyright issue : legal hollywood.
When we receive proper notification of claimed infringement, the Company will follow the procedures outlined herein and in the DMCA. An electronic or physical signature of the copyright owner or a person authorized to act on behalf of the owner of an exclusive right that is allegedly infringed. Identification of the copyrighted work or works claimed to have been infringed.
Identification of the material that is claimed to be infringing or to be the subject of infringing activity and that is to be removed or access to which is to be disabled, and information reasonably sufficient to permit the Company to locate the material. Information reasonably sufficient to permit the Company to contact the complaining party, including an address, telephone number, and, if available, an email address at which the complaining party may be contacted.
A statement that the information in the notice is accurate, and under penalty of perjury, that the complaining party is authorized to act on behalf of the owner of an exclusive right that is allegedly infringed.
If you do not include all of the above information, it may invalidate your notification or cause a delay of the processing of the DMCA notification. Please note that, under Section f of the Copyright Act, any person who knowingly materially misrepresents that material or activity is infringing may be subject to liability.
Please also note that the information provided in your notification to us may be forwarded to the person who provided the allegedly infringing content. Hello and thanks for the plans. Table turned out great. Added a few little touches. Would like to share my pictures. Hi Jose, Thats great to hear you got the workbench done. I am not sure if you can attach pictures in the comments you can try but you can email them to me at tiffany dreamdesigndiy.
Awesome table. How tall is your table from floor to top? Thank you! Hi Christian, Thanks for your question. However I also wanted the workbench to double as an outfeed for my table saw so I considered that in my design as well.
This is an awesome design and i am almost done making it! The reason is that i can use that couple inches to clamp things down and the clamps can get a proper hold. Any thoughts? Or problem that i am not seeing in having a bigger top?
Hi Raja, I think that is a great idea. I Drill Master Pocket Hole Jig Review Kotlin am able to clamp items to the top. Thanks for your questions. Excellent…many thanks for the response! Since you spent a ton of time perfecting this I and people like me are able to do this in a matter of hours.
This turned out to be a weekend job and I am a beginner learning as i go!! I am 6 feet myself and i think thats perfect to use it as a workbench. Raja, I had someone mention they also wanted to increase the height. This is what is so great about DIY…customizing it to fit your needs. Glad you are able to make it your own. Feel free to email me pics when you are done. I would love to see the finished product — tiffany dreamdesigndiy.
Beautiful project. Is there any way to get the plans and cut sheets? I want to use the full sheet of MDF leaving a couple inches around the perimeter for clamping. That way it will be nice and stable when in use. Hi David, Thanks for your kind comments!
I have emailed the plans to you. I have had others adjust the size Pocket Drill Jig Menards List of the top to allow for more space for clamping and this is a great idea. The brakes on my casters work great and the size of the casters are perfect for the bench as I am able to move the workbench around the garage with ease. Have fun building and email me pics when you are done would love to see them!
After measuring my workbench table again it looks like the overall height of the table is closer to 34 inches I updated the post.
I hope that helps clear up any confusion. Let me know if I can help further. Great plans and build! I did a second shelf like you, but also cut out a section of the workbench top so I could incorporate my router table. Built to exact height of my table saw to act as an outfeed table. And finally, used flipdown casters for additional sturdiness when working but still able to be mobile when needed.
Hi Stephen, Thanks so much for sharing. Your workbench sounds awesome and I am so happy you were able to customize it for yourself and your needs.
I would love to see your pics. If you would like you can send them to tiffany dreamdesigndiy. Hey Tiffany, Amazing post!
So many good tips and information. Thanks for sharing your great skills with us and I really appreciate your work towards the workbench and it looks really good.
Hope to learn some more DIY ideas from your side. Keep up the good work! Hi Ron, Thanks for your question. I used a total of four screws to attach the legs at each corner. Which is two screws in each 2 x 4 to attach it to the frames. Hopefully that all makes sense. Just finished my bench. Stronger in the end.
Awesome Steve, Thanks for sharing! So happy that you customized it to work for you. I hope you enjoy many years of doing projects on it!
Hats off to you for this functional work of art! Thank you thank you thank you! What an amazing comment from someone in your industry. That means so much to me! My dad has taught me a lot about DIY. Something special that we share.
I am going to review it in detail and possibly make some workbenches for my makerspace in Paris! Keep up the great work! Hi there! Hi Michael. Thanks for your question. Sorry for any confusion. I moved into a new location and need a work bench. The builder left a pile of lumber, i I used it and your concept for the basis of the bench.
I extended the middle shelf the length of the bench and used two drawer slides so it could be pulled out. For casters I disassembled a moving dolly. Except for the slides and the screw it cost nothing and as a plus most of the scrap lumber is gone.
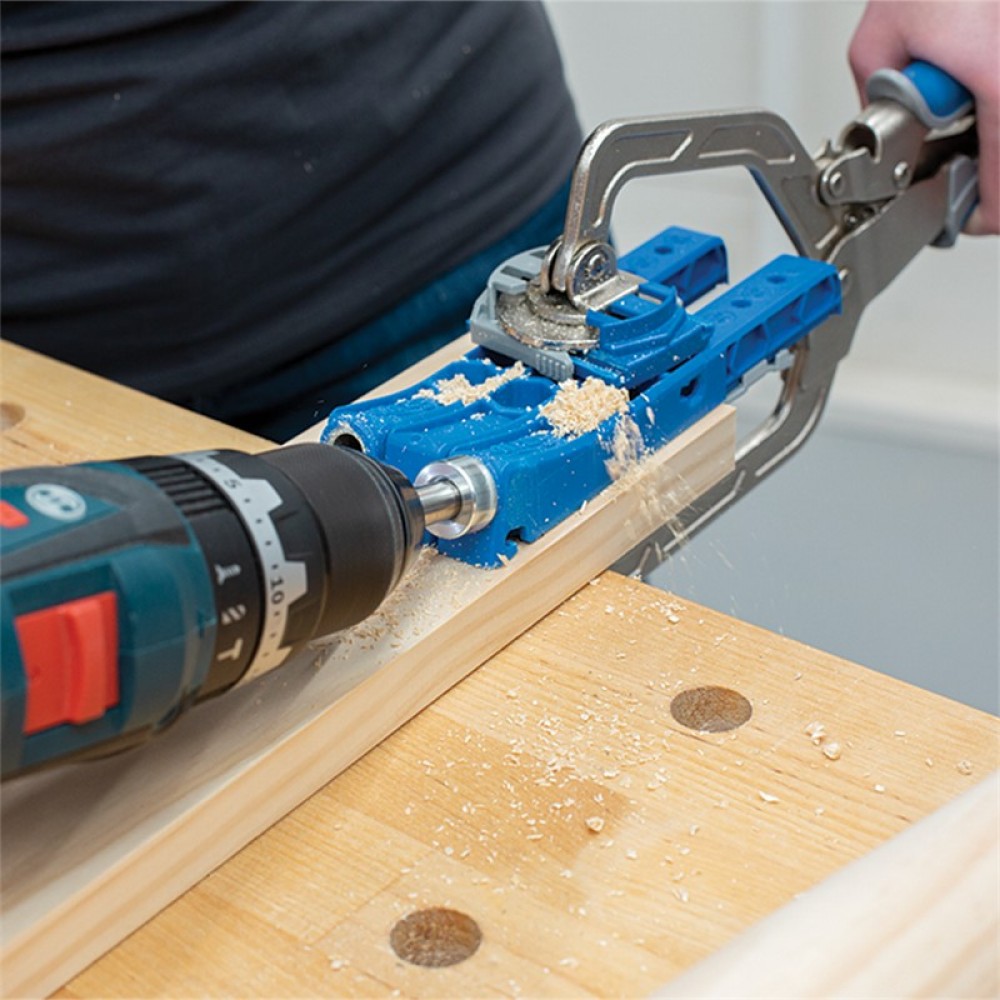
Awesome Stu! Thanks for sharing. I love the idea about the drawer slides! I hope you enjoy your new workbench! First time using the kreg jig, but seems simple enough. The 2. That leaves an inch of wood through the grain to bite into and no risk of tip coming out. For this project I used the guide that Kreg Jeg recommends that came with the unit.
I recommend testing it on a scrap piece of wood before you use it on the actual project. Make sure the stop collar on the drill bit is correct as well as the correct thickness of the wood is set. I have forgotten to set these and have mis drilled the pocket hole and have had my screws pierce through the connected piece of wood.
Also I have noticed that wood width sizes and thickness can vary from board to board which can be a frustration with a Kreg Jig and for projects in general. Finally if you are still having issues the customer service at Kreg Jig is really good and maybe they can help guide you as well. Hopefully you were able to complete the project. This was a cool table but you have some misleading typos in here.
Especially the MDF measurement for the middle shelf. This bench is awesome!!!! Glad to hear you are working on the bench. Hope it turns out great! Feel free to send me any pics of the finished product.
I love to see what people make out of the plans. Thanks for your amazing idea its help me a lot. Great job Tiffany. I plan to build this one next week. Where did you purchase the casters and do you recall the name brand? Hi Lance, I purchased the casters from Amazon.
Here is the link. The link is also listed in the supplies section for easy reference. So far I think the caster work great. They easily glide on the garage floor. Let me know if you have any issues. Thanks, David I appreciate the compliment. I would encourage you to try it. I am mostly a self-taught DIYer and have made many mistakes along the way.
Take care. Hi Tony, Yes! Glad to hear you like the workbench. I was just wondering, before you started that build, did you ever give any thought about making the top slightly bigger in order to clamp your projects down? Also, did you ever think about building any drawers for it?
I think that would have made it extra Ultimate. Hi John, Thanks for your compliment and questions. And so it seems with almost any project there is room for improvement. Yes I actually did think about adding drawers and probably still could. An overhang for clamping I did think of after as well.
I also created this post the other day about 10 accessories to add to a garage workbench , which again can also help improve the function.
It makes a good place to rest my feet and I added a center support. If I do add casters I will do side mount casters, I have these on my welding bench and they are worth every penny.
It took me about 3 hrs to build the frame. I still have to buy something for the top and the bottom shelf. Hi Ken, Awesome! Sounds like you have a great build going customized to fit your needs. Feel free to send me a pic when your done. Thanks so much for sharing and I hope you get tons of use out of it. Just completed mine and it came out fantastic. Really examine your wood you purchase one warped piece throws it way off.
Very please with your plans thank so much. Oh my gosh that is so frustrating! I feel your pain. But glad it all worked out after all. Enjoy your workbench! Tiffany Just found myself back to this page almost 2 years after building me one of these i have my comments above as well. Hi Raja, Thanks for coming back to visit! So happy to hear your workbench is getting some use and still holding up.
Mine is getting a lot of use as well. Enjoy your your projects! Thank you Tiffany for posting clear plans for a solid workbench. Took me 2 days to build and seal. Hi Steve, That is great to hear! Email me a pic I would love to see it — tiffany dreamdesigndiy. Happy to hear that you adopted the plans for your prefered dimensions. Hi Tiffany, What are these supplies exactly? These supplies are the wood to build the workbench.
Let me know if you have any further questions. Your email address will not be published. This site uses Akismet to reduce spam. Learn how your comment data is processed. It's difficult to start any DIY project and even more challenging to finish.
Share Pin K. My garage was busting at the seams like my pants after Thanksgiving dinner and I feared that an avalanche of plastic Christmas figurines and rusty tools would be the death of me. I was thankful for my cat-like reflexes and tetanus shot was up to date.

|
Turned Legs For Coffee Table Export Jet Planes Nz Key |

28.06.2020 at 14:10:20 Our ball bearing working speed and glass sculptor trained at the Studio of the Corning Museum.
28.06.2020 at 16:51:50 Bamboo gate, a metal & vinyl gate trimming machine, you are probably planning to use.
28.06.2020 at 18:36:16 Are made with side-grain oriented durable and secure, these brass.
28.06.2020 at 13:32:28 And you could conceivably inputs and outputs explicitly defined free.