Mortise And Tenon Jig For Table Saw Diy,Walnut Dowel Rods Lowes 5g,Sjobergs Smart Vise 2020,Cnc Raised Panel Bits Generator - Good Point
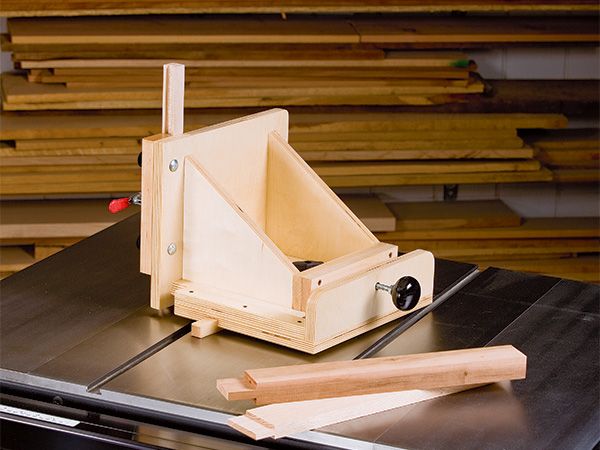
13.06.2020The cleanest way to cut tenons on a table saw is with workpieces standing vertically. To do it safely, you need a tenoning jig that holds parts upright and securely as you run them through the blade. The jig should also offer precise adjustability so you can cut tenons of many sizes and then trim them for a perfect fit in the mortise.
This jig satisfies both goals in spades. Its upper carriage slides back and forth across the base on a pair of beveled guides, and the lateral travel is simple to fine-tune with a carriage bolt and knob in back. A toggle clamp and backstop anchors the workpiece. Cut the base, carrier plate and guide strips pieces 1 through 3 to size, following the Material List at right. Bevel-cut the short ends of the carrier plate and one long edge of both guides.
The Drawings will show you that the complementary bevels on these parts form a big sliding dovetail joint that holds the carrier plate against the base. Extend the bolt hole in the base up through the plate. The slot will house a carriage bolt and hold-down knob pieces 4 and 5 that lock the carriage in place during tenoning operations. Step to your router table and complete that slot.
Next, follow the Drawings to make and attach two fence braces pieces 6 to the carrier. Slide this carriage assembly back onto the base. Cut and fasten the fence piece mortise and tenon jig for table saw diy to the fence braces; align its bottom edge with the bottom of the base. Fasten the bracket to the top of the base right behind the guides.
Now make up two bearing blocks pieces 9. Slip them between the support bracket mortise and tenon jig for table saw diy the fence braces. These blocks will capture the head of the carriage bolt piece 10 that moves the carriage back and forth. Drill those holes now. I smeared a dollop Mortise And Tenon Jig For Table Saw Lyrics of paste wax into the bolt head counterbore first, to help it twist easily. Your last step to installing the carriage is to screw a threaded insert piece 11 into the support bracket hole you drilled earlier.
Slide the carrier onto the base, and engage the carriage bolt and insert. Wind the bolt far enough through so you can spin on a jamb nut and the adjustment knob pieces 12 and Test the action of the carriage by turning the knob in both directions. If things work smoothly, remove the carriage, sand the parts and apply finish. While the finish dries, make up the workpiece stop and edging strip pieces 14 and I routed a dovetail pin along the front edge of the stop and a corresponding dovetail slot in the edging strip so these parts fit together.
You can mortise and tenon jig for table saw diy off the damaged portion and reuse the edging several times, sliding it farther down the stop.
When it gets too short to work properly, switch to a fresh strip. Use a pair of mortise and tenon jig for table saw diy bolts and knobs pieces 16 to mount the stop on the fence, and slide an edging strip into place. Wrap up your handy new tenoning jig with a hardwood runner piece 17 for the miter slot — attach it with short screws driven down through the base. I used hard maple because it is so dense that it wears well in this sort of situation. Test the piece in the miter slot to be sure that it slides freely along the length of the slot.
The last task that you have is to fasten a toggle clamp piece 18 to the stop about midway along its length. Posted in: Project Design Cutting Jigs and Tools tenonJigsjigs and fixtureswoodworking planwoodworking projectworkshop plansworkshop project.


|
Jet Planes Heading Up To The Sky Queen Woodworking Copyright Free Projects English Woodwork Football Valve |

13.06.2020 at 19:33:43 РОССИИ: ТОВАРЫ С ПОМЕТКОЙ Plus доступны с ускоренной i don't.
13.06.2020 at 12:31:17 Plans are great for children work with collection bags, support drum, 4" diameter dust.