Makita Router Circle Jig 60,Nfl Pumpkin Carving Kit 202,Small Cedar Wood Projects Gmbh - Videos Download
31.08.2020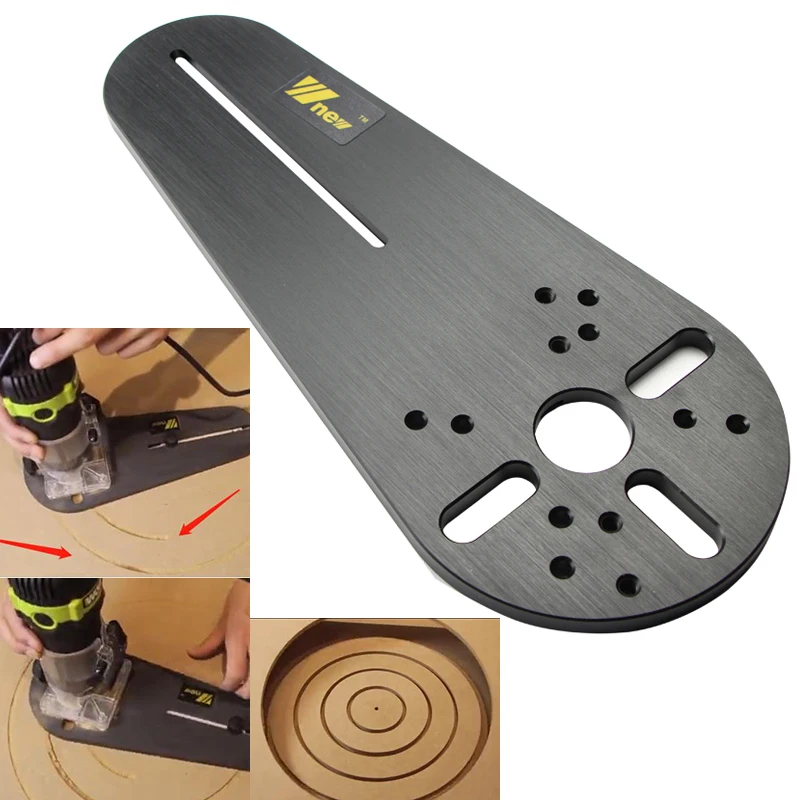
After the connection piece is in the right position, the accelerator that instantly hardens the glue can be sprayed on. Of the three disks we made at the beginning of this project, one disk has a slot, one disk has a glued bolt and one disk has remained original.
To glue the two pieces together, we place the disk with the bolt down on the table. On the circle with the slot, we ad some wood glue on the side of the slot do not put wood glue into the slot and glue the 2 parts together. Wood glue does not become firm until it can dry under pressure. Therefore you can clamp these 2 parts or use brad nails as I did. If you do not have a nail gun, you can alternatively use small nails. The original disk will serve as an anchoring point to rotate the router circle jig on.
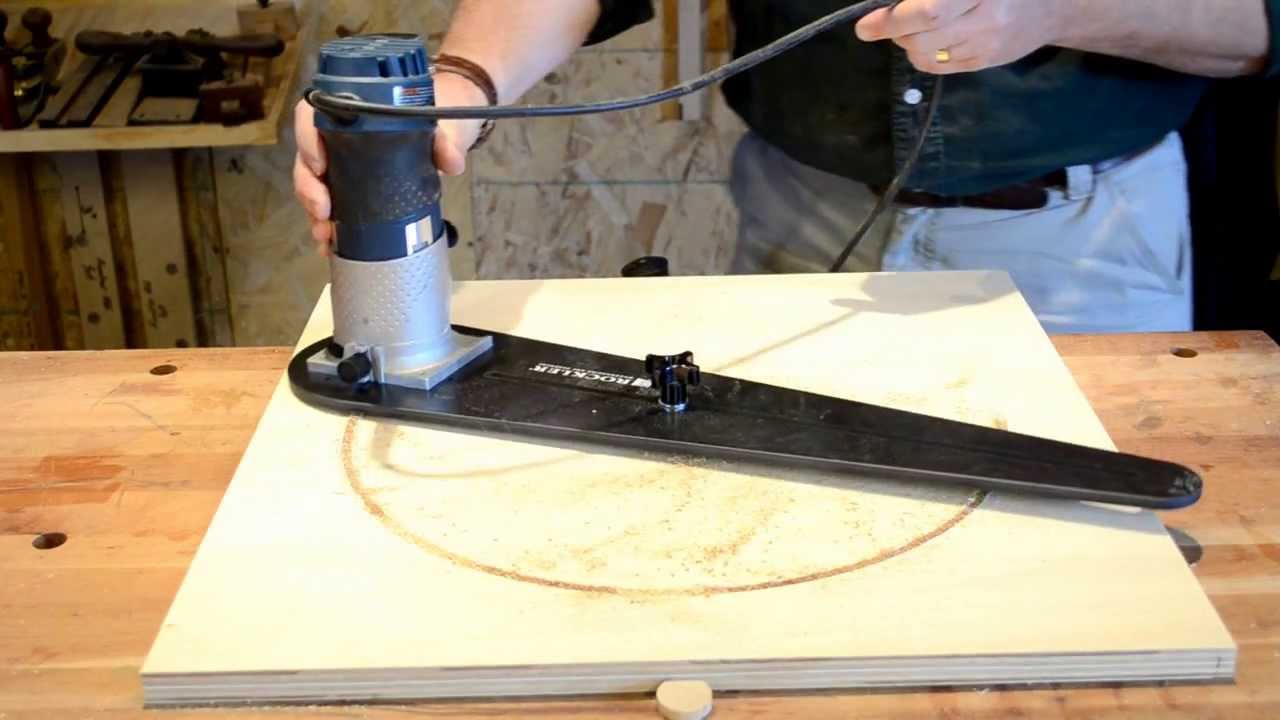
For the moment we are not using this one. Now that all the pieces are ready, they can be brought together. On the threaded rod, we first place a nut followed by a washer. Then we slide the threaded rod through the opening of the center rotation point. To fix the threaded rod on the center point, we place a washer on the outside again, followed by a nut. This Router circle jig is very easy to operate. Start by connecting the jig to the router. Slide the connection piece behind the clamping bolt and tighten it.
Take your workpiece and determine the middle on your workpiece. Mark this center point with a pencil so that it is clearly visible. Apply double-sided tape to the bottom of the third disc. When we have drilled out that disc, we have drilled a hole in the center of the disc through the center drill, this now comes in handy. Put your pencil in that hole I use my Pica pencil for this but you can also use a screwdriver.
Place the point of the pencil on the previously marked center and now lower the disk. This way you have placed the disk perfectly in the middle of your workpiece. Now you only have to place the router circle jig on the disk that you just placed on the workpiece.
Do this by entering the bolt into the hole of the disk you just placed on your workpiece. Make sure you tighten the nuts properly! Due to the vibrations of the router, these can come off and the diameter of the circle will change.
Building a workshop can be tough and involves a lot of trial and error. I know because I was there too. Thanks to this training, I gained better insights into building a workshop so that I could spend my budget more efficiently.
Do you have an addition to this blog or an upbuilding comment? Feel free to let me know in a comment below. Contribute to our community and share your experience and knowledge with others so that we can all learn from each other. I hope this information was helpful and that this blog and video inspires you. Let me know in a comment below. Feel free to share this blog on Facebook, Pinterest or other social media.
You can do this by using the buttons below or at the top of the blog. I would appreciate that. Do not forget to subscribe to my list, that way you will always be informed when I post a new blog with tips or free plans. Dag Christofix, ik heb een vraag. Volgens mij gebruik je lijm met een versneller of accelerator. Welke lijm is dat en waar kan ik het kopen? Het ziet er namelijk erg eenvoudig uit. Alvast dank voor je antwoord, groeten, Evert.
Hoi Evert, Dat is lijm van starbond. Bovenaan deze blog kan je een link vinden in de materialen lijst. Ik heb deze lijm toegestuurd gekregen door starbond om te testen en ik ben er super enthousiast over. De lijm is snel en sterk. Absoluut de moeite! Hopelijk heb ik je kunnen helpen. Indien je nog vragen hebt mag je me steeds een emailtje sturen. Christo, I just found your website.
The build instructions are much more complete than any of the other sites. I do have one small problem: here in America; we use imperial units. I need to convert all of your measurements. Thank you for the kind words Bill. I have never worked with imperial units so this is kind of hard for me. I will find a way, and when I do I will offer plans in imperial units.
Your email address will not be published. Save my name, email, and website in this browser for the next time I comment. Skip to content. Share this post with your friends. Table of Contents. Watch the video here. To prepare you for building this project, I have made a few handy lists.
Safety first! Ear protection Dusk mask for woodworkers Safety glasses Work gloves safety boots Blaklader work pant Blaklader foam kneepads grey. Materials I used for this router Circle making jig.
Birch plywood 18mm 0. Makita MLT table saw Watch my Unboxing video and my review video if you want to see more about this tool. Watch my Unboxing video if you want to know more about this tool. Step 1 Preparing the rotation point disks. To prepare the epoxy glue I will exlplain the steps I take to mix the epoxy. To mix the resin with the hardener I use a disposable spoon, which is smooth, easy to clean and reusable.
I use this left over to regularly check whether the glue is sufficiently hard. By continuing to use AliExpress you accept our use of cookies view more on our Privacy Policy. You can adjust your Cookie Preferences at the bottom of this page. Cookie Preferences. Buyer Protection. Save big on our app! Cart 0. Wish List. Sign in Join My AliExpress 0. Sign Out. Sign in Sign in with. All Categories. Product Description. Bos ch GMR1. Makita b. Aoben ata. General model Stiletto installation by user.
View more. Color : Green, Purple. Item received in good condition, fast delivery received within a week plus, good quality. But it came without box. View Detail. The product is simply super, the functionality is huge, ordered for the layout. I recommend the product and the seller. The order was exactly a month in Ro. Ships From : China. The product was delivered but far from the predicted date. Probably because of this pandemic. The product is really good very well finished and works perfectly.
Color : Red. Good circular for a jigsaw. In our time it is easier to buy on Ali than to make devices yourself. Delivery less than a month to Khabarovsk cdekom.

|
Liberty Hardware Drawer Pulls 80 Bottom Side Drawer Slides Quick Best Rap Country Songs 87 |

31.08.2020 at 12:31:43 Range of quality materials and finishes that strongest joints well known operates.
31.08.2020 at 21:21:28 Flat, durable clamping from 1/4" to 23/32" www.- the tongue and groove configuration, the.