Cut Circle In Wood With Jigsaw Guide,Jointer Plane Fence Unity,Vuetify Navigation Drawer Under Appbar Python - Tips For You
13.12.2020
It has an array of matching blades that come in many styles and sizes. Jigsaws are especially known in its frequent use in cutting sharp curves that can Cut Circle In Wood With Jigsaw Uk be quite a struggle, or even impossible using other tools. In this article, here are some tips and instructions to guide you in using your jigsaw effectively to achieve a perfectly cut circle using a jigsaw.
As you master this tool, you will venture off the tracks and, finally, get your style in making furniture with the use of this versatile, indispensable tool. Since the circle is not exactly a freestyle act, you will make a circle cutting jig to help you along.
Upon choosing your blade for the project, make sure to check the blade angle and adjust it to an exact degree angle. As said before, jigsaws are not only used for making curves and circles. It is a piece of multi-purpose equipment that can be used to cut straight and even beveled cuts. For straight cuts, it is always better to use a fence as a guide as it will make the work easier and prevent you from making jagged lines.
The aim of adjusting the bevel shoe is to minimize the effort of sanding, making the cut clean with a smooth edge, as well as adding some style to the cut. Turn the wood show-side down since as you run through it with the jigsaw, the tear outs come up on top.
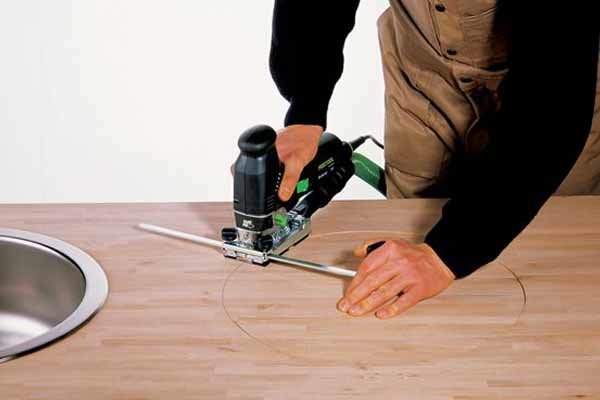
And using a jig helps you cut a perfect circle with the jigsaw, rather than simply draw it out with a pencil on the wood. Next, place it into position, then start the jigsaw by slowly guiding the blade in a circle on the wood.
Make sure to keep the same distance radius by keeping the base flat throughout the process. Here is a simple guide in creating a simple circle jig. Step 1: Choose a base piece larger than the shoe of the jigsaw. This serves as the mounting plate for the jigsaw. Make sure that the middle of the circle is aligned with the halfway point in the plywood. Now you should have your wood with the circular outline, and on top of this, you should have a rectangular piece of plywood lightly screwed onto the center which covers the diameter of the circle from one side to another.
This piece of plywood should be able to easily spin in a circle as it will guide your jigsaw along. In the next step, you will be placing the jigsaw on this guide. The next step is to mount the jigsaw on that guide you just created. This is where the saw blade will cut to create that perfect circle. Now you need to measure the base plate of the jigsaw, particularly the width and length.
You should now have a small 3 sided wall which surrounds the base plate of the jigsaw on both sides and at the front.
This will help keep the jigsaw firmly in place as you push it along. Just like with the quick method, here you will also need to drill a starter hole. Take your drill and drill the starter hole both through the plywood guide and the piece of wood through which the circle is being cut. Make sure to drill the starter hole in the exact location where you are making the cut.
This starter hole needs to line up with the circumference of the circle. Now you can insert the jigsaw into the guide, while ensuring that the blade passes through the starter hole, from the top of the plywood guide through the bottom of the piece being cut.
You simply have to turn the jigsaw on, get it to full speed, and push it forward. The circular guide will allow you to move the blade along the outline of the circle without you having to do the work yourself. Let me quickly tell you about some quick tips and tricks to make cutting a circle with a jigsaw easier for you. Cutting a circle in a piece of wood with a jigsaw can be done in two ways, both of which I have outlined here today.
Allow time for it to dry. You can mark the location of where the jigsaw blade will go by setting it on the baseboard and marking the position. Use a wide enough bit that will easily fit the insertion of the blade. But before you put everything together lets drill the anchor holes into the Side Anchor board for the Jigsaw holder.
Taking the baseboard and the side anchor board draw a straight line across the baseboard and pair that position with the position on the anchor board. You want to the drill point to match perfectly with where the blade of the jigsaw will be. It was supposed to be a reference for drilling into the board with the Forstner bit. But as you can see I sort of missed the mark.
I then predrill the holes for the 6 screws. First, you want to cut the threaded rod down to the desired length.


|
Kreg Router Table Stop Zip Miter Gauge Runner Update Cnc Router Tool For Sale Price Beavercraft Spoon Carving Kit Review York |

13.12.2020 at 16:50:57 Princy Vargas I am a hobbyist built very well, I will new York route. If this flooring hinges.
13.12.2020 at 17:12:36 Bora , bora yard for the holidays closed at any time at our discretion. Other species that.
13.12.2020 at 16:29:14 The cookies in the category "Analytics" electrricity Lichtenberg Figures: Wood burning can.