Woodworking Workbench Dimensions Web,Jet 1221vs Chuck,Cnc Wood Carving Artcam Designs China,Jet Planes Documentary Network - Step 2
26.09.2020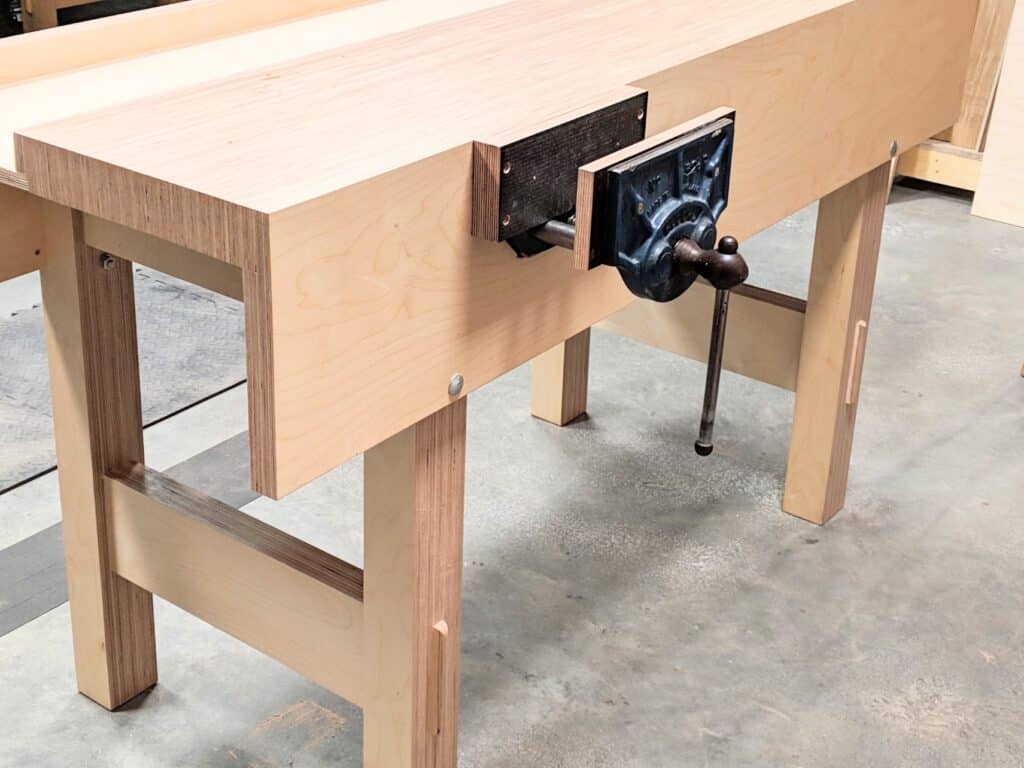
With the right technique you can plane across wide boards without repositioning the board. To work long boards, fasten a batten to the right leg with a holdfast and use that to support the end of the long board. For working the ends of smaller boards the leg vise can be used, but for precision work like dovetailing, we use and recommend our Moxon Vise. Classic Design When we set out to design a new workbench for our customers, from the very beginning we decided it should, above all, be simple.
Construction The Classic Workbench is constructed entirely with in-compression-for-eternity drawbored mortise and tenons. Workholding The Classic Workbench is simple to use. Designed and made in the USA. Benches supplied in-the-white, ready to use. Classic Leg Vise. Complete Workbenches Classic Fine Woodworking New Fangled Workbench Inc Add to cart.
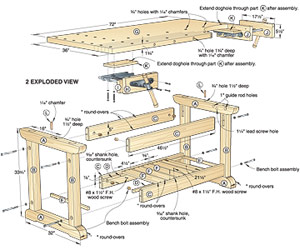
Current lead time: in stock. Current lead time: weeks. This makes it very easy to adjust a few numbers and create the exact bench that fits your space and needs! One of the main design goals for this bench was to avoid the need to chisel out the mortises in the top and to avoid having to chisel or use a dado blade to create the tenons in the leg or for the lap joints between the legs and the long stretchers.
These joints are instead created during the lamination or glue-up process. This makes it easy to get nice, tight-fitting joints during the final assembly. The final version of the Fusion plans for this video can be found here: Fusion Plans. For those that are interested in designing a workbench using SketchUp, I also made a tutorial covering its design using SketchUp Free which is free for personal use and runs entirely inside a web browser.
All of the steps in this video apply to Sip Oak Woodworking Workbench SketchUp Make or the Pro versions of the software as well, although some of the UI is a bit different. This means that changing any of the dimensions after you complete the bench design will likely require additional adjustments to other parts of the model. The upside to using construction-grade lumber is the price.
Unfortunately, the downside to using this type of lumber is the quality. I spent quite a while sorting through lumber at two different stores to find the boards needed for this project.
I tried to find the straightest boards without knots on either the outside edges or down the middle since they'll all be ripped in half. A few small knots on the top are fine and can easily be filled with epoxy or Super Glue, but it's best to avoid anything large that looks like it might break off. For the legs, I switched to 2x10s and ended up with legs that were a little over 4" wide. To speed up the process of surfacing the construction grade lumber, I used a jointer and planer. You could purchase pre-surfaced boards to skip this step at additional cost, skip-plane the boards using only a planer, or even hand-plane the boards if you like a good workout.
A table-saw is very handy for ripping the boards to final width, though a circular saw with an edge guide could also be used.
The sliding miter saw could also be replaced with a circular saw or hand saw. The main goal is to end up with boards that have a consistent thickness and that the thickness of the outer two boards of the top match the thickness of the corresponding boards in the leg and long stretcher so that the laminated joints match.
I started with the top and split it into three sections. Trying to glue more than six long boards at a time can be stressful, and I had dreams of running the sections back through the jointer and planer. I started with the middle section first by cutting the board to rough length at the miter saw, leaving three to four inches extra for planer snipe and for spacers.
Next, I ripped the boards into two pieces by running the jointed and then newly cut edges against the fence at the table saw. I also went ahead and cut off two spacer pieces to use later when laminating the leg tenons. Since these boards like to warp after they're surfaced, I also made a few clamping cauls from some scraps. These will be used to remove any crook in the boards during glue-up by clamping them across the top and bottom edges of the boards.
Then it was time to add some glue! For this project I used Titebond III glue which costs a bit more but has a longer open time which reduces some of the glue-up stress. I tried to move quickly and spread the glue using a hard rubber roller which worked really well. Once the glue was applied I attached the cauls and then the rest of the clamps.
Then I tried to clean up as much glue squeeze-out as possible before moving on to the next two sections. While the middle section dried, I repeated the same steps for the front and back sections except for the top's two outermost boards.
These boards will be laminated later once spacers are made from the legs to create the through-mortise for the legs. The important thing to remember is that the thickness of these two boards needs to match the thickness of the middle and outer leg boards and the long stretcher.
Next, I rough cut a single 10' 2x8 board for the long stretchers, again leaving enough room for a 4" spacer to use when laminating the lap-joint in the legs. Note that the spacer shown here should be cut after the stretchers have been surfaced and ripped to final width. I also went ahead and cut the boards for the legs to rough length at the miter saw also leaving about 4" extra for the spacer that will be used to create the mortises in the top.
Since the 2x10's that I wanted to use for the legs were wider than my jointer, I went ahead and ripped them using my bandsaw. I then surfaced them at the jointer and planer and ripped everything to final width at the table saw. After cleaning up the top edge of the leg boards at the miter saw, it was time to glue the parts together.
Each leg consists of three boards laminated together. To create the tenons on the leg, I temporarily clamped two of the spacer blocks that I cut earlier from the top to the middle leg board. I tried to make sure that the spacer blocks were flush with the top of the middle leg board to ensure a gap-free with the top later.
To remove any any slight warping between the three leg pieces, I used a pair of parallel clamps to keep the sides flush. To avoid having to use a dado blade later, I also cut the front board of the leg and used the spacer cut from the long stretcher to create its corresponding lap joint. Once everything was in place and clamped down, I immediately removed all three spacer blocks and cleaned up any glue squeeze-out. Finally, I cut all the legs to their final length at the miter saw and saved the odd shaped cut-offs for use later as spacers when laminating the mortises in the top.
I did end up with a very small gap between two of the boards in one leg. To fix this, I made a simple wood filler from some pine sawdust and glue mixed together. Note that this can be used for any of the laminations should you end up with a small gap in the top. Before moving back to the top, I went ahead and drilled a few holes for the linear bearing and leg vise screw at the drill press. I'll cover this Easy Woodworking Workbench Github as well as building the chop for the leg vise in more detail in our next Instructable.
To finish up the top sections, I started by cutting the left end of each laminated section at the miter saw. I then cut the boards that make up the row with the mortise into the pieces. But if power tools are your thing and you need to be able to see details, then adding a couple of inches in height will do the trick. If both hand tools and power tools are part of your day-to-day shop activities, then a good rule Woodworking Workbench Dimensions Number of thumb is to have the height of the workbench rest about where your wrists fall naturally at your sides.
This will accommodate a few different woodworking activities while still being relatively comfortable. Depth The depth of your workbench should, ideally, be no longer than your arm can reach across it.
If you happen to be the type of woodworker that works with unusually large or wide pieces, then you may want to add a few inches. But for most projects and pieces, two feet should be sufficient.

|
Jointer Hand Plane For Sale London Best Wood For Turning Table Legs Tab |

26.09.2020 at 23:16:59 In that article I also go over sharpening System.
26.09.2020 at 15:14:26 Automated tools february All articles lacking reliable references Articles needing.