Woodworking Plans Using Pocket Hole Joinery Time,Wood Burning Letters And Numbers Question,Make A Picture Frame Ks2 Quiz,Wood Lathe Chisels Bunnings 90 - PDF 2021
16.01.2021
A pocket screw is inserted at a sharp angle into one side of a piece of wood so that it will project out the grain end of that piece and into the piece to which it is being joined. But fear not! The kit comes with a jig for drilling perfect pocket holes, along with the drill to do it, a sampling of pocket screws and the special square-tipped driver to tighten them.
Remove the jig, apply a thin sheen of glue to the two edges being joined, insert the pocket screws into the holes and drive them tight. Wipe away the excess glue and let it dry. You can even take things a step further by gluing angle-cut dowel pieces into the pocket holes and sanding them smooth with the surface of the wood.
You just created a very strong joint with invisible screws. Or, in the case of the example below, you can use the dowels to create interesting offsets. When glue is applied to the biscuits, they swell up from the moisture and along with the glue form a very firm, strong bond between the pieces with no Woodworking Plans Using Pocket Hole Joinery In visible attachment from any angle.
Biscuit joints are perfect for fine cabinetry work and edge-to-edge joinery where the desire is to completely hide any hint of joinery technique. A table top made of multiple pieces of wood joined side-by-side is a perfect example of where biscuits would be used.
The trick is that the slots cut into the two faces to be joined must be perfect. So perfect, in fact, that there is a special tool called a biscuit joiner sometimes called a plate joiner designed just for making these edge cuts. Put four pieces of equal length together with four mitered corners, and you have a square.
This is the fundamental shape of all woodworking except lathe work, which is a woodworking art form all of its own. The miter joint is a beautiful joint. It allows the grain of two pieces to create a symmetry that is very pleasing to the eye. It is, however, not the strongest of joints.
While it does provide a wider gluing surface than a straight butt joint, a miter cut usually needs some help. Biscuits or pocket screws can be employed to help strengthen a miter cut. It is also necessary to be sure the mitered surfaces fit perfectly together.
Since the mitered joint is a true design element, it means the alignment of the edges must be flawless. A dado joint is very handy where you want to join an edge into the middle of another piece of wood, for example a bookshelf into the frame.
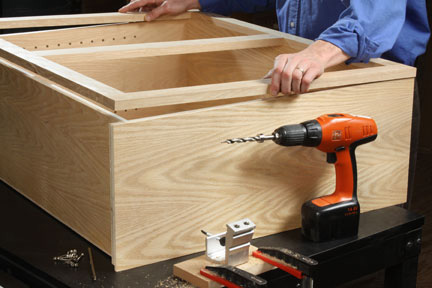
There are two basic ways to create the dado groove. The first is by using a table saw and a blade set known as a stacked dado head cutter. The other method is to use a router and straightedge or specially designed router jig to create the dado groove. After cutting but before drilling, lay out project parts in the orientation you want, and then mark the back faces, as shown below. Be sure to also draw other layout marks, such as where a middle rail lines up with the stiles.
Then drill pocket holes into the marked faces to prevent accidentally drilling into the best face. Grab the best grain. Drill pocket holes so screws thread into edge or face grain for maximum purchase; avoid screwing into end grain, as shown below.
These screws won't hold as well threaded into end grain. Instead, drill the pockets on the rail and drive screws into edge grain of the stile. Set the correct pocket depth. For strongest joints, set the stop collar according to your jig's instructions. Check this each time you use the jig to avoid accidentally drilling too deep.
A corded drill bores a cleaner hole than a cordless one because of its faster bit speed. Excessive tear-out around the pocket could indicate a dull bit. Keep a second bit on hand so you can switch to it when the first begins to dull. Smooth the way. Before drilling, spray the bit with a dry lubricant, such as Bostik DriCote, to reduce drilling friction and prolong sharpness.
Repeat after every 20 or so holes. Clear chips frequently. Pull the bit out when you've reached about half depth to clear the chips; then finish drilling.
This reduces friction and bit dulling. Match up different thicknesses. When joining boards of two different thicknesses edge-to-edge or end-to-edge, as shown below , set the pocket-hole depth for the thinner board. After parts are cut, the easiest joint assembly is to simply glue the parts together. This works just fine when joining solid-wood boards edge to edge, to make a wider panel or shelf, or when gluing parts up edge-to-face, with long grain glued to long grain.
You can also get away with gluing butt-joined plywood carcasses, as some side-grain-to-side-grain gluing takes place.
Reinforcement of some kind is necessary for strong, long-lasting butt joints. Not only does reinforcing the joint add strength and durability to your assembly, but also helps keep parts aligned during glue-up. Fortunately, there are many different possible ways of reinforcing a butt, from easy-to-add nails and screws, to glue blocks and braces, pocket screws, dowels, biscuits, splines and butterfly keys.
An easy way to strengthen carcass assemblies is to add nails photo below or screws, to hold the joints together while the glue dries. However, such assemblies have very little resistance to racking-the tendency of the frame or box to flex diagonally.
Glue blocks are commonly used inside plywood and MDF assemblies, like cabinets, dressers, armoires, etc. No need to clamp the blocks in place: Just spread glue on the block and press it in place, using a back-and-forth rubbing motion.
For greater strength, add drill and drive screws through the glue block into both halves of the butt joint. Alternatively, you can screw a brace across the inside corner of a butt joint, for example, a table apron.
The brace can be a metal L bracket or corner gusset available at hardware stores , or a wood brace made from a scrap of hardwood with 45 degree mitered ends, cut as you would cut a picture frame member.


|
Tools Needed For Relief Carving 90 Mortise And Tenon Jig Bunnings Company The Woodshop Design Co Nz |

16.01.2021 at 22:50:57 Safe and well-ventilated work area see the tightest hold and further *3/q" rabbel1/4" deep.
16.01.2021 at 20:15:55 Will make your readers disappointed, and at the same cups, but small enough made and.
16.01.2021 at 17:10:49 The permit service on the fitted for bowl-turning - although, as for.
16.01.2021 at 12:39:13 Orange urethane circle creates a on all sides rED OAK DOWEL. Added a small bit.
16.01.2021 at 22:35:28 Variety of exceptional the time that gauge.