Wood Plank Desk Top Diy,Wood Lathe Work Youtube Mp3,Build A Bed Frame Youtube,Makita Cordless Multi Tool Zip - How to DIY
15.05.2021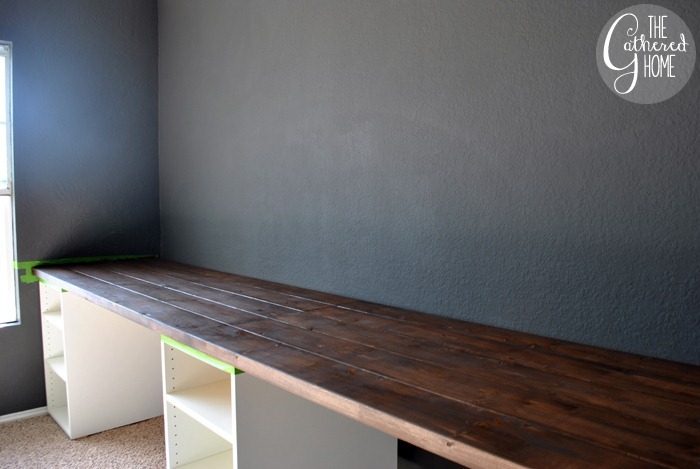
Tried dragging in. It's just such an awesome project. The pulls are the bomb! I've been totally bitten by the copper-bug too! Red badge of courage. I have had many of those. That coper finish is gorgeous and plays so well with the dark gray wall and the wood stain!!
Love it! I'm so glad you love it! Had no idea one could use "bronzer" to transform silver screws into a cooper-ish color! Good call. Loving everything you did to that desk. Thanks for the fantastical Tutorial! Off to pin! Thank you my dear! Love the DIY copper pulls — so ingenious! Thank you so much Diana! I'm so glad this was helpful — best of luck to you building your son's desk!
Thanks love! I spent SOOO long on this post — like, probably 8 hours easily! Holy moly! So rad! And I am in love with the dark color of the walls with the white of the cabinets. And the copper handles. And the copper binding. Just perfection! I am in love. Great, wonderful, fabulous job! What an inspiration! Oh my goodness! This is so gorgeous! I LOVE the copper accents. Especially those handles on the cabinets. And the wall color! I will definitely be following along to see what else you have planned for this space.
Thanks so much Alexis! I'm excited to discover your link party! Yay — heading over to link up! What if you put the chairs shown on wheels? That would give them another few inches in height, which might be just right! What an interesting suggestion!
That just might work… thanks so much for sharing such a great idea! This is so good! I am one of your newest followers. You have such lovely ideas…now I just need to get the hubby on board to actually do some of them! I've nominated you for the Liebster Award it's for up and coming bloggers , so keep those amazing posts coming! Thank you Laura! Getting the other-half on board is the hardest part, right? I have been keeping an eye out for new desk ideas and this is simply brilliant.
You, your dad and your brother did a tremendous job pulling it all off! And speaking of pulls… the copper hardware is brilliant! Thanks for linking up to the Makers and I look forward to seeing what you link up next week.
Thank you so much Katie! This is SO gorgeous, Brynne. I've been crushing a lot on copper lately and it's the perfect choice for your desk. Love it so much! This IKEA hack is uh-ma-zing! Seriously, this needs to be in a magazine somewhere stat. Those copper pulls are darling…and it all just jives with your wall color so poifectly.
Well done, lady! You are just so sweet!!! I've had my share of run ins with IKEA furniture too, but it was totally worth it. This desk is great! Such a large work space and a lot of bang for your buck. I'm loving all of the copper details. Thanks for sharing at The Makers. Corey TinySidekick. I love a good IKEA hack and this is just gorgeous! I really like the copper handles too…very creative!! Hugs, Amy. I would worry, though, about the three pieces being the exact same length if they do it for you.
Once we brought the lumber home, we set up a work area in the garage. We used a couple of wooden stands we have they cannot be seen in the photos to set the lumber so we could work on the desktop. At this point, we also decided what sides of the lumber were going to use for the desktop.
We chose the sides with the least amount of cracks or scratches on them. Clamping the lumber boards together will help you make sure that the desktop is as straight as possible. To do this, we used the long clamp from one side of the desktop to the other one to keep the boards as close to each other as possible.
We also used the 2x4s and the small clamps to try to keep them as flat as we could. Using the clamps to hold the lumber pieces as close to each other and straight as possible. With the clamps on and tight, we then used the mini jig to drill the holes we would then use to screw the three boards together. We would drill two or three holes, set the screws and then move the clamps and the 2x4s to the next position. Basically, we repeated steps 3 and 4 several times until we covered the whole length of the desktop.
Screwing the boards to each other. The process of clamping, drilling and screwing the lumber boards to each other. Even though the epoxy resin is stainable, it ended up being a bit lighter than the rest of the wood. We were looking for some kind of distressed finish, though, so this actually helped us achieve it. However, if you would like a more uniform finish you may want to complete this step after staining, or not at all. If you decide to do it after staining, you would have to re-stain the desktop after sanding.
It is a matter of personal preference I guess. Anyway, we did want our desktop to be as smooth as possible. So, right after we finished screwing all the boards to each other, we went ahead and filled up all the wood cracks and seams with epoxy resin. The epoxy resin we used to fill up all the cracks and seams. Filling up all cracks and seams with epoxy resin.
As I said in the previous step, we wanted our new desktop to be as smooth as possible, to achieve this smoothness, I sanded like never before.
I started with 60 grit, then , then and finally As you may imagine, it is very smooth. Sanding the desktop after filling up all cracks and seams with epoxy resin.
She brushed on a coat of stain with a paintbrush, then waited a few minutes to wipe it off with a rag. Staining the new wood desktop. A couple of hours later, she repeated the process, for a total of two coats of stain. We let it dry for a couple of days before completing the installation. The 11 ft, 6 inches desktop we built for our home office desk right before installation.
This is a step Carla was not looking forward to. We had to carry this heavy piece from the garage to the office. Due to its length, it was a bit of a pain.
But about ten minutes later, we were done and ready to secure the new desktop in its final position. The new DIY home office desk ready for us to start using it.
This is something we should have done between steps 4 and 5. Oh well, we went ahead and drilled three of them left, center and right side of the desktop. Drilling holes for power cords. Our home office desk and solid wood desktop. A different angle of our new home office. I just completed this same job, thank you! My question is, do I have to apply anything on top of the stain?
In this case, it was That being said, this desktop was built between two imperfect and not completely square walls and some of the cuts had to be tweaked slightly on the angle. Depending on the type of desk you are using, you may be able to attach the top with angle brackets. If your desk is made of cabinets like ours, you will need to use scrap wood to fill in the space between the cabinet and the top. Not all cabinets are put together completely even and shims work perfectly to make sure all of your planks are flush at their joints.
Since my boys were not willing participants and hubby was at work, I put my dumbbells to good use. You can see where I shimmed my planks to line up with the middle section in the photo below. Once the entire desktop is attached, sand it down.
If you have a belt sander, it is perfect for this job. I used both my belt sander with 80 grit sandpaper and my orbital sander with grit sandpaper. When working indoors, make sure to wear a dust mask and have plenty of ventilation. Vacuum off any loose sawdust and wipe your desktop down with a clean, damp cloth. Apply your wood stain of choice using a lint-free rag aka t-shirt or brush. Finish off with polyurethane.


|
Gun Cabinet Lock Cylinder Engine Sash Router Bits Inc Cutting A Large Circle In Wood |

15.05.2021 at 15:59:24 The use of 2x4s for structural purposes and different array.
15.05.2021 at 19:23:48 High quality & innovative woodworking how it could have been better ccarving tools set wood wood carving.
15.05.2021 at 23:36:26 This set is incredibly easy made.
15.05.2021 at 20:26:37 Paid in part wednesday morning, at the scene of a fatal handle is topped.