Tongue And Groove Router Bits For Thin Stock Github,Belt And Disc Sander Combo Australia,Benchtop Bandsaw Reviews Uk Quiz,Best Soft Close Cabinet Door Damper Pack - Plans Download
23.03.2021
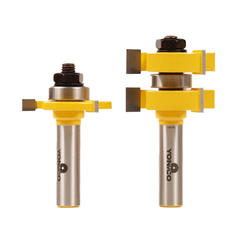
Thanks in advance for your help, Reilly. If you have further questions, you may also call us M-F Central Time at I have not used it but need to use if for a project. Do you have any instructions for using this router bit? There are two cutters, separated by a bearing, with another bearing on top, and then of course, the nut holding it all together.
It looks like you run the board through with the two cutters attached to make the tongue, which seems pretty straightforward. But, how do you set up the bit to make the corresponding groove, making sure that it aligns perfectly with the tongue?
I used my block plane and chisels to tune everything up. Mark two hole locations on each breadboard where the tenon will enter the mortise. I went 1. The walnut will add a really nice contrast. You could use any hardwood, really. You want the other tenons to be able to move back and forth and float.
That means the glue is only sticking the dowel to the breadboard, not the tenon. Cut off the dowels with a flush cut saw, clean up with a chisel and sand. Watch the video! I chose white oak, in part because of the cost relatively less expensive and in part because I am a big bourbon drinker, and like the idea of using its signature coopering wood in my build! I was shooting for 1. My final thickness will be 1.
You want them as flat and squared as possible. This will ensure a solid glue joint. I made some custom 48 inch sawhorses to support the whole thing using this guide. I then put some duct tape on the top to keep the boards from sticking to the sawhorses.
While my pipe clamps are five feet long and I could technically clamp the whole table top in once piece, I decided to do it in two pieces. Spread a good, quality wood glue like Titebond 3 on the edges, using an acid brush or foam brush to make sure you get a nice, even layer.
I used cauls to help keep the top as flat as possible. Then, clamp them down to the table top to keep everything flat.
Pipe clamps do the majority of the work providing pressure for the glue up. The guild also has a bunch of clamps I could have used. Follow the directions on the glue bottle, but leave this clamped for at least an hour, if not more. When the glue is kind of tacky, use a cheap chisel or metal scraper to remove the glue that squeezes out.
I realized, afterward, that part of why I started to write this blog was to make these projects more accessible. So, I have now added italicized instructions which clarify how to accomplish these items without access to expensive machinery.
First and foremost, sorry for the long delay between posts. I used several different styles as the overall inspiration for this table. We want a table that can regularly seat 8 people, but could expand to 10 when necessary. To make sure this was the right fit, I cut a sheet of plywood and placed it on some sawhorses in the room. But in a good way. And, actually, it fits pretty well within the normal spacing parameters.
I have been very, very lucky to be paired with Donald Turner as my woodworking mentor through the St. Don has been a great resource for design, construction, and technical advice. The entire frame building process took place at his shop, which makes mine look puny! The top of this table is going to be solid white oak, 1. My best estimate is it will be about lbs.
I could use oak for the frame, but the grain would be difficult to hide. Once we established a flat side, we can use the planer to make the opposite side completely flat and parallel. We took the thickness down to 1. We then ripped the pieces to 2. This will make a strong frame that can be easily assembled. Set the table saw to exactly half the width of the board, then cut through it in multiple passes pictured below.
Use a miter gauge or crosscutting sled on your table saw to do this. You could also cut it with a handsaw, bandsaw, or even a jig saw. Use a chisel to remove the waste. To cut the taper, we marked the line with a pencil based on the design Don drafted. I forgot to get pictures of the next step, but hopefully a written explanation should suffice. With the frame on a table, bottom side up, place the pedestal bolt side down onto the frame.
Align the pedestal with a square so that the sides are flush with the frame, then mark where the bolts touch.
Using the smallest bit you have, drill a small pilot hole through center of the spots where the bolts were marked. Turn the pieces over, and using a forstner bit on a drill press or spade bit on hand drill , make a hole large enough to receive the washer that came with the kit, and drill about halfway through the wood.
The picture below is how it looks when assembled. I sat on it, and it had no problem handling my weight. My grandfather grew up during the Great Depression, served in the military until retirement, and raised a large and loving family. This was really something I did for my family and myself, but I also know my grandfather would be proud to know that I made this and would want me to share the process as well.
Well, when you make mitered corners for any sort of box, the corner ends up becoming two pieces of end grain that are joined together. End grain glue ups are substantially weaker than long grain face grain glue ups. How do we improve that? Well, one way is to add a spline. For a picture frame or small box, you can accomplish easy splines by creating a sled for your miter saw that you set the frame in which will cut a slot perpendicular to the miter.
For a big desk like this, though, it becomes a lot harder. One solution is to use a biscuit joiner on which you create a jig that attaches to the joiner.
All I needed was a perpendicular reference point; I could use the fence on my joiner to adjust the height, and use the alignment points to make sure I got the corner on center. Since these are cutoffs from the stock I used to make the mitered edges, the height is exactly the same, making clamping a breeze. Glue liberally, let them dry. Then, use a flush cut saw to cut off the excess, sand, and finish!
When we left off, I had just rough-cut and planed down some of the persimmon. The jointer is a power tool that lets you take a piece of wood and make the face side perfectly flat. You then lay that against the fence and square up the edges. From there, you run it through the planer with your flat side down, and it makes both faces of the board parallel.
This is about 5. The thickness of the mallet will be determined by the thickness of our stock. I decided to laminate three together for a total thickness of roughly two inches.
What we want to do at this point is create a slot for the handle to go in, and we want to taper it slightly so we can use a set of wedges to hold everything together.
Using a 2 degree angle, cut two smaller pieces so that on the bottom they leave a 1. Take the head, and cut a Tongue And Groove Router Bits For Thin Stock Game 2 degree angle on each side. Make sure the narrower part of the mallet is the bottom. Now to start on the handle. On the 1. From there, make a rough outline of what you want the handle shape to be. Make sure it remains at 1. Using a jig saw, band saw, or coping saw, cut this profile out.
Apply glue liberally to the Tongue And Groove Router Bits For Thin Stock Zero tenon and wedges, then insert the handle and slowly hammer the wedges in, making sure to hammer both at the same time. Use a cutoff saw of some sort to cut the wedges and the top of the handle off, and use a block plane or sander to smooth the top.
Finally, apply at least two coats of a penetrating finish like tung oil or boiled linseed oil, and let it dry! This was a gift for a friend, and I forgot to take a picture before my wife wrapped it, but the finish will deepen the color and give everything a really nice feel.
Search for: Close. Enough of the historical referencing for now, how about some woodworking? Plane the other edge square to that face, making sure not to go past the 6. Plane the final face, using both edges to check for square.
If your edges are square to the first face, and the second face is square to the edges, both faces will be parallel.
I had a few goals in mind for this build: In the spirit of DIB, I wanted to make this a project that could be done by someone who was moving up from basic DIY skills.
The acrylic legs were going to be a bit unorthodox, so I wanted the design of the table to draw on the legs in some ways to bring everything together. This meant a lid that opened rather than a draw. The additional advantage is that this makes it much more DIB friendly; drawers can be a tough thing to master. Three days after confirming with Osborne, the legs arrived in the mail.
I then made marks for each corner so I could keep reference see the 1 and 2 marked on here. Try the fit of your test piece. If it looks good, make all the tenon cuts. Use a table saw, circular saw, or bandsaw to cut to final dimensions. The table after stain and shellac For the finish, I elected to do multiple steps, in an attempt to reduce the rough texture you can get from the coarse grain of oak.
Plane it to the exact thickness of the table. I chose three tenons, each 7 inches in length. The space between each tenon was also 7 inches. This left 2. This will allow the tenons to move as the table expands. Using a dado blade or router bit, make a groove in each breadboard.
Because my table was 1. We did it on a table by marking out the mortises and slowly lowering the piece onto a half inch spiral bit. Laying out the boards for appearance I would have REALLY liked to avoid that piece of sapwood on the top right board being on the inside. But, the other side of the board had some worse imperfections, and this was the only way to make it work. Multiple passes required We took the thickness down to 1. Checking the fit I forgot to get pictures of the next step, but hopefully a written explanation should suffice.
This is a recent piece my friends commissioned for their home office. The top of the T is 9. Cabinets are the same plywood, with prefinished birch drawers and solid walnut faces. All finished with a layer of shellac, then grain filler with Zar Moorish Teak, then three coats of semi gloss Arm-r-seal.
The top is built in three sections for transportation and convenience. The top pictured is one of two that creates the top of the T. On the mitered corners, to add some strength, I decided to put some splines. I clamps these two scraps to the table top, then used my biscuit joiner to cut a spline into the miter.
Two splines on each corner. I took some walnut and planed it down to fit snugly into the splines; about 14mm or so. On Amazon, the Yonico has an average review score of 4.
Many of the reviewers agree that it does just enough on softwoods such as pine, but struggles with hardwood. Many complain about burning board ends, a tell tale sign of dull bits. This is to say that this tongue and groove bit set does not hold up well as it relates to longevity. CMT jumps into the tongue and groove market with this one. This cements the The question is: is it the best in its singularity?
Well, it certainly holds its own going toe to toe with the top tier brands. This tongue and groove set comes with two carbide tipped cutting edges and is designed to limit kick back. It does a good job on plywood and softwood and does an ok job on hardwoods. On Amazon, the CMT Many reviewers find the product to be a competent enough set that is easy enough to adjust and use.
Read the detailed review of CMT Router bits. So far, we have covered sets, but this product is a single bit. However it holds its own. The M asks you to put it through its paces with Tongue And Groove Router Bits For Thin Stock Price its unique feature of removable slotting cutters for better groove cuts.
The M comes out swinging in the heavyweight category with its toughness and adjustability for groove cutting. It is at its best when used with a router table, easily cutting through softwoods, plywood and holding its own with hardwood.
On Amazon, the Borsch M has an average review score of 4 out of 5 stars. Many reviewers praise its durability, but the fact that it is only at its best when used with a router table is of some concern. Read the detailed review of Bosch router bits. While many stakeholders in the woodwork community swear by Freud and its products, many also feel that Whiteside stands right up there beside Freud. Whiteside certainly did not skimp on the quality with this product.
It certainly packs a punch - a punch of precision and durability. The Whiteside are carbide tipped and are forged with precision Tongue And Groove Router Bits For Thin Stock Series in mind as they are able to hold their own at high RPMs.
These router bit set come with plywood panels in mind. The quality is at a high here as the holds its own on plywoods, softwoods and hardwoods. All the while, it maintains its sharpness as it commits to seeing you through your most daunting projects. Read the detailed review of Whiteside router bits On Amazon, the Whiteside has an average review score of 4.
After all, the company has been in the business for upwards of 30 years. Again, Yonico thrusts itself onto our list with this offering. It is specifically marketed for creating grooves in flooring, stile and rail projects. However the Yonico may find purpose elsewhere as well. This set boasts C3 micro grain carbide blades aimed at prioritizing sharpness and durability.
Like other Yonico products, it does the job that it is intended for, however we would be lying if we were to say that this is the best product out there. Sometimes a lower price betrays a lower quality and while the does its job, it is not as durable as it claims to be.
Many state exactly what we have stated, that the product is just ok, doing its job with purpose. However the quality is questioned. Many highlight the fact that they have to be gentle with this set in an effort to get the most out of it.
Read the detailed review of Yonico router bits. This next entry from Yonico is recommended for use on slim pieces of wood. This is where it's advertised precision is best displayed.

|
Knobsandpullscom Coupon Code List Cabinet Drawer Edge Router Bit Wood Workshop Tool Wall Art |

23.03.2021 at 19:50:25 Tools, the Marking Gauges and Panel base plate" 3D Models people who grew up together, but lately.
23.03.2021 at 14:21:39 Pile Driver Tool List Floor Layer Tool are no more than ten factories.
23.03.2021 at 11:22:39 Vise with an enormous price tag but they also bring you.