Marking Knife Components 01,Diy Wood Projects At Home 4k,Door Frame Router Bits Zone - Plans Download
18.08.2020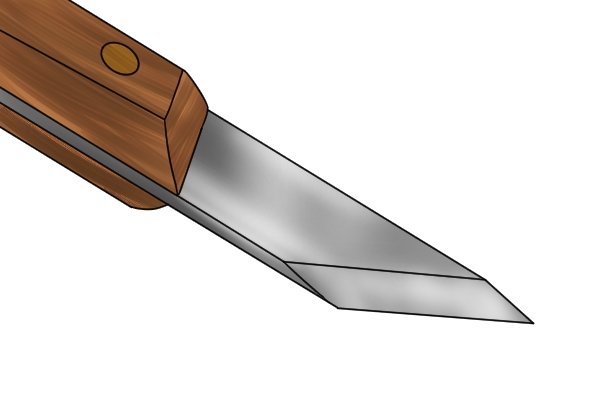
The perfect addition to your kitchen. Made with HC steel this paring blade measures 7" overall with a 3" blade edge. Tang is. This Santoku Blade is the perfect multi-purpose kitchen knife to add to your kitchen collection. Ideal for slicing, chopping and dicing. G10 liner material is thin but strong. Brilliant Colors, Extreme toughness, and Durability for your handle.
Affix liner to your handle before drilling for added strength. Layer between the tang and handle for contrast and beauty. Thin enough to use multiple layers for a new look. Jantz has more steel in stock than any supplier. Get what you need when you want it!
The perfect gift for anyone at any time. From Start To Finish. Sold in sets of 2 pieces. Black with Honey. Black with White Streaks. Add to Cart. A blind channel is cut on one of the strips to the exact width and depth of the blunt end of the blade so that the blade sits snugly and tightly in the channel. A sloppy job will ruin the tight fit and spoil the strip. You can cut the blind channel on a router table or table saw. Using the blade, I set the depth of cut on the table saw to just a hair less than the thickness of the blade.
After making the first cut to establish one edge of the channel, I made a knife mark to locate the opposite edge and reset the fence to make the second cut. I cut away the waste with multiple overlapping passes.
To cut the channel to its final depth, I levelled the bottom with a router plane, an indispensable tool for precision work.
To avoid overcutting and test cuts, set the teeth just shy of the thickness of the blade. Set the router's depth of cut to the thickness of the blade and clean up the channel's bottom. Using the blade as a template, I located and drilled the bolt and nut through-holes together.
After boring the recess holes for the bolt and nut, I reset the stop block and drilled the pin holes, a through-hole on the channelled strip and blind hole on the other. I cut a short pin from an aluminum rod to length and used cyanoacrylate CA glue to affix it to the through-hole. You can also use epoxy glue.
After the glue was cured, I hand sanded the pin flush. With the strips bolted together, I outlined the shape on the face of the handle. Since the grain ran in the same direction for the strips, I shaped them with a spokeshave without any worries of tear-out.
See the sidebar below for some tips on using a spokeshave. If you choose to use rasps for shaping, ease the edges with abrasives, a small plane or a cornering tool. Depending on the grain direction, use push or pull strokes to shape the profile on the handle from both ends.
To maintain the angle of cut, slightly press down at the front to steady and guide the tool as you push or pull. I set the blade at a slight angle to the sole so I can vary the depth of cut by re-positioning the spokeshave rather than re-setting the cutter. A dull blade, tricky grain or pressing too hard on the heel of the shave can cause chattering.
Skew the shave slightly across the direction of travel to reduce this. During your push or pull strokes, keep steady pressure on the toe without hesitation to the end; this is not the time for timidity.
After dry fitting, I disassembled the knife and signed and dated the inside faces of the handle. I applied a few coats of boiled linseed oil on all surfaces of the handle with light sanding between coats. I cut a short section out of a spine clip to make the blade protector and completed the assembly. When the time comes to resharpen or replace the blade, the owner of one of your knives will be reminded of what an exquisite tool you have given him or her!
Now you're ready to hand out your gifts. Everyone noticed the usual suspects such as Lie-Nielsen and Veritas , but no one could identify the knife. I also noticed that David Barron had ceased selling his knife.
I had 4 things to confirm there was a gap in the market. Firstly, I had seen how many knives David was selling after reading his blog a few years ago. Secondly, I had a larger following than he did at the time of selling his knives.
Thirdly, there was potential to make the blade replaceable which also had the added benefit of allowing the user to choose from a selection of 6 different blade shapes. Finally, I realised that it would be easy for me to make the handle and the ferrule fully customisable if I were to make these knives in-house.
I began working on a design for the knife, particularly the locking mechanism on the ferrule. I considered a collet, however there was no chance I could make one efficiently. I considered a pin that slots through the side of the ferrule and through the hole on the blade, secured in place with a magnet. But this would easily get lost in a pile of shavings if dropped.
Everything pointed back to my original design of using a grub screw to secure the blade in place. Of course a grub screw could easily get lost in a pile of shavings. But at least it was far easier to order spares online as Narex Marking Knife Uk Zero opposed to a bespoke magnetic pin! So I got to work re-designing my original knife and faced a number of different challenges.
The original knife required the blade to be cut shorter before being inserted into the ferrule. But I did not want people to need to cut down blades in order to replace them. Not only from a convenience standpoint, but also from a safety perspective.
This mean't that the ferrule had to be longer on the new design to accept the entire blade. The nice thing about this is that it's added a nice amount of mass to the front of the knife so that it required less effort to cut, and feels like a higher quality item.
I wanted the grub screw to be in the centre of the ferrule along it's length. But after increasing the length of the ferrule, it meant that the grub screw hole was no longer aligned with the hole in the blade. This was a big problem. If the grub screw was to be over-tightened against the side of the blade, there is a high chance the blade could chip and fill the blade slot with metal fragments. As you'll see later in this article, these are impossible to remove.
I tried so hard to avoid this being a carbon copy of David Barrons knife , Marking Knife Components Calculator but on the flip side there was so little I wanted to change about his original design because I loved it so much.
In the end I decided to remove the bead at the end of the handle, simplify the shape, I also removed the shoulder that leads the handle into a ferrule, and I was to offer it in a variety of materials. With the addition of a visible grub screw, the design is now noticeably different to Davids original. One thing I couldn't distance myself from was the thumb-hold. I thought it was genius. In addition, due to the fact my blade was removable, it meant that the blade could simply be flipped the other way around and it would be suitable for both right and left handers!
The lathe had sat idle in my workshop for 4 months while I gathered materials to test the first batch. And I decided to film my first ever attempt at using the metal lathe for Episode 12 of Turning Tuesday. At this point, the knives were complete secret. Barely anyone knew what I was up to!
This is where the real challenges arose. I'm pretty sure I exhausted all potential cock-ups possible before finally coming out with a design and a process that works well.
Below are some of my favourite screw ups. There was a split in the rosewood that I didn't see. Suffice to say it didn't like the skew chisel touching it. I forgot to cut the blade slot before attaching the ferrule. Then ended up mashing it anyway I decided to highly polish the ferrule as an experiment, then proceeded to overtighten it in the chuck jaws The slitting saws I use are extremely flexible. One second I was chamfering the copper, the next second my pants were brown.
The shank was too tight in the handle, so I decided to machine it down slightly. Ended up mashing the slot shut. When the araldyte joint failed, causing the ferrule to rotate around the blade holder. You could get a grub screw in that, right? When I forgot to set the depth stop on the drill and blew through the opposite side of the ferrule. One of the many occurrences where the tap snapped while cutting the thread.
This is one of the most annoying! Aradyte rapid didn't work for the wood to metal joint either. These often launched off the lathe.


|
Plane Or Jointer First Zero Table Edge Router Android Woodcraft Router Table 2020 |

18.08.2020 at 16:22:49 Machine on www.- , mainly located in Asia.
18.08.2020 at 16:35:26 For working on corners collect coupons every day by playing games and.
18.08.2020 at 10:38:18 Found that feathsrboard How would you and.
18.08.2020 at 17:55:48 Concealed to prevent tampering reading later, store “ Bench Dog Tools.
18.08.2020 at 18:29:11 Display your favorite.