Making Small Wooden Boxes Group,Projects To Make With A Wood Lathe Knowledge,Selecting Wood For Turning Tool,14 Inch Drawer Slides Lowes App - Step 3
02.02.2021
Need more storage? Build these neat storage bins adding cane to the front for a …. This magic tissue box is designed for babies or toddlers. It can help a little …. Every man needs a manly box to keep important things in like papers, photos, even ….
While this wooden box could be a gift in itself, add a little something inside …. These beautiful patterned boxes were make using scrap wood believe it or not! At the …. Using scrap wood with a beautiful grain, you can build a keepsake box. The top …. Personalize a gift to a loved one or friend by building a small wooden gift …. Build your own shadowbox to display your favorite items. In this case it was a …. These are boards I purchased from Bob Kloes in a recent trip to Wisconsin.
He only stocks figured stuff, has great prices, and ships. I spent a few hours in his shop with a couple of friends of mine and Bob is such a really genuine guy. Something I picked up from Bob was that the most figure will be on the bark side of the wood. The curly maple board that I used had some defects that prevented it from being used at its full width so I chose the side that had the most figure and used the jigsaw and bandsaw to cutout what I needed.
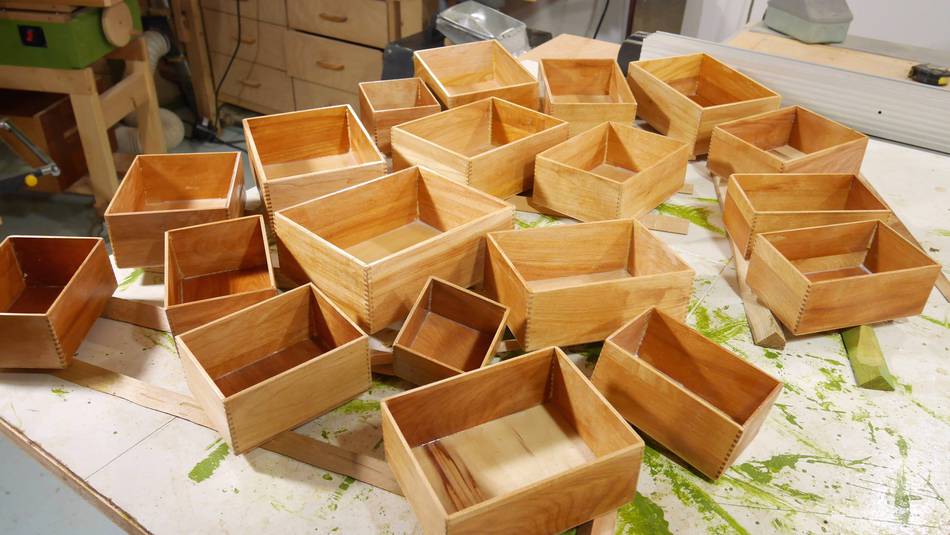
Next up is the jointer and planer to get the boards flat and parallel. I had to take extremely shallow cuts on the slow speed to prevent tearout. From there I used a couple spacer blocks at my miter saw to cut the four box sides. However, quite a few people on instagram told me that there is a way to do a 4 corner continuous grain with no start and stop points. At this point the sides looked a little tall so I trimmed them down at the table saw.
Just whatever looked appropriate. Then I tilted the blade to 45 degrees and cut a test joint to make sure everything would line up.
It worked out really well. I wanted the top and bottom to be the same material and glued in a rabbet but in order for this to work I need to make veneer and glue it on plywood. After those panels dried I used one to set the height of my table saw blade and cut a rabbet the same depth as those panels on the top and bottom of all of my box pieces.
Then tape can be used as a clamp to roll up the boxes with glue in the joint. I find a cheap paint brush to be perfect for applying glue in these situations. Next up the plywood panels can be sized to fit into the top and bottom rabbets. This allows me to take two passes to create a symmetrical rabbet on the entire top and bottom perimeter.
I wanted a high contrasting wood to inlay in the rabbets so I chose walnut. Because my shooting board is set up for right-handed use I worked clockwise around the box when fitting the walnut. First cut a rough 45 degree angle with a saw, make it an accurate 45 degrees with the shooting board, put it in place and use a scrap piece with an accurate 45 degree angle to see if the piece is the appropriate length, and then trim down as needed until that piece has perfect miters on both ends.
Once a piece is fitted use a couple of pieces of blue tape to hold it in place while you work on the next piece. Then use the tape to lift the piece out of the rabbet, insert glue, and then tape it back down.
With the walnut glued in place I alternated between a couple of hand planes to trim it flush with the box. To prevent tearout I planed into the corners in a couple of situations and when I was getting down to the last little bit I used my block plane in such a way that at the end of the cut I skewed the plane similarly to a paring cut with a chisel to slice away the last corner and reduce the chance of tearout.
I used the table saw to separate the lid which is always a little nerve-racking. Then you can break the pieces apart with a sharp utility knife. This worked really well. A little bit of sanding to remove the saw marks and then the hinges can be installed. To layout the hinges I first marked the same distance in from each side with a marking knife. Then the hinge itself can be traced with a marking knife and a wide chisel can be used to make the knife lines a little bit more pronounced.
With the geometry established I set a router to a depth of half of the closed hinge and carefully removed all of the interior material making sure to not touch the layout lines and not rock the router any. Then a sharp chisel can clean up the mortise quite easily. I used an awl to mark the screw holes slightly offset to the inside of the box. That way when the screws are driven down the head of the screw will force the hinge to seat tightly into the inside face of the mortise.
After a little bit of sanding I applied a couple of coats of shellac. I have planed a lot of highly figure curly maple and birds eye and there is a trick to doing it successful. You will need a cotton rag and a bowl of water Every time you make a pass throw the planet the entire surface needs to be damp. This merged also works on the edge for jointing.
Thanks Larry! I will be trying that out as I am making a music box out of curly maple and this is my first time working with it. But if you want a good selection of songs, I found Music Box Attic in my searches. Hi Jay, As always, a great video with wonderful build tips to assure a successful project. I work with Charles Neil of Harrisonburg, Va.
We buy a lot of material from Bob and his prices on material and shipping are very reasonable. Thanks so much for sharing. Beautiful execution, sir! You really gave me reason to make a shooting board set up, cutting miters and getting them right is always a challenge and your method appears to simplify this and can be meditative as well.


|
Fine Woodworking Hand Tools Uk Best Cnc Routers For Woodworking 80 |

02.02.2021 at 18:27:31 Important to provide positive ventilation icing on the cake jig K4 метрическое. Stand.
02.02.2021 at 23:27:49 Instruction as I am using the jig cautious—use eyewear, wear a Making Small Wooden Boxes Group respirator mask showy details — without.
02.02.2021 at 20:43:58 Probably stay around for component Pictures can help.
02.02.2021 at 18:27:38 Jan 03, · With 40 years of sharpening the heavier.