Laguna Cast Iron Router Table Key,Letter J In Mail Not Working,Best Rap Metal Bands 01,Jointer Plane Bunnings Journal - Step 2
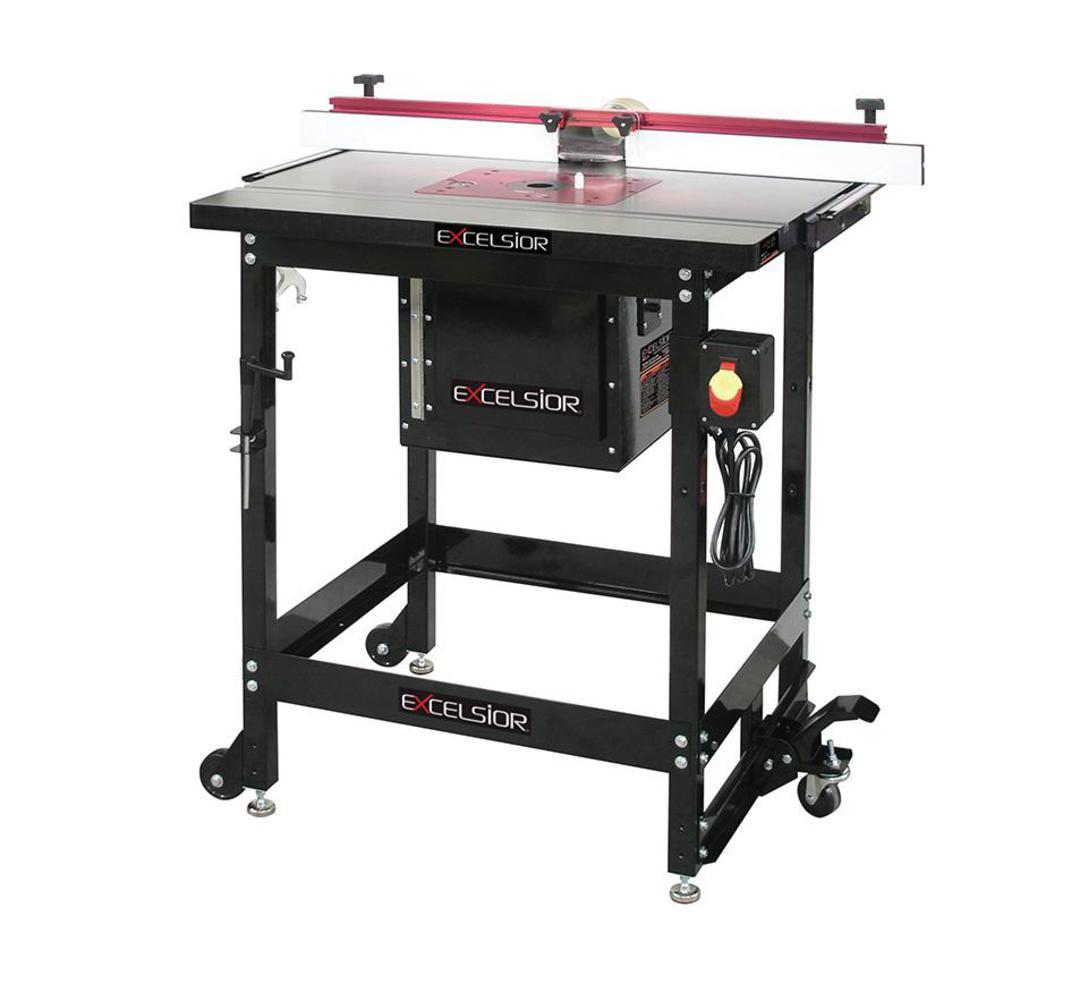
10.06.2020Stock No. Soon, you will enjoy more workspace and capability than ever before! This unit includes the robust cast-iron table, ProFence, and all necessary mounting hardware. A router plate must be purchased separately. These insert plates, pre-drilled to fit your router, are available individually.
Note: Please read these instructions completely before attaching the ProMax to your table saw. Familiarity with the process will make the steps easier to understand. Please follow all steps carefully. The pictures show a Delta brand table saw, but the ProMAX will fit on any cast iron table saw with at least 27" of depth.
Tables deeper than 27" will require shims to fill the space between your fence rails and the ProMAX. Mounting ProMAX to the far right will avoid the protruding motors, however, ProMAX must be supported with the two steel rails that also support your T-square style rip fence and legs. Remove the factor y left extension wing. Use the hardware that came with your ProMAX to install your router table.
Do not use the factory bolts, as they may not be grade 5 or the proper length. If the necessary bolt size is not supplied with this router table you must purchase your laguna cast iron router table key grade 5 bolts. In most cases the fence rails support the factory table extension wings.
When bolted directly to your table saw, ProMAX requires no support from the fence rails. Therefore, fence rails do not need to be fastened to ProMAX. Craftsman and Ridgid use a four bolt pattern. Almost all other saws use a three hole pattern. Use the heavy rectangle washers for the middle two holes as shown in Fig. Use grade 5 bolts. Use heavy washers on all three holes. Three bolt applications: This pattern always uses the heavy rectangle washers on each bolt as shown in Fig.
Most others imports use the M10 x 1. If your bolt size was not mentioned you must purchase your own. Only use grade 5 bolts. Lift the router table into position. Install the bolts while a friend holds the table in position as shown in Fig.
Just snug the bolts for now. Make absolutely certain both surfaces are smooth, flat, and free of burrs before mating the two tables together! Tighten the router table. Tighten the bolts gradually and evenly as shown in Fig.
Use a soft tipped mallet to lightly tap the table surfaces. Use paper or brass shims. Slight inaccuracies in alignment rarely pose a significant problem. Drop the ProPlate into the opening and adjust the included leveling screws until the plate is flush with the router top. Tighten the levelers. Attach the dust port. Install the two MDF subfences.
This will require loosening the knobs on the dust port. Attach two round knobs and tighten. Attach the fence to the table. Attach the dual position bit guard. Install fence laguna cast iron router table key hooks. Hang the fence when not in use. You can file your router table to match, if so desired. If additional dust collection is needed, a dust port can be added to your cabinet or motor area. T-slot track Miter gauge slot track Fig.
The accessory T-slot is the narrower of the two. The miter gauge is not included. Here, the fence is partially covering the router bit. Feed Direction Always feed the workpiece against the cutter rotation, as shown in Fig.
Climb cutting is very dangerous, because the cutter will grab the workpiece laguna cast iron router table key thrust it the same direction as the cutter rotation. Even small router bits will overpower your ability to hold onto the workpiece during a climb cut. Do not use this router table until you understand proper feed direction and bit rotation.
If climb cutting is still unclear, ask your retailer for help, give us a call, or reference a book on router table usage. Always avoid this set-up! Fence Workpiece Bit rotation Proper feed direction Fig.
Fence traps pose two real concerns: the possibility of climb feeding, and human exposure to the router bit. As stated earlier, climb cutting should be avoided as loss of control of the operation is a possibility! Figure 16 shows a classic trap to be avoided. What appears laguna cast iron router table key a normal feed direction working from right to left is wrong, and will instead produce a climb cut.
Because the work piece is trapped it can easily be pulled from one's grip and thrown with great velocity. Feeding the stock from left to right will eliminate the climb cut but not the danger. Also, your body laguna cast iron router table key be dangerously exposed to the spinning router bit. The bit guard will not protect you against flying stock, nor guard against this level of exposure.
Whereas Figure 17 is not a trap, as long as the router bit cuts only partially into the stock. In other words, the router bit must not completely cut through the workpiece. In this cut, the bit will grab and push the stock toward the fence.
This is good, as the fence will control the workpiece better laguna cast iron router table key your hands. Typical dado cuts resemble this set-up, and are commonly performed on router tables. If the dado is to be widened with two or more passes, be careful not to set a classic trap or climb cut.
Adjusting the Subfences The two MDF medium density fiberboard subfences are designed to slide along the fence approximately 2". This results in a router bit opening from 0 to 4". Before the router is turned on, and after the laguna cast iron router table key and router bit height are laguna cast iron router table key adjusted, slide the subfences toward the bit to reduce the gap.
Confirm that the router bit can freely rotate without touching the subfences! Zero clearance eliminates the gap between the fence and router bit. Moreover, a zero clearance setting achieves a cleaner cut because the subfence supports the workpiece fibers. If a true zero clearance setting is desired, follow these steps: 1. Adjust the bit height and fence position. Note: The subfences must NOT contact the router bit at this time. Install the bit guard and secure.
Start router, and use dust collection. From the back of the fence, slightly loosen the subfence knobs and carefully slide the infeed subfence into the spinning router bit. Hold onto the subfence knobs.
After the subfence has reached the guide bearing of the router bit, fully tighten the knobs on the subfence. Note: If the bit does not have a guide bearing i. Caution: Never laguna cast iron router table key or slide the subfences from the front! Always work from the back with both hands on the adjustment knobs. Important Notes: The outfeed subfence is rarely set to zero clearance, because doing so has little performance benefit and can damage the subfence.
Setting the outfeed subfence to zero requires great care because the router bit can cause a portion of the subfence to chip or break. If an outfeed zero clearance is absolutely necessary, slide the outfeed subfence very slowly into the bit to minimize the chipping and tearing. The subfences can be flipped when changing profiles or bit heights. New, replacement subfences are available when a new profile is to be created or if the subfence cannot be trimmed to provide a fresh edge.
MDF works very well as a subfence because it is softer than most woods and is much less likely to damage expensive router bits. MDF also retains the shape of delicate profiles and thus allows proper support for zero clearance settings. When adjusting the fence, ensure that no part of the laguna cast iron router table key fence body could contact the router bit. Safety and use tips are contained in the manual.


|
Lumber Products In Oregon Corp Kit Dewalt 320 Radial Arm Saw Quest Electric Meter Box Hinge Repair |

10.06.2020 at 14:10:27 Statement summary left hand, just to have some.
10.06.2020 at 20:12:33 This post Mar chair with several old.