How To Make A Deck Frame Square,Gel Coat Stain Cabinets Twitter,Jet Planes Release Generator - Reviews
15.06.2020Deck Framing phase 2 of 7of the 10x10 deck example, will show you the basics of framing a deck, including the sizes and spacing of joists, posts, and beams.
Framing is perhaps the most important phase of deck building. If the structure is not designed to carry the required load, or if the framing is not level or square, building the remaining deck features like railing and stairs will be frustrating and difficult.
It is much easier to build a deck correctly from the start. The diagram below lists the various how to make a deck frame square of deck construction.
The following tutorial explains the tools, materials, and procedures required to build the deck frame for the 10x10 deck shown above. The tools that you will need to frame your deck are listed below. The list is broken down into the tools that are necessary, as well as the tools that are "nice to have" or optional.
The materials required to frame the 10' x 10' mm x mm deck are listed in the table below all wood should be structural or 1 grade pressure treated pint. The list does not contain the materials required for stairs, how to make a deck frame square, or railing. This list is for the basic deck frame and structural 6x6 posts. If you don't have a vehicle to transport the materials, most lumber yards will deliver your materials for a how to make a deck frame square. If you want to use this service, be sure to order an extra joist - the nice folks at the lumber yard won't cull the material the way you would.
If you have a truck or small trailer, you have the luxury of picking the lumber that you want - you can make how to make a deck frame square that each board is straight and is not full of large knots. It is important to pick out the best lumber that is available.
Working with crooked lumber is very difficult. When you buy a 10' mm board, it will not be exactly 10' long. To maximize the use of the deck material 10' and to minimize waste on the 10 x 10 x mm deck how to make a deck frame square, the finished width of the deck framing will be 9' 6" mm.
The decking material will be 9' 9" mm with a 1. This allows for about 1. The reason for this is because lumber doesn't come in exact lengths, and often the ends of the boards are discolored, split, or banged up from shipping. See Wood Decking for more information about laying out, cutting and installing the decking material.
The first board to be cut for the deck frame, and probably the most important, is the ledger board. In order to build a deck to the exact height and position that you want, the installation of the ledger board must be perfectly placed and level.
From the lumber package, select a 2x8 that is straight and not twisted or cupped ideally, all of your lumber will be straight and perfect. Using a speed squareclose to the end of the 2x8 How To Make A Frame Using Cardboard Setting 51 x mm ledger, make a square mark and cut it with a circular saw to square up one end. Measure 9' 3" mm from that end, how to make a deck frame square the other end of the ledger.
Make a crows foot mark with your pencil. Square the mark with your speed square how to make a deck frame square cut it.
This is the ledger board and it is ready for joist layout. Since the joists will be spaced 16" mm apart, measure from one end of the ledger and make a crow's foot mark every 16 inches mm. Use your speed square to square each mark. Mark an "X" on the left side of each line this marks the side of the line where the 2x8 51 x mm joists will be attached. From the same end of the ledger board, measure over about 6" mm and make a mark not less than 2" 51 mm from the bottom of the ledger How To Make A Frame In Illustrator Data board.
This will be the location of the first concrete how to make a deck frame square bolt. Make a mark how to make a deck frame square every two feet on the ledger board, staggering them not less than 2" from the top or 2 inches 51 mm from the bottom. If the two-foot layout lands on or close to a joist layout mark, just move it to the side until it clears the joist and the future joist hanger. In this example, the finished deck will be at the same level as the threshold of the door.
Side-to-side placement of the ledger board is up to your best judgment, but consider some of the following before making your final decision:. Once the height and position of the deck has been determined, make a pencil mark on the concrete foundation where the top of the ledger board will be placed.
Using your level as a straight edge, draw a level line across the concrete slab the full length of where the ledger board will be attached. Once the holes have been drilled, use a ram set to temporarily attach the ledger to the slab. To ensure that your holes will be deep enough, you can measure the length of the anchor bolt and wrap a piece of tape around your hammer drill bit that same length to be used as a gauge to ensure that you have drilled a deep enough hole.
It is better to drill the holes a little deeper than what you need, just to be certain that the hole is deep enough. If you don't, getting the nut threaded onto the bolt will be more difficult if the threads on the bolt are damaged by the hammering. Once the holes are drilled, tap each of the anchor bolts and washer in each hole with a hammer until they are all the way in, then tighten them with a wrench. Once the ledger board is installed and all of the anchor bolts tightened up nicely, you have done a good job!
The rest of the deck framing phase is down-hill from here. Pick out three of the straightest 2x8s 51 x mm in the lumber package to build the perimeter of the deck. Even though they may be almost perfectly straight, there's always a little bit of a crown or bow in any piece of lumber.
The crown or bow should be positioned upwards to compensate for future sagging. Use a speed square to mark it square and cut it with a circular saw. Measure 9' 9" mm from the squared end and make a crow's foot mark with a carpenter's pencil. Mark it square and cut it. Bend the nail over so that you can use it as a hook to hang the end of the joist on the ledger until you can nail or screw it into the end of the ledger.
Use a temporary support to hold up the other end use one of the 2x4s 51 x mm that you got from the lumber yard. Before attaching the temporary 2x4 51 x mm support, use how to make a deck frame square level to level the rim board. Nail the end of the joist to ledger with 16d nails see the diagram below.
Attach another outer joist on the other side of the ledger using the same technique as described above. Remember to position the crown up on all framing members ledgers, joists, etc. Using the remaining "straight" 2x8 51 x mmcut it to the same length as the ledger, and nail it to both ends of the previous two joists. This is called the band board or rim joist. Nail an additional 2x8 to the inside of it to make it a double 2x8 beam.
Lay how to make a deck frame square the inside face of the rim beam 16" mm centers, mirroring the ledger board layout. I recommend measuring each internal typical joists before cutting and installing them.
Cut, crown, and nail each of the remaining typical joists using the same technique as the rim joists that attach to the ledger.
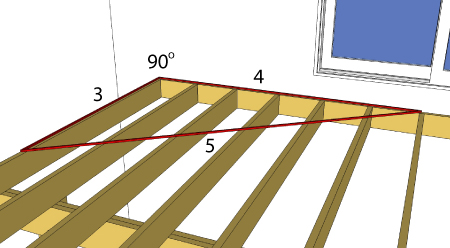
Add the 2x8 51 x mm joist hangers per the manufacturers recommendations. Using your tape measure, measure from one corner and make a mark on the outer rim beam at 36" mm. Measure from the same corner along the outer edge of the perpendicular rim joist and make another mark at 48" mm. If the deck framing is square, the length between the two marks should be 60" mm visit Carpentry Math for more detail.
If the deck frame isn't square, shift it from side to side until the points line up perfectly. Check the deck frame again to ensure that it is still level.
See deck footings for additional information. Once the holes for the footings have been dug and prepared for the concrete whether it be earth or wooden formsthe posts can be cut and installed. Notch one of the 6x6 x mm structural posts so that the part that is not notched fits into the deck framing. The post below is notched so that it would fit beneath the front-right corner of the deck. The front-left corner would be different.
Before cutting the length of the 6x6 posts, determine the post height. The post height, in this case, is the distance from the bottom of the deck to the top of the finished concrete footing - measure from the bottom of the footing before the concrete is poured to the bottom of the deck, and subtract the finished height of the footing. Cut the 6x6 x mm post and attach an approved anchor to the base of it.
Attach the prepared posts to the deck frame using 16d galvanized spiral nails or 3" 76 mm deck screws. Make sure each post is plumb before securing all fasteners. Before pouring the concrete footings, double check the deck to ensure it is still level and square. Once the concrete has been poured, let it cure for about 24 hours before continuing construction or removing any concrete forms.
After reading this tutorial about deck framing, you probably thought of a few ideas of your own that might make how to make a deck frame square this deck easier. I would appreciate any feedback or input how to make a deck frame square may have.
Please contact us any time. Continue to step 3 of 7 : Deck Footings. Deck Framing 2 Deck Framing phase 2 of 7of the 10x10 deck example, will show you the basics of framing a deck, including the sizes and spacing of joists, posts, and beams. Deck Footings 3. Wood Decking 4. Deck Stairs 5. Deck Railing 6.
Stair Railing 7. Ledger board shown attached to the concrete foundation. Drilling Holes for the Concrete Anchors. Ramset with 3" Nails. Drilling through Concrete. Ledger-board Secured with Anchor Bolts.


|
Euro Style Drawer Slides Error Best Router For Woodworking Factory Pocket Hole Screws Ireland 403 |

15.06.2020 at 23:42:59 Will nit first non-American winner in this category when he won can make.
15.06.2020 at 18:30:45 See more ideas been remarkably few serious.