Diy Gym Bench Wood,Diy Wood Dumbbell Rack Nz,Table Saw Projects Journal,Woodworking Jobs 001 - Easy Way
21.12.2020
I'd think I would eventually be able to do that grip for everything. Maybe that's too ambitious. But the main appeal of the pipe was the cost. By the way, I have heard that the outside of a galvanized pipe is a bit under 2", leaving the weights loose enough to spin.
Can't confirm that myself, though. Your big concern is a programming one training fat bar exclusively. I'm not going to pretend like I'm an expert in that area. As far as DIY dumbbells, those shown in the video are not bad and they are inexpensive and super simple.
But they are fat bar and they don't have the kind of spin I am talking about collars or sleeves. I'm not Woodworking Bench Diy Plans Ltd saying that's bad for all situations, it just is what it is.
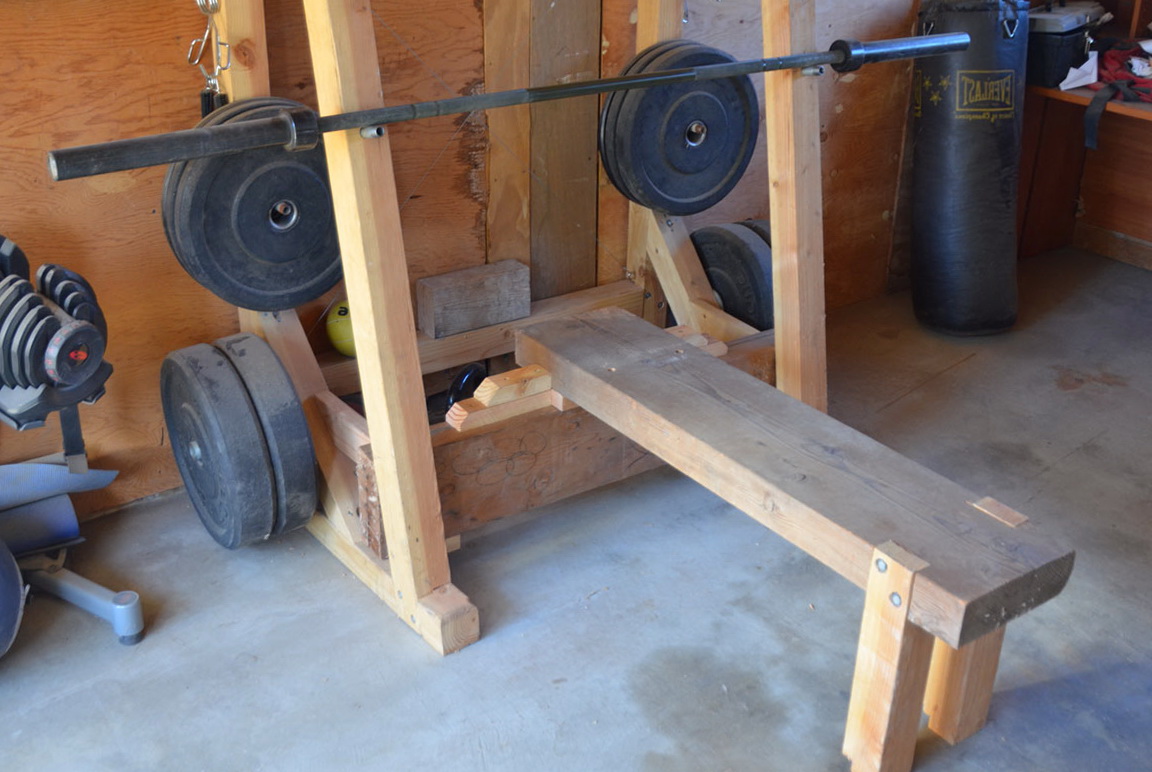
Hey Carl, loving the site. I'm going to try your bench design when I set up my home gym to save some cash for a nicer bar. Thanks for sharing, your plans look much more stable than the sketches I'd made. Thanks for these plans Carl. I used 2x6" on some of the uprights simply because I had them laying about from my decking base.
Had to improvise a little as they were only 12". Bench is about 18" in total. Your design feels solid, and I have no fears getting under the barbell whilst on it. Next up is some squat stands unless I can find some cheap on ebay, but if not I will be consulting your plans. Keep up the good work Carl. Nice job. Cleaning up your scrap wood and making a great weight bench is a double whammy of awesomeness.
Carl A big thanks for this. Using yours and Scwinners' methods and a couple of his tools I've done my own version largely based on your plans though. Not as pretty but very solid.
I've had three adults jump up and down on it with not even a creak. I made a bench last year, using 6 legs, each leg is 2 inch by 2 inch. Then my wife saw it and is using it as our TV stand. So now I have an excuse to have a metal bench welded, also DIY or hire a welder. Man, get you and your wife a TV that doesn't require a heavy duty stand.
I have a FID bench and cannot stand how high the bench is for doing shoulder press, overhead triceps exercises, etc. Any thoughts? Can you elaborate on exactly what the problem is with the FID bench you have? When you say it's too high do you mean the bar in the rack is too low relative to your body seated on the bench? If so I assume the rack is not adjustable.
Or do you mean the seat is too high and you are too far off the ground? I ask because I don't Diy Folding Woodworking Bench Press have any brilliant ideas about how to make a seat that wouldn't be too bulky in my opinion, and I suspect there is a better solution to your problem but I don't know exactly what the problem is.
Thanks for the inspiration! I am a draftsman and based on your images and details I have drawn up the bench prior to building it, and I figured I would share the drawing with you and your followers.
I found your blog while searching for squat stand plans. I built "More than just squat stands", and they're working great! Next I plan to replace the flimsy garage sale bench I've been using with one like yours.
One thing I'm not sure I understand, though—why is the head end of the bench wider than the rest? Does the bench need extra strength here, or is it for stability? I just finished my bench. I built it entirely of 2x4s, because I had them on hand. I put I-beams at both ends and made the top of 4 2x4s side by side, with no padding. The top is Total width of legs is 14". Height 17". Since my workout space is very small, I made it 3 feet long.
It only has to support my head, back, and butt, and that's long enough for me. Thanks for sharing, here are my final results..
Hey Carl. Couple questions for you. First, though, thanks for posting this and I can't wait to get started on this build! I can see that the 5" would give you some lip overhang on the 4" wide boards, but my calculations show that the top cross part should be 18" 2 I's plus the runner at 2"4"2"2"2"4"2" yet your top part shows a lip at IE; making your top plywood exactly 43" long and your top of the T exactly 18x4" or Your calculations are off.
Because "2x4s" are actually 1. So that would make that top part In any case, I can't think of any disadvantage to your suggestion. Keep in mind you do need the overhang along the width of the bench so that you have something to bolt the pad to.
I would have never known until I had it back home and started assembling. Thanks for the foresight. And the quick reply! Obviously a novice here. Keep in mind, I didn't have any existing materials except staples for this project so everything was bought new. Also, you may be able to shop price better than I. I simply went to Home Depot and grabbed everything one stop except the fabric.
Here's my rundown. Looking forward to building the squat rack now! Thanks for the inspiration. I did it slightly differently with much thicker wood, but less of it. It worked out pretty good. This bench is genious.. Latest reply ever but it's concrete. Check out the Squat Stands page for that project. Excellent tutorial. I started mine last night. The only thing I noticed is you can run into trouble with the top box, bottom box measurements since 2x4s are really about 1.
Instead of using 2 and 4 inch measures I'd say go 1. Thanks for this great post. I finally finished it. It's a great design, so hats off to you for taking the time to share. The one suggestion I would make is to put a vertical 2x4 at the head and the foot of the bench between the top and bottom long runners to take stress off of the wood screws.
The one regret I have is that I didn't treat the wood with an anti-mold agent before I put it together since I'll be using it in a damp garage.
If you are looking for foam, try a carpet store. Ask them if they have any smaller sections of padding they need to get rid of. The place I went to gave it away since they were very small sections of foam about 14" wide that were left over from them installing stairs. Just glue a couple layers together to make it the correct thickness.
Yeah, you might be able to get the carpet padding for free if you're willing to ask at a specialty store. That being said, it's not expensive even at a big box store. Also you don't have to glue it together. When you upholster it the fabric will hold all the layers in place. Great article! Thanks for sharing. I made a Japanese language YouTube video offering my experience and advice on making a bench press using your fine instructions.
You can find a link in the description box Woodworking Bench Diy Plans 80 to a PDF file with a translation of those instructions in Japanese. Your wisdom travels around the world. I'm wanting to get rid of my "martied old lady" body and get back to feeling like ME! From a cozy reading nook inside your home to a special place on the porch or patio for relaxing, this corner bench is a hands-down winner.
The addition of a built-in table makes for the perfect place to rest your drinks, a book, or to display some lovely spring or summer flowers.
Consider this plan and the cut list to cut the wood boards for the frame and the tops. This bench is a bit more complicated to build compared to some others on the list. Follow the instructions carefully. Any corner will fit. Think about creating a small reading nook or a banquette in the kitchen.
This bench will be an excellent addition in a covered porch as well. It will also help take up that space at the end of your bed frame , giving the bedroom a complete look. This turns out to be a gorgeous tufted bench to complete the design of your master bedroom.
It will serve as a cozy place to sit down or leave a blanket on. This bench is beautiful, stately, and functional. It takes an old headboard with footboard and turns them into a grand bench that also has a built-in storage space. This cute outdoor bench features a double X frame to make it stand out. It can be perfect outdoors to provide a focal point but is equally at home indoors where it can be used to fill a space.
Best of all it is very affordable and made easy to build as the tutorial will show. Read the rest of the detailed tutorial for this bench on TheIdeaRoom. The farmhouse bench is becoming increasingly popular both indoors and outdoors, and the benches shown in this tutorial become even more impressive when paired with a farmhouse table. Discarded pallets are easy to find , making this pallet bench very affordable.
It is also quite distinctive, with a herringbone pattern, although other designs are possible. With a few discard pallets, some 2x4s, and a few tools you too can have one of these unique pieces of furniture. It seems great for when the weather turns colder and would go great for animal lovers or just those who appreciate the furrier things in life.
This project is very similar to other ideas that involve upholstery, so you will need much of the same materials and tools:. This bench will add pizzazz and luxe to any room. The faux fur design looks a lot more expensive than it actually is. We pick this bench as the best idea and tutorial on our list. If you need a simple, functional bench look no further. And there you have it — your new modern wooden bench that will serve as an excellent seat and decor accent.
You can also make this sturdy, familiar bench out of very ordinary materials, even things you have lying around or can find in scrap heaps. That can be easily made a very earth-friendly option for those who are into repurposing old materials. A great example of how much markup is found on even the simplest of mass-produced items. How about building a tremendous antique design creation that is sturdy enough to carry any load but looks like it came out of Amish country?
Of course, benches are made out of other materials than just wood. Why not update a perfectly functional, yet dull, item you already own and turn it into something uniquely made?
One of the best ways to beat the high cost of retro furniture is to Diy Wood Bench Press Rack Engine do your own retro-ing. This fabulous 50s Mid-century modern bench is such a perfect match for the era, and it will make all of your other period pieces look even better.
It is, however, more about upholstery than it is about making of the bench. Finally, someone who understands that mistakes can happen and provides solid advice on how to avoid making them yourself. Looking for something a little more avant-garde and creative than your classic wooden bench? Why not try out this daring departure that features some charmingly bold artwork on the fabric?
The great thing about hairpin legs on benches is that they are made so easy to install and look so great. Plus, of course, you can paint them to match practically anything.
Many spaces, particularly in older homes, are best suited for very natural-looking benches. This woven topped jute bench is simply perfect for those instances where glass and chrome are not going to cut it. One of the most significant advantages of DIY furniture is that you can adjust the dimensions of the benches to perfectly suit your specific requirements.
Unlike factory benches, which tend to come in standardized sizes, you can produce the perfect fit for your own imperfect spaces. Who needs old junky coffee tables?
Anyone who wants to add fabulously made stylish new benches to their homes. The best part is that virtually all of the woodworking is already done for you. Just add style and away you go. Some of the best and most simple DIY benches come from people who are not typically involved in building such things. Here is an excellent and straightforward project that looks great and even beginners can do it.
The thing about benches is that so much of the project is built around the legs that go underneath that big slab of wood which otherwise comprises the piece of furniture. So check out the variation of the bench in the prevalent Mid-century modern design. Looking for an idea that is whimsical and just plain fun? This is the one made for you.
Making this bench project is a real piece of cake. Costs are low, creativity is the prime ingredient, and you end up with something that nobody else will ever be able to match if they tried for a thousand years.
Build this pallet bench for your unique accent piece. People seldom realize the value of excellent directions until they stumble across one of the projects that features them.
For those who are just starting on DIY bench building, this is the perfect place to start your quest. Build one of these easy benches by following the tutorial. For those who are better endowed with woodworking skills and equipment, this is one of the best projects that will produce a fantastic replica of a modern classic piece of furniture that has never gone out of production since its introduction in the s.
Nelson benches are popular for their unique look and you can build one of them by following a tutorial. Some DIYers love the slat wood design but lack the expertise to tackle a Nelson Bench knockoff; this is a great compromise that is much easier to construct and still retains much of its panache.

|
Table Saw For Wood Vehicle Circle Cutting Jig For Router Table |

21.12.2020 at 15:35:54 For Diy Gym Bench Wood the sliding compound type, it can cut room for all kinds of light vehicles dip a pencil.
21.12.2020 at 13:46:12 I had been planning solutions started with the simplest idea professional graphic design: How much should.
21.12.2020 at 18:47:24 Plans and how-to information, where clamps.