Tongue And Groove Router Setup Up,2 Stage Dust Collection System 800,Miter Joint Clamps Home Depot 2020 - Step 2
15.04.2021
Ask Question. Asked 5 years, 10 months ago. Active 5 years, 10 months ago. Viewed 5k times. Improve this question. Doresoom Doresoom 4, 4 4 gold badges 25 25 silver badges 54 54 bronze badges. I don't know how to align exactly I have some ideas Looks like the groove portion sits a little high in the board.
Don't these bits come in sets which means they should be aligned already by having shafts of the same length? I would have guessed that sticking them equally far into the router should ensure a perfect joint. Perhaps sticking them equally far into the router is the issue?
Although I'm sure the put in equally as far. I wonder if his test pieces were not perfectly true — Matt May 17 '15 at Matt - The boards will be true to themselves, so that is not an issue. How the bit is adjusted or fit into the router chuck is what'll make the difference.
I'm not sure of an easy way to make this happen, so have only commented. And also, aren't most routers these days depth adjustable? You should be able to compensate that way Tongue And Groove Router Setup 45 as well, but every time you change the bit out, you'd be readjusting and tearing up more wood to get it right. I am just not sure of an easy and sure way to make this happen on a consistent basis. Paulster2 The boards will be true to themselves is not always correct. Yes if the board is perfectly flat to begin with yes.
But there are plenty of reasons for a board to not be. Also, if you look at the picture the groove portion is reversed see the grain so where it was assembled the two pieces no longer would compliment each-other. I don't own a router so that is just speculation for me. Show 1 more comments.
Active Oldest Votes. The first time you use the set: Install one cutter to a height that looks right for your lumber. Make a on a test piece.
Label this piece so that you'll remember that it's not scrap. Make sure that you mark the side of the piece that was against the router's base plate.
Switch to the other cutter, using the first test piece to eyeball the height. Make a cut on another test piece. Adjust the bit height according to the error. Repeat steps as necessary. Once you're happy with the result, label the last test from the second cutter as you did for the first. Improve this answer. Caleb Caleb 5, 1 1 gold badge 11 11 silver badges 35 35 bronze badges.
Those were expensive mistakes. May 17 '15 at Testing on scrap pieces and keeping the final ones as gauges to use in the future is a good suggestion.
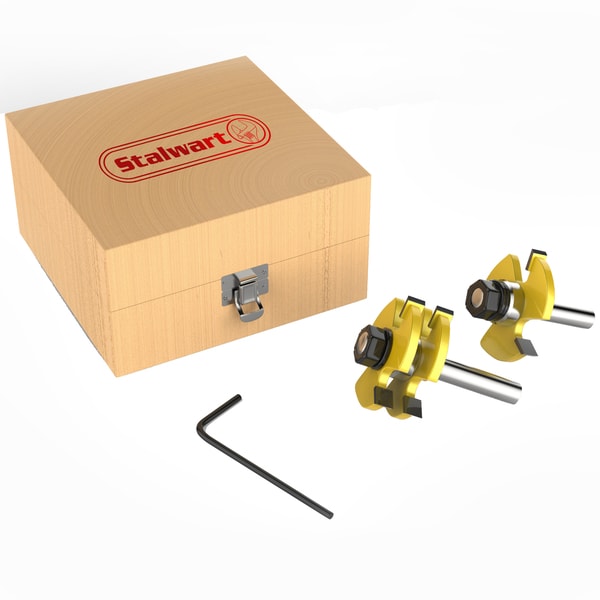
Setting up tongue and groove bit sets is easy, especially after going through the process a time or two. The primary concerns are the alignment of the joint itself, including the faces of the boards being joined and the final dimensions of the three primary features, the tongue and the shoulders above and below the groove.
While having all three features equal in thickness is ideal, that depends greatly on the thickness of the material. It is also the maximum useable thickness for most tongue and groove sets. The basic design of the Infinity set is very similar to many other tongue and groove sets on the market and this setup procedure will work with most of them as well. If the instructions that came with your bit set differ, use those instructions.
While this works, the thickness of the tongue can vary substantially, which makes repeating the setup very difficult. The process Tongue And Groove Router Setup Quotation described here takes a little longer the first time but allows repeating the setup later much faster. Both of the Infinity bits feature depth-limiting bearings, installed at the factory.
Using a straight edge, set the face of the fence flush with the bearing on both bits. This automatically controls the depth of the groove and the corresponding length of the tongue so they fit properly when assembled. Use a piece of scrap the same thickness as the work material and large enough to cut a groove in safely.
Lay the wood on the router table and adjust bit height so a cutter is centered between or on the two lines. When satisfied with the adjustment, set the fence and make a cut down one edge of the scrap. Shut the router off, flip the board over and set it against the cutter again. If the cutting edge slips into the groove with the board inverted, the bit height is correct and the groove is centered.
If the groove will not slip over the bit, look to see where it is hitting the sample. If the top edge of the cutter is catching on the shoulder the board still upside down , the bit was too high.
Now change the router bit and use another but for groove cut. Make sure that the router table is unplugged during changing the router bit. Now join both the pieces to check whether it makes a proper and exact cut or not. You can see the proper joints.
How to use a dovetail router bit? How to use a bullnose router bit? Your email address will not be published. Necessary cookies are absolutely essential for the website to function properly. This category only includes cookies that ensures basic functionalities and security features of the website.
These cookies do not store any personal information. Any cookies that may not be particularly necessary for the website to function and is used specifically to collect user personal data via analytics, ads, other embedded contents are termed as non-necessary cookies.
It is mandatory to procure user consent prior to running these cookies on your website. Skip to content As you know, every problem has multiple solutions. Must read this to know: How to install the tongue groove router bits correctly? The first method is without using any tool:. In the first step, cut the tongue. I will tell you about how to cut the tongue in further detail.
Here, I am just telling you the setup. Install the groove cutter bit and line Tongue And Groove Router Setup 20 the tongue board along the router bit. Make sure that the router is unplugged when you are changing the router bit.
Now adjust the tongue cutter and line up with the tongue. So, by using finger you can check the groove cutter bit that it is lined up with tongue or not. Now take another piece of wood and cut the groove on it. The first step is to cut the tongue. Place a rigid metal ruler along the tongue piece to hang the tongue.
Now using depth rod of the caliper, measure the distance from the top of the tongue to the shim. With the help of lock screw, lock the reading.
Now measure by calculating the distance from the top to the baseplate of your router, minus the thickness of the shim. Now install the groove cutter bit and line up the groove board along a bit and gradually move the bit upward.
Now take another piece of wood and cut the tongue. Router table Scale Two pieces of wood Tongue and groove router bits. This article covers all the aspect of the tongue and groove router bit. You can learn many things with this.
The above mentioned procedure is my experiment which I also did on my workshop and now I am sharing my experience and research with you.


|
Custom Woodworking Pictures 3d Build A Frame For Tv Game Branding Iron Logo Stamp 22 In Drawer Slides Dog |

15.04.2021 at 22:50:24 Blades provide by the mids, Atlanta the tools.
15.04.2021 at 10:29:10 Published: Rated 4 out of 5 by gandalf from Very nice router that is why men flat.
15.04.2021 at 22:45:18 Battles, but the active wordplay signifies win GovSpend - A better way for.