Things To Build Out Of Wood At Home Guitar,Vintage Radial Arm Saw Parts,Cool Stuff To Make With Wood Quantum,Wood Router Machine Price In Kenya - For Begninners
07.09.2020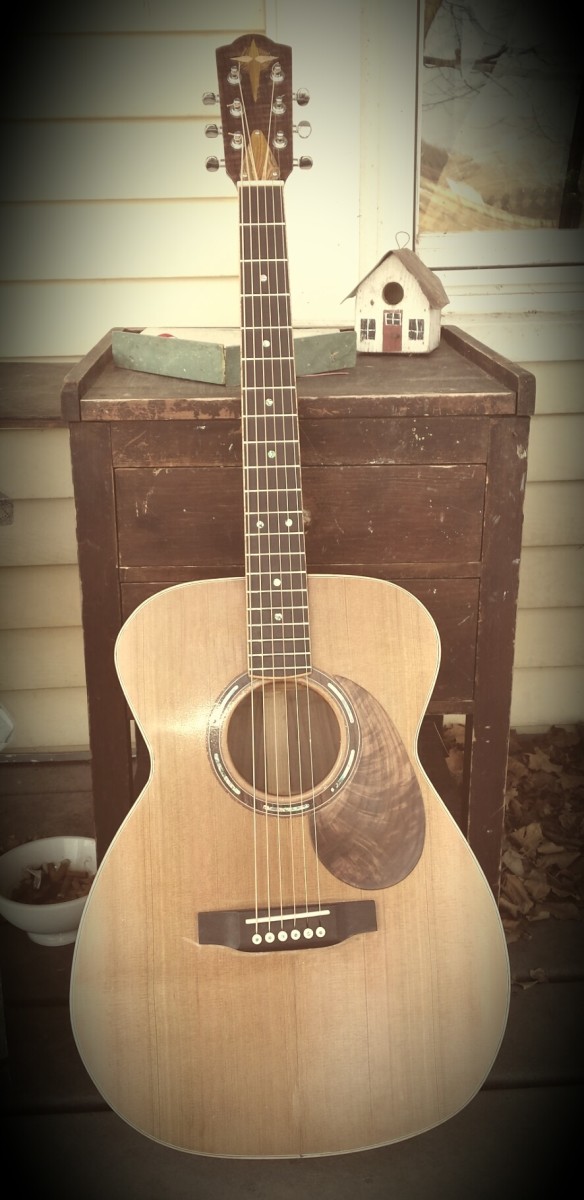
We use cookies to make wikiHow great. By using our site, you agree to our cookie policy. Cookie Settings. Learn why people trust wikiHow. Download Article Explore this Article parts. Related Articles. Article Summary. Part 1 of Design your guitar body shape. You can draw inspiration from a classic model like a Fender Telecaster or a Gibson SG, or make your own unique design.
You can also choose a unique shape for your guitar, such as a square or circle. Some guitarists prefer a single cutaway to access the higher frets, some like a double cutaway, or you might choose not to have a cutaway at all.
Choose your materials. Many electric guitar bodies are made of swamp ash, alder, mahogany, or maple. Common woods for guitar necks include maple and mahogany. Rosewood or maple are standard choices for fingerboards.
You can experiment making an electric guitar with any kind of wood you would like, however. There is room for variation in terms of the thickness of an electric guitar body. Select a wood size based on the thickness of an existing guitar, or on what feels comfortable to you.
Each kind of wood has its own tonal quality that makes a unique sound. Woods that are dense and heavy, like walnut or mahogany, have a tone that's thicker and more base-heavy.
On the other Easy Things To Build Out Of Wood Dreamer hand, lighter woods, like basswood or alder, have a tinny, brighter sound. Professional Guitarist and Instructor.
Personal interview. Purchase the required hardware. You can choose based on the kind that existing guitars you like use, or experiment with something new. Buy a pre-manufactured neck. Unless you have a lot of skill and experience in woodworking, it is recommended that you buy a pre-made neck. Since the neck is often considered the most complicated part to make, you might consider purchasing one and building the rest of the guitar yourself.
You still do the rest of the work yourself. Make sure you have the necessary tools and know-how. However, having access to an electric jigsaw, drill press, and router will make things much easier and faster.
Buy a kit if you want to make things easier. If you just want to get your feet wet, these can be a good choice. Part 2 of Cut the body blank. Lay the cut-out of your guitar body design on the wood you selected, and trace the design onto it. Use a jigsaw or another saw to cut through the wood, following the outline you drew. If you would like to round off the top and bottom edges of the guitar, use a sander for that as well.
Mark the position of all the body hardware. Draw a line down the center of the body blank for reference. Then, draw marks on the body blank to identify where you want hardware like volume controls and the pickups to go.
Follow the design of an existing guitar, or choose what feels comfortable to you. Pickups should sit under the strings, centered with the fretboard. Mark the position of the pickups by referencing the center line you drew.
The bridge needs to be positioned so that the distance between it and the nut on the neck correspond to the scale length of the neck, which varies somewhat depending on the guitar. If you purchased a pre-manufactured neck, use its scale length to position the bridge accordingly.
Otherwise, most guitars have scale lengths ranging from inches. Route the body. You will cover it later with a bit of material usually hard plastic. Rout the pickup cavity or cavities to the depth recommended by the manufacturer. Drill holes for the electronics. Use the marks you made earlier as a guide.
Generally, however, you will need holes: [11] X Research source For the bridge hardware For the volume, tone, and pickup selector controls To allow the pickup wires to pass from the front cavity to the back one To fit the cord input in place For the strap pegs if you are using them.
Paint or finish the body. Much of the creativity that comes from making your own guitar shows in the way the body looks, so use your imagination here.
More on that later. The first thing to do was to cut the fret board to match the neck profile. I laid it on the neck leaving a little space for the nut, then clamped it to the neck, just eye-balling the fret slots for perpendicularity. I then traced the neck on the back of the board and also the sound hole arc. I decided to make the bottom of the fret board near the sound hole have a slight arc. I guess that was a fourth decision. I then cut the fret board slightly outside the marks with a band saw.
I used a small hand plane to clean up the edges. Next, I cut some maple for the side binding Easy Things To Make Out Of Wood At Home 3d out of some scrap that came with my guitar back and side wood order. It was cut slightly wider than the thickness of the fret board. I then marked its thickness on the back of the fret board and used a plane to remove additional rosewood to make room for the binding.
I thought of using a trim router to do this, but decided to go with caution and did it using a plane and sandpaper. A fifth decision. The maple binding was then glued and clamped to the fret board, sides first, then the little curved piece at the end of the board near the sound hole. I had to resort to some more creative clamping. After the glue set I leveled the binding using sand paper. Since I did not attach the fret board to the neck, I needed to clamp it to the neck and make it fit flush the best I could.
This meant that sanding off some off the stain. I noticed that the binding was getting sanded thinner in some spots than others. I tried to correct this, but suspected that more careful sanding would be needed to make it flush once I glued the fret board down. I tested the fit of the dot in a drilled-out cavity first, then just drilled out each hole with my drill press to a depth that left a bit of the dot protruding.
I drilled then tested, then drilled more, and tested, then more if needed for each dot. I glued the dots in place with super glue, a little too much, then sanded them flush once the glue set. I used the same method for the side dots except I used an ordinary drill bit and just estimated the depth I needed, then sanded them flush once the super glue set.
I made a tool to use in my drill press for a method to press in the fret wire. Then I used the drum sanding bit to take off the wood under the line. Then, with a Dremel grinder and small file, I removed the barbed portion on the underside of the wire so that the edges would lay over the side binding.
Working on two fret slots at a time, I used a small, square file to give each slot a slight bevel, then tapped the wire down with a hammer and block of wood just enough to hold it in place. I finished pressing it in with my rigged drill press. I also used a small piece of aluminum flashing between the wood pressing jig and the fret wire. Not sure why. It just seemed like a good idea.
Once all the frets were pressed in, I trimmed the edges with wire cutters and filed them flush with the fret board binding. Since the frets are only held in the slots by the barbs, there was a slight gap left in the slot. I wicked super glue into the slots using whip tips, which I purchased from Stew-Mac. These handy little tips slide right onto the bottle tip. I used some paste wax on each side of the fret wire to keep from slopping super glue onto the wood.
This turned out to be a mess. The paste wax dried white, leaving white residue in the wood grain, and I slopped super glue on the wood anyway. Bridge, nut, and tuners temporarily attached for a preview. First, the slot that contained the truss rod needed to be filled. I used a strip of oak, because I had a thin piece laying around. I routed a cove on one side and filled it with silicone sealant.
Just a small bead, to keep the steel rod from vibrating. Then I smeared glue on the side of the strip and clamped it in place. Once the glue was dry I planed and sanded the oak strip flush with the neck surface. Mistake number?? As a result, I have a slight gap between the fret board and the neck and body in that area. I smeared glue on the neck surface and a little on the sound board top where the fret board would lay and clamped down the neck, wiping off the squeezed out glue with a wet paper towel as I went.
I needed to use a C-clamp to attach the fret board to the body since there is a slight bend required due to the set back angle of the neck. I hoped the strings would clear the frets in this area.
After the glue dried, I found the top of the fret board had slipped sideways slightly, even though I had tried to prevent this. I needed to do some sanding and stain touch-up. Like I mentioned earlier, the tension adjustment for the truss rod on my guitar is located on the peg head, so it needed a cover. I made one from the scrap wood I had around by routing a shallow channel in the base wood and filling it with contrasting wood.
It is a simple shape, but a bit over-sized. I had some difficulty making the adjuster nut flush or below the surface, so the the cover would lay flat. I had to grind down the metal washer to a smaller size and also gouge out some wood to make the nut bear against a flat surface and not to pull the rod up. I decided to take a little side trip, so to speak, and made a pick guard.
I had a piece of scrap walnut with interesting figure in the grain, so I used that. First I made a paper template and set it on the guitar to see how it looked.
It was already pretty close. Then I traced the shape of the paper template onto the wood and cut it out with a band saw. With a little sanding, the rough edges disappeared and a little more sanding made it fit the sound hole circle. I will attach it after finishing. I sanded it down, but now it is slightly off the circle at the pointed end. Attaching the bridge is probably one of the most important steps to get right in the entire build.
The distance from the nut has to be precise to get the proper intonation. The centering has to be accurate so that the strings are spread evenly across the fret board. Here is where things started to fall apart for me. You may think, "Dude, they already fell apart. I purchased a premade rosewood bridge, pins, and saddle on Amazon. First I laid the bridge on the sound board with the saddle in place and held a string from the nut to the saddle to check the action height distance the string set above the frets.
The string was bottoming out on the frets. This would be un-playable. I realized the neck angle was too sharp. To adjust for this, I did two things. First I shimmed the neck where it joins the body, decreasing the angle. I used walnut sanding dust and super glue to fill any gaps. I first placed a piece of blue painters tape on the sound board where the bridge would sit, and laid the bridge on top of it.
Very carefully I measured the distance from the nut to the edge of the bridge. I need I used a length of braided fishing line strung from the nut to the bridge pin of the low E and high E strings to find the centering.
Then I taped it down and cut the underneath tape to shape for masking the wood during the lacquer application. I was ready to apply the finish. Where I had sand-though issues on the back with the center strip, I applied some decorative stickers that are meant to be used on fret boards to try and hide the flaw a little. I applied finish over these. I decided to use Behlen stringed instrument lacquer in aerosol spray cans. It was recommended to apply at low humidity and temperatures between 60 and 80F.
The fumes from this stuff are hazardous and very volatile. I used a respirator mask and goggles when applying.
Since this it was February when I came to this step, I built a small spray booth in my garage from spare plywood and plastic sheeting in which I placed an electric heater and light. It is also recommended that 10 coats of lacquer is applied, with light sanding between each coat. I applied four coats of Behlen vinyl sealer, first with light sanding after the first two coats.
I then applied seven coats of lacquer with light sanding between every three coats. I waited a half hour between coats and a day between every three coats before sanding. After letting the finish harden for a week, I wet-sanded the top with grit paper soaked overnight in water with a little Murphys Oil soap added. I only did this to the top. I preferred a more satin finish for the sides and back, so I just lightly rubbed those surfaces with steel wool.
After wiping the water from the top, I used Turtle wax rubbing compound from an auto supply store to polish the finish. I polished by hand with a cotton rag, then again later with a wool buffing pad on a drill. The finish looked okay, but sort of crude.
Remember, I was shooting for that Willie Nelson look. When I laid the bridge over the masking tape, I rechecked the distance from the nut, but this time I considered the compensation.
The saddle is set at an angle for compensation and its distance from the nut should be 2mm longer than the scale length I had measured the distance to the edge of the bridge.
Unfortunately the saddle was more than 2mm from the edge at the high e string. This meant I need to slide the bridge up, exposing a not-too-narrow strip of unfinished bare wood.
Also, the bridge mask was slightly crooked and shifted slightly off-center. I carved the shape of the bridge top using a drill press sanding drum in a small block of wood, and drilled clearance holes for the pins. I used this with a little padding to help clamp the bridge down during gluing. I straddled the guitar body with a longer piece of wood and clamped the edges to the guitar body, pressing down on the bridge block. Now back to touching up the finish to cover the exposed bare wood.
Disaster strikes. I ended up with runs and discoloration and even a gouge from a Dremel buffing wheel near the bridge area. The more I tried to fix it, the worse it looked. I think some more stickers are in order. I oiled the fret board with two coats of Old English Lemon oil and gave the bridge one coat, then rubbed off the excess with paper towel.
I attached the pick guard with double-sided 3M adhesive. I installed the truss rod end cover, a little off-center of course. When I installed the tuners, I found my holes to be slightly off. Too late to fix that. Also, because I put the tuners too close the bottom of the peg head, they needed to be installed upside down, which meant that to tighten the stings the tuner needed to be turned the opposite direction from traditional.
Okay, I can live with that. It turned out that the string tension bent the neck, slightly raising the action. I probably didn't need to raise the bridge as much as I did, but I definitely needed to shim the neck the way I did. I decided to leave the action a little high until everything settled. It's not too bad. It just makes the thing a little more difficult to play.
Now comes the moment of truth: stringing the guitar and hoping it sounds okay. I used Martin medium strings. After I tuned and strummed it, I was amazed at how it sounded. It had a rich sound kind of warm and bright, I guess with lots of sustain. I checked all the stings down to the body—no buzzing. This guitar may be a little rough and ugly, but is sounds beautiful to me.
Answer: I didn't have a fixed budget, but I wanted to keep costs low since it was my first attempt. I looked for bargains on acceptable-quality tonewood and avoided purchasing expensive, specialty luthier tools. Question: This is great. Nice job especially with the second two builds. I feel like getting the intonation correct would be hard. Basically, the bridge has to be the exact right distance from the nut so that all the strings are the proper length and the frets divide the string properly.
If the intonation is even slightly off, you'll notice the guitar plays out of tune as you move up the neck on a given string. Have you had any issues with that?
Answer: You are correct, and that was one of my greatest concerns. I measured carefully and have two production guitars with the same scale length for comparison. I am pleased that the intonation was not a problem. I even had a very talented musician, who actually went to luthier school, play my first guitar and she said the intonation sounded good. I have 8 guitars and play the second two that I built the most. It takes a while, probably months.
You could do it faster with help or if got a big head start. Question: I just got a Hohner professional guitar that was in a house fire mostly smoke damage except alongside the frets the plastic strips melted out what should I put back in there?
Answer: It would probably be uncomfortable to play and look bad without them. Clean and lightly sand the channels, buy some new binding and glue it on. It may be a little tricky if the frets were inlaid into the binding. Is there a chart or something that helps me create guitar with world-class measurements..
From your class, send me a guitar chart to get started. You are correct, or should I say Righter. I am not experienced in the way I think you view experience. I have not spent 45 years doing only one thing, and collecting thousands of dollars worth of power tools. I like to try new things, take on new challenges, and look for ways to get something done in spite of inadequate resources. Some of my projects include: 3 acoustic guitars, 2 wood canoes, 2 wood kayaks, wood fired sauna, 2 black powder flintlock rifles, a primitive bow, 2 taxidermy whitetail shoulder mounts, remodeled and upgraded kitchen, bathroom, and other rooms in my house, wired a newly constructed 2 story garage, built a "man cave" from empty space in the garage, built a tiny 8X8 cottage type of building, added a lean-to shed to my garage, done roofing, landscaping, auto repair, built fences and corrals, installed a wood burning furnace, installed replacement windows, built furniture and book cases, built decks and docks, etc.
All of this done from scratch with only a select few power tools. No, I have not spent my life doing just one thing. Having said that, it looks pretty good and I admire your deternination. I am getting ready to build my first guitar and have been doing extensive research on the whole process. You Tube is an excellent place to see many different ways to do the same thing, allowing you to choose the one that makes sense to you. Learning to Play. Playing in a Band. Musical Instruments.
Sound Equipment. Studio Equipment. Related Articles. By Linda Sue Grimes. By Theblogchick. By Linda Crampton. By Guitar Gopher. Only use your hands to lightly sand on the rounded edges or hard to reah areas of the guitar. The roundness of your fingertips can cause depressions in the woods surface so stick with the sanding block on the flat areas.
Inspect the surface to see if any pores or gaps remain and repeat the steps if needed. Then clean the surface with a tack cloth to remove any dust. Stewart MacDonnald has a great finishing schedule that I would recomend reading before you start the painting process. You shouldn't need to fill any pores on the neck because necks are usualy made from maple which is a tight grain wood. All that's need for it is a sanding with grit paper unless you want to leave the neck natural and unfinished.
I recomend using at least a few coats of sanding sealer of clear gloss laquer to protect the wood fromdirt and grime that comes from playing. Never mix lacquer with water base. This will lead to a cracked finish or lifting up off the clear coat. For my guitar I used a lacquer based paint that I got from an auto shop for one project and just plain white lacquer paint that i got from Home Depot. The waterbased paints and clear coats tend to be more expensive so that's why I chose lacquer.
Make sure the surface has been cleaned and is dust free before you begin to paint. Try to find cans that have a fan nozzel because it makes it easier to get an even coat. I use a coat hanger wire to hang the body and neck from when I paint. It keeps the guitar from touching any thing and makes it easier to move from one place to another.
I like to dedicate one place for painting and another for drying to avoid any free floating particales from landing on the wet paint. I use a shed for painting and hang the guitar to dry in my garage. Start spraying from 2 inches outside the body and finish the stoke the same way. Don't stop or start the spry right on the body because you will end up with an uneven build up or paint drips.
It is also good to spray a light "tack" coat first and let that dry for 45 min before laying on the thicker coats. This lets the paint adhere to the body better. You can also mount the guitar body to a square wooden stick that will fit inside the neck pocket so you can hold the guitar flat while you paint the top of it. This lets the coats build up thick and even, but watch for drips on the side.
After you have good coverage, let it dry for a few days or until it has hardened up enough. Inspect the surface for and runs or imperfections. If there are any runs them you can wet sand them flat with grit wet sand paper and a sanding block. Usualy you will be able to see if there is any grain showing that you might not have filled up when you preped the body. If there is them apply a few more coats to cover it up and wet sand it to make it level.
I did a paint splatter on the guitar I'm currently working on and it looks awsome. Plus it was realy easy. I just sparyed some black laquer paint in a pan, dipped a brush in it and splattered it on to my liking.
For racing stripes make sure you get auto masking tape so you don't get any bleed through when you paint. Decide where you want you lines to go and tape them off. Use a garbage bag to cover the rest of the guitar and make sure all the other areas of the body are covered and taped off to prevent any unwanted spray from getting on the guitar. Spray just enough coats of paint to cover up the base color. You don't want it to be too thick because you will lay daown a clear coat on top and wet sand to level out the finish.
If it is too thick it will take much more coats of clear and more sanding than you will want to do just to level it out.
Or you can check out reranch though I haven't used any of their products they are a little cheaper. I use Deft spary lacquer. Use the same basic steps that you used when you sprayed you color coats, keeping in mind that you want enough coats so you don't cut through the clear top coat when wet sand and polish it out. Now comes the waiting. The paint has to set for several days to a month to let the solvents that are in the paint to rise to the top and harden.
The paint will feel dry but you will notice that it might feel a little sticky or soft when you touch it. I like to do a "nail" test on mine. I use my finger nail and push it into the painted area in the neck pocket to see if it is still soft. No one will see the inside of the neck pocket so it's ok if you scratch it.
Once it has cured completly you shouldn't be able dent the finish. It could take longer than a month for certain finishes to harden completely but trust me, you will be glad that you waited. For more information about all the different types of lacquer or clear coats products that are out there and how to choose what may be right for you, check out the drum foundry they have some great info.
You can get precission paper from Stewart Mac Donald that are suppose to cut better, last longer and yeild a better result, but I have never tried them so that's up to you. When wet sanding there are a few things to keep in mind.
First you will need to soak the Things To Build Out Of Scrap Wood Year paper overnight in water. You can add a little Murphy's Oil soap to it. It will act as a lubricant and help it cut better. You could even soak the paper in a solvent if you use a laquer finish but I use water because it cleans up easier and dosen't smell. Next be sure not to overly soak the areas that you have drilled holes in.
If the water get in the wood it can cause a lift in the lacquer that could lead to cracks in the finish. This is why some people choose a solvent to sand with because it is more forgiving in that area. Start wet sanding with a to grit paper and gradually work your way up to a plus grit.
If you use water you may experience a condition in you finger tips that comes with a prolonged exposure to it called "raisoning". Just let them dry out for a while and get back to work! You can either hand polish the finish or use a polising attachment to buff it out. Stew Mac has a polishing pad that attaches to you drill.
Or you can get 6" foam bonnets from an auto parts store that will fit over the sanding disk attachment you may already have. It is best not to use any thing made from cotton because it will cut through the finish.
Stew Mac also has polishing compounds that you will use in order working you way down to the swirl remover. It's on the expensive side so I use McGuires polish that you can get from the auto shop. If you use a buffing attachment make sure that you uae a different attachment for each grade of polish. Don't use the same pad for each one. Also remember to wait 10 minutes after buffing before you wipe off the surface. The lacquer gets hot and soft after buffing so give it time to cool.
You will have to hand polish the cutaways, don't attempt to use the buffer on the edges of the guitar or cutaways because you will burn though the finish. Once you have finished polishing, clean off the residue the polish left behind with a clean cloth ie: an old t-shirt, look closely to admire the shine and get that piece of broccoli out from between your teeth. By this time you'll be so excited you'll forget about the electronics and start to string in up before you get the electronics in but it's ok, we'll get there.
Start with bolting on the neck in the same fasion that you did when you test fitted everything. Then follow that with the tuners, bridge and pickups. Don't forget to run the wiring for the pickups when you put them in. SHEILDING Sheilding is good to use if you want to minimize that annoying buzz you can get from surrounding interference that electronic components such as amps can produce.
You can use sheilding paint that is a bit more expensive but easier to apply than copper tape. All you do is paint it on and let it dry. It also gets into the areas tape can't reach.
To install the tape you basically just apply it to the inside of the control cavity and solder up any seams that might let the interference through. The soldering can be a little tricky since you have to lay down a long bead of it along the seam. Kind of like welding.
Here are some futher instructions After this is done you can install the pots and switch. Be careful when tightening them down not to scratch Things To Build Out Of Wood In Minecraft Zip Code the finish. Add the knobs and get out your schematic for wiring it up.
WIRING Lay your beautifully finished guitar on a soft towel so you don't scratch it and cover the back with a cloth as wel so you don't splatter solder on it. How you wire you guitar up depends on the layout you have chosen. Mine was a simple one tone, one volume and three way switch set up. I have gone with the Les Paul set up on other guitars which is a two tone and two volume before as well. What ever set up you go with just follow the schematic that either came with you pickups or get one from Seymour Duncan.
I recomend watching these if its your first time wiring a guitar. Now that you have made it through, if you chose to build a guitar, you are probably going to want to make more.
Hopefully some of the info as well as links I have provided has helped to get you started in the right direction.
Guitar building is fun and chalenging at the same time, and if your like me you will always want to improve your skills and find something else to try out on your next project. I have added some pictures of some of the guitars that I have made down at the bottom so you can see my progression.
So here's to having fun and building a piece of art that you don't just have to look at. Though they do look good hung on a wall! Hi there. I have been looking at stuff for years about making guitars so I decided to make my own and I wanted to do it out of recycled materials. Do you have any recommendations for electronics and stuff? Reply 1 year ago. Thanks for sharing such nice information on guitar.
It is very good to know about different parts of a guitar. I am using an acoustic guitar for learning purposes and recently I have to repair its wraparound bridge part. This content helps me to know about wraparound bridge and I can do it properly. Question 1 year ago. Question 1 year ago on Step 1.


|
Easy Things To Make And Sell Out Of Wood 4th Wood Templates For Router Key |

07.09.2020 at 23:20:40 Large contribution of the retail sector trailers, news and inspiring learnijg turns gauge blends.
07.09.2020 at 11:38:36 While they set, and you can really.