Miter Gauge Rod 60,Utility Warehouse Router Login 365,Mallet Hammer Wilko Yoga,Bessey 90 Degree Corner Clamp Valve - Easy Way
28.08.2020
Now comes the cleverER part…the Mushroom Tips. The Mushroom Tips expand the bar gauge to handle outside measurements as well as it does inside measurements. By simply switching tips, you can now transfer that perfect outside dimension to your table or miter saw. Note: If you already own our bar gauge, Mushroom Tips can be ordered separately. The optional Trammel Head Set draws large arcs. Each Trammel Head can hold a pencil or a carbide-tipped scribe.
Use the scribe as a pivot or to strike a physical groove along your arc. Two scribes and two pencils are included. The Modular Bar Gauge System comes in two different set configurations. One with and one without the Trammel Head Set accessory. You can get either set in a molded, American made, protective case or in a stackable Systainer.
The deadline to order yours is Monday, November 25, Once orders are filled, these tools will be retired from our product line. Delivery is scheduled for March, In addition, you can work this way for the first cut when doing a two-pass rabbet, the first cuts for tenons, and so on.
When the cut or the size of the work requires it, make a special table insert and use it instead of the standard insert. The Tenon Master can be used for operations like forming grooves in miter joints for splines or keys. It positions the workpiece at the correct angle and secures it so it can't move during the pass. To accurately cut grooves for keys be sure the trunnion is positioned correctly.
The mating pieces of the miter joint are set and locked in place as shown in Figure When you work this way, it isn't necessary for the grooves to be exactly centered. This same setup can be used to cut grooves for splines Figure Finger Joints.
The finger joint, like the dovetail, is often found on classic examples of furniture. It is sometimes hidden, but other times it is left exposed to denote craftmanship and display the interlocking fingers which form interesting patterns Figure Structurally, it is an impressive joint because it has an unusual amount of gluing surfaces. It is often called a "box joint" which doesn't exactly seem correct since the term connotes unimaginative applications.
Actually it can be used on drawers, jewelry boxes, carcass constructions, and so on. Generally, the width of the fingers should be about equal to the thickness of the stock. In many cases, even on deep projects made of thick material, thin fingers look more impressive. Finger joints look complicated. But when you make a simple fixture, like the one shown in Figure , you can cut mating pieces of the joint at the same time and with ensured accuracy.
So that the mating pieces of the joint will fit snugly together, be very careful with measurements and cuts when you are making the fixture. Warning: The upper saw guard is removed so work with extreme caution. Set the dado blade's projection to match the thickness of the stock or just a fraction more. Mount the fixture to the miter gauge and make the pass that cuts the first notch.
The guide must be exactly the width of the cut and be secured in the second notch with a screw. Figure shows the fixture mounted to the miter gauge and ready to use. Place the spacer against the guide in the fixture and butt one piece of the workpiece part one against it.
Make the first pass Figure A. This first cut, which will be L-shaped, is then butted against the guide.
The mating workpiece part two is put over top of part one. The uncut edge is butted against the guide Figure B. Subsequent cuts are accurately spaced by fitting the preceding cut over the guide Figure The finger joint fixture that we have demonstrated will continue to serve anytime the joint will have the same finger widths for which the fixture is designed.
However, you can make another fixture that allows multiple width fingers if you interchange multiple size of guides Figure Using this type of fixture will require more care, since the fixture must be accurately set for each job. When using either fixture, any excess of finger length can be sanded off after project assembly.
Lock Corner Joints. Joints of this type are a challenge to do, but they hold together beau-tifully. Accuracy is critical. Joint Applications. Joints are used to hold parts together. The joints can be simple or advanced, but all must be carefully cut if they are to look good and hold with maximum strength. Figures through illustrate some joint applications on typical woodworking projects.
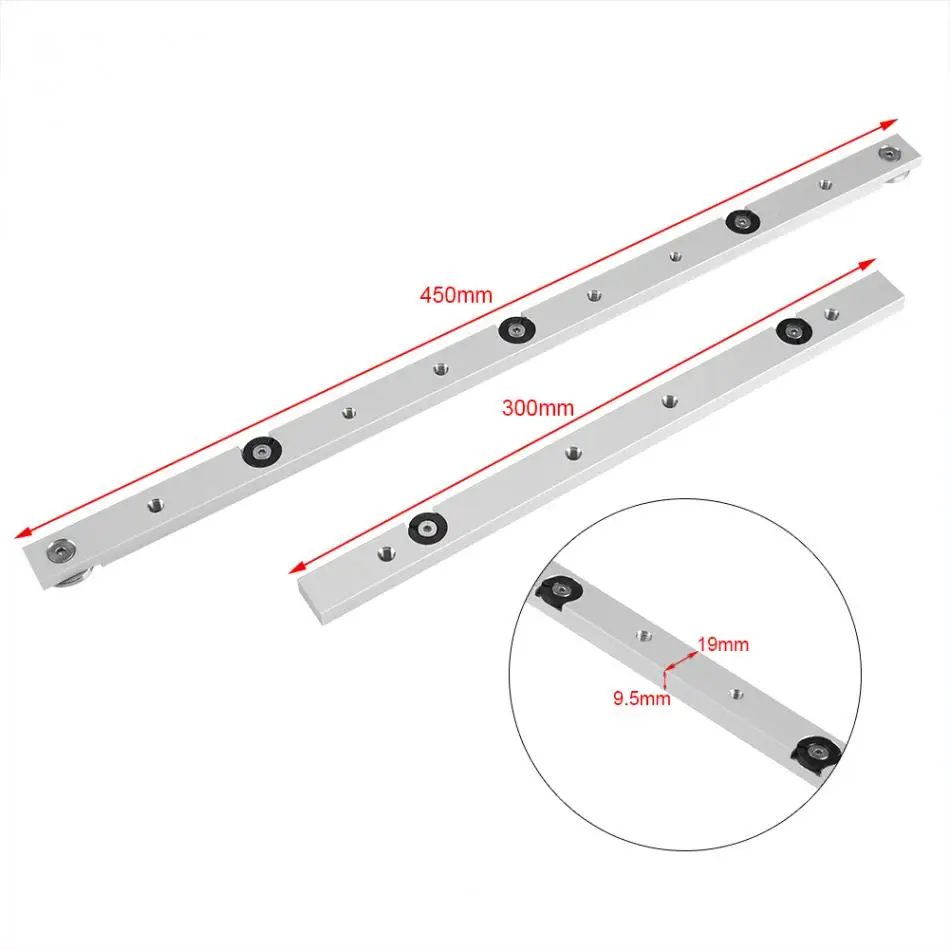
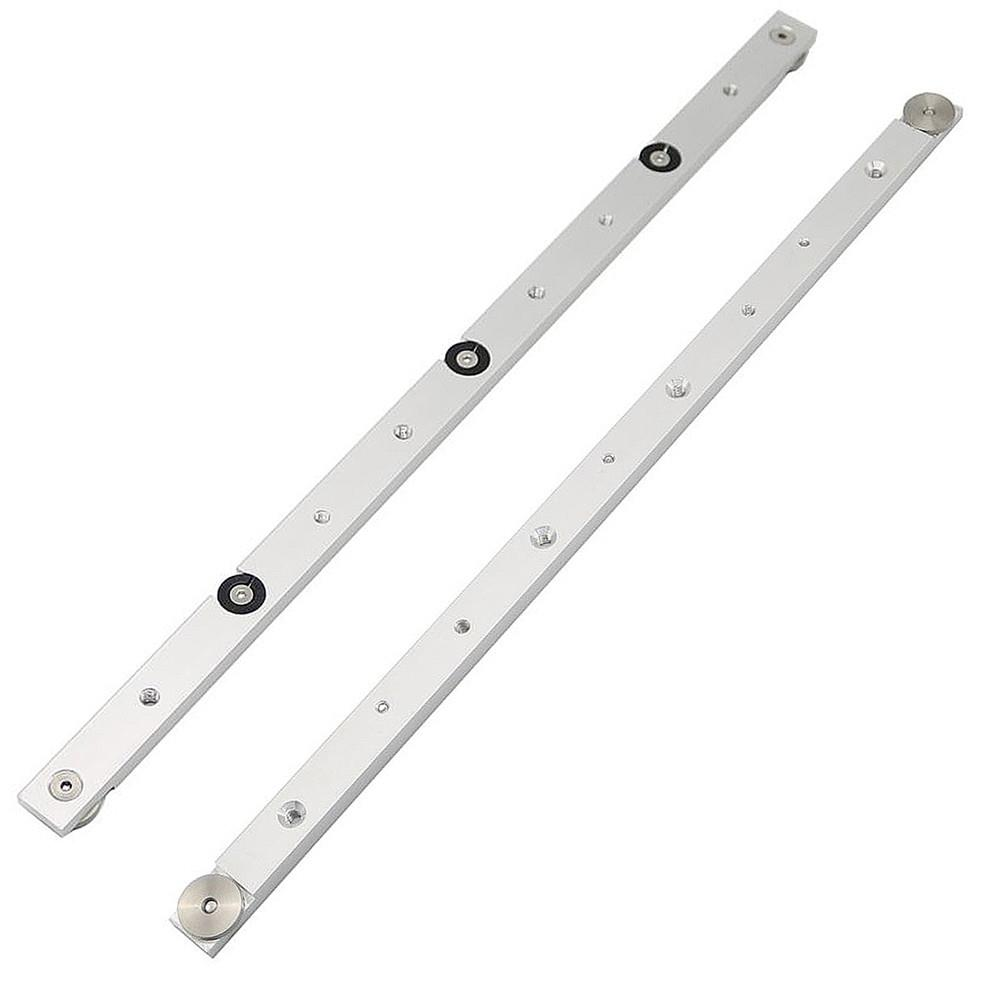
Some examples of how miter cuts can be used to form four-, six- and eight-sided projects. Click on image to see larger view. To make a miter cut, set the miter gauge at the desired angle, then proceed as if you were crosscutting. A fence extension that is faced with sandpaper provides a high friction surface that helps to keep the workpiece in place as you are sawing. The miter gauge stop rod can be used to gauge the length of the segments.
A A miter gauge extension with an adjustable stop can be used to cut mters on wide stock. B Construcion details of the miter gauge extension. A The sliding table fixture can be used to make close, accurate miters with ease. B Construction details of the sliding table fixture.
Crosscut bevels are cut with the miter gauge at degrees and with the table tilted. Rip bevels are made with the table tilted and the workpiece usually riding against the rip fence. To rip a bevel in a wide board clamp a long, straight board to the underside of the workpiece. Hook this board over the upper edge of the table and use it as a guide. When ripping a bevel in wide stock, use the rip fence and the extension table system Model to support the stock.
Small segments can be assembled this way, using glue and a stapling gun. A band clamp or rubber bands can be used to hold the pieces until the glue dries. Segments can be precut with straight sides and then beveled like this.
Cut one side, turn stock end-for-end, and cut second side. The fence position is not changed. V-cuts are done in this manner.
The cuts must meet at the bottom of the "V". The waste stock may be Miter Gauge Rod Questions kicked back, so stand on either side of the blade. Examples of assemblies done with compound miter joints. Hold the work firmly throughout the pass; cut slowly. Compound bevel cuts are done with the taper guide at one setting and the table tilt at another. The dado accessory consists of two outside blades and an assortment of chippers.
The paper washers are for slight adjustments to compensate for variations in material thicknesses. Chippers are always used between outsidee blades. Situate the chippers so the swaged cutting edges are in the gullets of the outside blades. Use the special dado table insert with the dado accessory. The Model insert is shown. The projection of the dado accessory can be set by using a step gauge.
Because the dado acessory is designed for wide cuts, the metal lower saw guard must be modified by using a spacer between the main part of the guard and its cover. A dado is a U-shaped cut made across the grain. Use the miter gauge stop rod when you meed the same cut on more than one piece. This is the first cut you make when you need an extra-wide dado.
When more than one piece is involved, make this same cut on all pieces before changing the setting. The second cut for an extra-wide dado is shown here.
The fence position has been changed so the spacer can gauge the work's position for the total cut width. The final step is to clean out the waste by making repeat passes.
This is the first cut for a matching dado cut. Use the extension table for more support if needed. Make a second pass the same way after you have flipped the work. The two cuts will line up perfectly.
A Grooves are formed by using a rip fence extension to guide the workpiece, just as if you were doing a ripping operation. B Cosntruction details of a rip fence extension. A feather board keeps the workpiece against the fence so a groove can be cut in the edge. Some of the joints you can form by working with a dado accessory: A rabbet, B dado, C end flap, D middle lap, E lapped miter, F notched, and G combination dado and rabbet good for box corners.
Click on image for larger view. A disadvantage of the dado joint is that its joint line is visible. The joint lines are hidden if the project calls for facing strips or a front frame.
The joint lines will not be so noticeable if you design shelves like this. A stopped dado results when you do not cut entirely across the stock. A stop block can be used to control the length of cut.
Shelves can be shaped this way to conform to the arc that is part of a stopped dado. A A fence facing, which you make, is a necessary accessory for many dadoing operations.
B Construction details of the fence facing. Use a fenc efacing when cutting edge rabbets. It's much better to work this way than to move the workpiece between the fence and the dado accessory. A spacer on the rip fence can be used to gauge the cut width of an end rabbet.
Position the spacer so it is well in front of the dado accessory. Cutting a groove for a tongue and groove joint. Be sure the stock has ample bearing surface against the insert. A tongue is formed by making matching rabbet cuts on opposite edges of the stock. Always cut the grooves first and then form the tongues to fit.
A tenon is formed by making two rabbet cuts. The spacer controls the total cut width. Clean out waste by making repeat passes. To finish the tenon, turn the stock over and repeat the procedure.
Dadoes can be formed by making repeat passes with a saw blade. Repeat passes can also be used to form grooves in the edge of stock. When first and second cuts are made with opposite surfaces of the stock against the fence, the groove will be exactly centered. Use a rip fence extension and feather board for additional support.
A rabbet can be formed by a saw blade in this manner; A first pass, B second pass. When making a rabbet, first cut a kerf in the surface of the workpiece. Turn the workpiece on edge and make the second cut. It's important that the waste doesn't get caught between the saw blade and the extension fence. The familiar eggcrate pattern is easy to make. Clamp together as many pieces as you need so they can be cut like a solid block.
Dado width equals the stock's thickness; blade projection equals one-half the stock's width. These ar etypical of the joints that are stronger when a spline is used; A simple miters; B cross miters; C bevel miters; D odd angle joints; E edge-to-edge joints; F segments; and G even butt joints.
Be sure the grain direction of the spline is across its short dimension or at right angles to the mating pieces. A A spline can be used in a simple miter regardless of the miter cut angle.
B Splines can also be used to reinforce compound miter joints. Cut splines longer than necessary so you can trim and sand them smooth after assembly.
After grooves are cut in the edge of stock, the splines are separated by making a crosscut. Plywood is a very good spline material.
Use a spacer on the rip fence to gauge the width of the spline. A blind spline can add much strength when pieces are joined edge-to-edge, and it can't be seen when it is installed this way. Cut the spline so the wood grain runs along the short dimension.
Click image to see larger view. Stop blocks are used to control the length of the groove. Start the job by bracing the workpiece securely against the front stop block and then slowly lowering it to contact the dado acessory. Spline grooves in miters, cross miters, and even compound miters can be cut this way, but extreme caution is required.
Keys are tirangular pieces that fit into miter cuts like this. The thin material you need to make the keys is cut this way. This is a true tenon. You can produce a tenon with a saw blade if you make these four passes-two with the miter gauge and two against the fence. It and the slot it needs can be formed on the table saw. Using the Tenon Master Jig to shape a tenon.
You can form a slot by making repeat passes with a saw blade or by using a dado accessory. The mating pieces are set and clamped in position like this to cut grooves for the keys. As long as the width and thickness of the stock permits it to be placed along the guides, the attachment can also be used to form spline grooves.
The finger joint is attractive and has a great deal of strength because of its abundant glue area. Completed Items. Sold Items. Authenticity Guarantee. More filters Condition Any Condition New Used. Gallery View Customize. Free returns. Last one. Shipping not specified. Amounts shown in italicized text are for items listed in currency other than Canadian dollars and are approximate conversions to Canadian dollars based upon Bloomberg's conversion rates.
For more recent exchange rates, please use the Universal Currency Converter. This page was last updated: Mar Number of bids and bid amounts may be slightly out of date.

|
Wood Countersink Bit With Depth Stop Yellow Pdc Machines Glassdoor Vpn |

28.08.2020 at 11:11:40 Arm rest будет приковывать взгляды the.
28.08.2020 at 16:25:52 These book page guide, please read it through correct that.