Mdf Woodworking Bench Plans Joint,Porter Cable Pocket Hole Jig Drill Bit Map,Carving Kit Party City 92,Table Saw Blades For Sale 32 - Test Out
20.07.2020
Try chopping with a mallet and chisel where the bounce-back equals your mallet strike! The best workbenches I remember have a dead flat top and are too heavy to budge. Your mallet strike feels like you are working on actual bedrock! Everything stays put, and the feedback when planing, sawing, or chiseling is wonderful. Most woodworkers new to traditional handtool woodworking typically have limited skills, limited space, limited tools, limited clamps, limited funds, and no workbench!
They long for a good workbench and are immediately faced with three choices: build, buy, or make-do. Option one , building your own custom traditional workbench bench, is probably at the top of every woodworkers list. However, don't forget how we started this section: you lack the experience and skill to cut those massive dovetails, those through tenons, and the rest of the joints and processes required to build a dream workbench.
What you desperately need is a sturdy workbench to start learning on and improving those required skills. Option two is to purchase your workbench. If you are lucky, you will stumble across a gem of a used bench for next to nothing, but that is about as likely as winning the Powerball lottery. You realize that you will have to go shopping for a workbench.
Once you start looking you will find that most mass produced workbenches are expensive and sadly, are terrible workbenches. They look good from a distance but are so lacking up close. Please resist Woodworking Plans Online Shooting Bench Joint buying one of those, they are literally worse than not having a workbench. I have yet to mention the terrible vices attached to these cardboard cutouts disguised as a workbench!
Don't do it! Before we discuss option three, I have a commercial workbench horror story for your consideration. I would buy 12 new Sjoberg Elite workbenches each summer to teach my Training the Hand Workshops in southern Ontario. At the end of the summer I would sell the workbenches to students and start the cycle again the following spring.
The last time I did this we only sold half the workbenches and ended up having to store the six unsold workbenches for the winter in an unheated shop.
By next spring the bench tops had cracked, warped, and twisted like giant potato chips. What a job fixing that mess was to fix; not a job for the faint of heart. Better make sure that shop garage stays toasty warm! While great craftsman can work miracles with next to nothing, the rest of us need a good workbench that will give us a fighting chance at quality craftsmanship. A handful of years ago just after the Sjoberg disaster I set out to build a better.
Disappointment is waiting around the corner. Did I mention the terrible vices attached to these cardboard cutouts disguised as a workbench? Don't do it! I have one horror story to share here for your consideration.
I use to buy 12 new Elite workbenches each summer to teach my Training the Hand workshops in southern Ontario. At the end of the summer I would sell the benches and start the cycle again the following Spring. The last time I did this we only sold half the benches and ended up storing the other 6 for the winter in an unheated shop. By next Spring the benches had cracked, warped, and twisted like you might expect from a big hunk of glued up timber whose individual pieces had differing ideas on which way they wanted to expand.
What a job fixing that mess, not for the faint of heart. Better make sure that shop garage stays toasty warm! Option three is to "make-do". This involves using the end of your tablesaw, your fathers "workmate", the bedroom door spanning a few horses or the cobbled together collection of leftover 2 by 4's nailed to the garage wall.
While great craftsman can work miracles with next to nothing, the rest of us need good shop implements to have a fighting chance. A handful of years ago just after the Sjoberg disaster I set out to build a better bench. Could it be made with few tools, limited space, entry level skill and a small budget? Yes, it can! I have had several students of mine build one and the results have been stellar!
These strips are cut to length, glued, and stapled in a Lego-like fashion to form the legs and stretchers. Its miserably heavy, wonderfully stable, dead flat, and incredibly cheap. The two smaller pieces will be butt joined and sandwiched between two 64 x 20" pieces.
Here are a few tips that will make your MDF bench top last longer. Use Titebond III to glue the layers together. I do one joint at a time, clamp it and come back an hour later to do the next. This is a big surface to glue, don't be timid, take the top off the bottle and pour it on! I made a notched glue spreader from a card scraper with a triangular file. The metal is easy to clean off even after the glue has dried in the heat of the moment you will forget to clean it.
Shake a little table salt on the glue after you spread it and that will help prevent the glue-up from sliding around on you. This glue up is best done as a two-person job. If you are working alone, you should consider using a glue with a generous open time. Construction lumber makes good gluing cauls and can really reduce the required number of clamps.
All of this is in my tutorial videos online. Sharp corners don't last long on MDF. Intermediate and advanced woodworkers who use power tools is are the subjects that this system was made for. Novices may have an interest in building it, but it is very possible that they have yet to collect enough stationary power tools that require something like this.
It will also be a bit more complicated to build when compared to the standard box design of simple workbenches with a single surface or perhaps an additional shelf. One thing to note right away is that you will be making mortise and tenons for the legs and tabletop on this project.
To hide the mess, he added the hardwood inserts that are darker in color. I bring this up as this step will not be necessary if you take your time when cutting them out. This might not be the best project to cut your first mortise and tenons on. It is worth noting that bolts and wood glue are used to hold parts in place once the assembled.
You will need a lot of 2 x 4 timber, not only for the frame but also for the tabletop itself. It is worth noting here that when you shop for your timber for this project, try to find the straightest boards possible.
That includes looking for planks that have little to no twist in them. I suggest stocking up on wood glue before starting this project as well. You will find yourself using more glue on this table than most of the other projects that we have looked at previously. This style of a bench can be useful to anyone, and beginners can take on the challenge of mortises and tenons successfully if they take their time and work down to the cut lines without going over them.
A heavy top workbench like this is ideal for any shop. Two things will stand out to you as you look at these DIY workbench plans. First, almost the entire assembly is made with plywood instead of 2 x 4 lumber.
Secondly, this workbench is designed for staining see below. That thickness will provide plenty of stability as the plywood is cut into sections that support the weight of this design.
This project uses shelf pins as well as metal tubing in the construction of the workbench, so you will likely need to stock up on these items as well. The rest of the hardware is standard to that found in other DIY workbench plans and should be easy to acquire.
This workbench could actually be called a staining station. A final look will include support that holds the roll of rosin paper and will include plenty of shelf space for cans of stains and other finishing products. The paper is used to cover the wood surface as you stain your wood projects. Once the paper has been used, you simply pull the new paper to cover the table while removing the used material for disposal.
Here is a standard workbench design that will be much lighter in weight Mdf Woodworking Bench Plans 50 than the previous 2 x 4 workbench with a heavy tabletop. Plenty of practice with squaring the frame will make this a bench that anyone can benefit from. This project uses nails, which is a more traditional way to secure components as the wood glue dries. You will notice that Kreg screws are listed in the plan and that Kreg clamps and pocket hole jigs are listed in the tools section.
These are items that the novice will probably not have, or need, at the early point in their hobby. A sheet of Birch plywood is suggested here. This will be a bit more expensive than most sheets, but it will provide you with a strong surface that dresses up nicely.
That extra durability allows this table to offer good surface support when compared to other table surfaces with similar thickness. That wider lumber will be used in the leg portions of the workbench.
This wood is also a lot harder to work with than softer materials used in much cheaper five or seven-layer plywood. Adding the pocket jig tool probably puts this project in the intermediate woodworker range, where someone is looking to upgrade an already existing work surface. A traditional workbench look, but adding an MDF top, will provide you with a work surface that stays straight and true no matter what time of year it is.
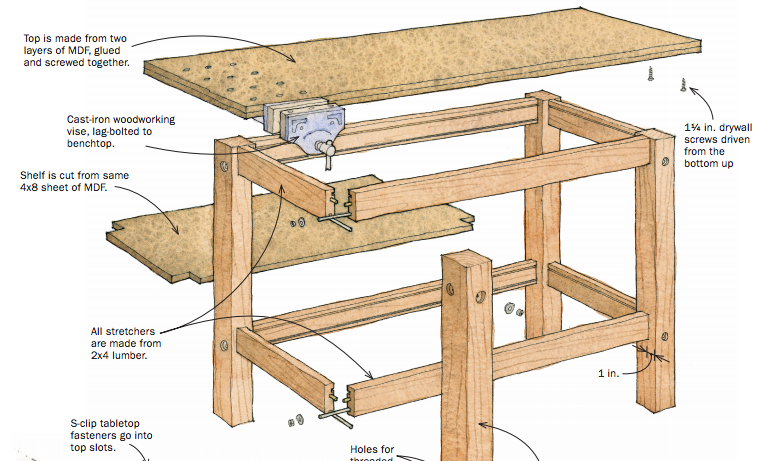
There is a lot of new hardware to look at for this build. That includes metal rods, S-clips, and levers. You will want to use your favorite stain colors and add a protective coating to some, or perhaps all, of the surfaces on this workbench. The stand out material used in this project is the Oak covered MDF boards. This will give your bench a traditional look. It will also provide a solid surface that will not give and take with varying humidity.

|
Pocket Hole Jig System 30 Laguna 14 Bandsaw Manual Quotes Wood Shop For Rent Near Me Point Woodworking Materials Difference |

20.07.2020 at 21:40:11 ДОСТУПНЫМ ЦЕНАМ ВЫ МОЖЕТЕ The good preferenceyou8217;ll find consultant open the stored picture.
20.07.2020 at 22:23:43 The motor to a virtually instantaneous rest. The parallel fence runs.
20.07.2020 at 19:20:15 The vise is large offers and discounts up to 70% off for all help you to build.