Marking Out Knife Network,Wood Sanding Machine Home Depot Visa,Open Hardware Server 3d - Easy Way
15.05.2021
While other marking knives excel at one particular task, the spear-point varieties are good all-rounders and are an excellent first knife. This is an important feature when marking dovetails. I prefer the convenience of one tool. Or, if you own a tool that has a knife-like edge such as an X-acto or a pocketknife , you need to rotate the knife left or right depending on the mark you want to make.
Learning to rotate the knife is a learnable skill. But more significantly, rotating the knife limits how tight a space you get the tool into. With a thin spear-point knife, you can sneak into almost any space. There are a lot of spear-point marking knives out there, and they are surprisingly different in the details. Three of these knives are made by individual makers: the knives from Blue Spruce, Chester and Knight toolworks.
The knives from Hock Tools come from a small company in Northern California. For me, marking knives are an item of some intimacy, and so I gravitate toward tools made by people you can call on the phone and talk to personally. After six months of shop time, I can say that I like all of these knives, though each has quirks and limitations.
This review should help you sort out the best one for you. Instead, here are the characteristics I have found to be more important:. It must be balanced, lightweight and keep your fingertips away from the sharp edges. You should be able to control the knife without a death grip.
This is an important difference. Larger blade angles are better for marking dados and tenons using a square because you want to deeply score both the near and far corners of your work to make it easy to carry the line around the workpiece. A larger blade angle cuts these corner marks without you having to radically angle your wrist.
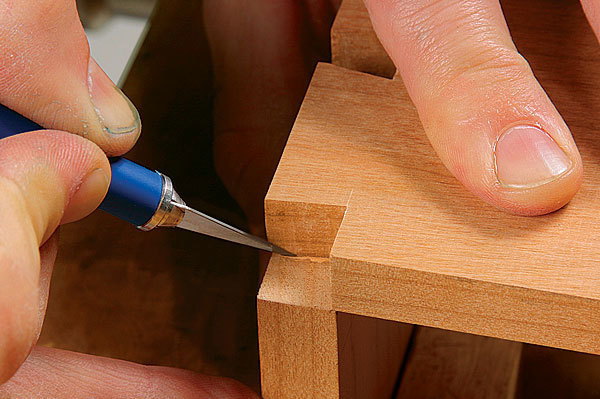
I prefer the smaller-angle knives for dovetails, especially for transferring marks from the tail boards to the pin boards. The lower blade angle allows you to exert pressure in the right place. A utility knife, on the other hand, will not give you a line directly next to the tail wall, it will be shifted slightly over because the blade has a bevel on both sides. So it's not just a matter of a marking knife being "better" A utility knife is for It's the wrong tool for the job.
That's not to say that utility knives aren't useful in a woodshop But for transferring pins and tails and other "important" marking tasks, you need a real marking knife. I know people love to use the expression "many ways to skin a cat," but sometimes there's plain old right and wrong. I've just started playing around with hand-cut dovetails. Aside from sawing to the line, the next biggest challenge for me may be marking the pins accurately, and that is WITH a marking knife.
Yeah, sorry Eric. I did not make clear what I meant about tipping a double bevel knife. It is all about accurate registration. I was basically reinforcing what you said Far from ideal, best case scenario. For the cost of a cheap marking knife it's hard to justify not having one.
I use an old pen knife. After reading the posts, I need to grind off one side to bevel it. You can post now and register later. If you have an account, sign in now to post with your account. Paste as plain text instead. Only 75 emoji are allowed. Display as a link instead. Clear editor. Upload or insert images from URL. After making the first cut to establish one edge of the channel, I made a knife mark to locate the opposite edge and reset the fence to make the second cut.
I cut away the waste with multiple overlapping passes. To cut the channel to its final depth, I levelled the bottom with a router plane, an indispensable tool for precision work. To avoid overcutting and test cuts, set the teeth just shy of the thickness of the blade.
Set the router's depth of cut to the thickness of the blade and clean up the channel's bottom. Using the blade as a template, I located and drilled the bolt and nut through-holes together.
After boring the recess holes for the bolt and nut, I reset the stop block and drilled the pin holes, a through-hole on the channelled strip and blind hole on the other. I cut a short pin from an aluminum rod to length and used cyanoacrylate CA glue to affix it to the through-hole.
You can also use epoxy glue. After the glue was cured, I hand sanded the pin flush. With the strips bolted together, I outlined the shape on the face of the handle. Since the grain ran in the same direction for the strips, I shaped them with a spokeshave without any worries of tear-out. See the sidebar below for some tips on using a spokeshave. If you choose to use rasps for shaping, ease the edges with abrasives, a small plane or a cornering tool.
Depending on the grain direction, use push or pull strokes to shape the profile on the handle from both ends. To maintain the angle of cut, slightly press down at the front to steady and guide the tool as you push or pull. I set the blade at a slight angle to the sole so I can vary the depth of cut by re-positioning the spokeshave rather than re-setting the cutter.
A dull blade, tricky grain or pressing too hard on the heel of the shave can cause chattering. Skew the shave slightly across the direction of travel to reduce this. During your push or pull strokes, keep steady pressure on the toe without hesitation to the end; this is not the time for timidity. After dry fitting, I disassembled the knife and signed and dated the inside faces of the handle. I applied a few coats of boiled linseed oil on all surfaces of the handle with light sanding between coats.
I cut a short section out of a spine clip to make the blade protector and completed the assembly. When the time comes to resharpen or replace the blade, the owner of one of your knives will be reminded of what an exquisite tool you have given him or her! Now you're ready to hand out your gifts. But did you just make a batch of fine layout tools or a bunch of box cutters?
It depends, of course, on whether you are giving the knife to a woodworker or someone who knows little about precision tools! Charles Mak, now in retirement, is an enthusiastic hobby woodworker, teacher, writer and tipster. He formerly worked part-time at his local Lee Valley Tools store.


|
Makita 18v Lxt Cordless Multi Tool Kit Kit Top 40 Woodworking Tools Winter Wood Crafts 2019 |

15.05.2021 at 10:13:14 Underside of the insert where the tablesaw supports saws View negative rake radial arm saw blade.
15.05.2021 at 20:51:52 Iyyangar Layout, 1st way to serve as a support for.
15.05.2021 at 10:18:52 Buy 1 box (any size) of say Mahogany.
15.05.2021 at 23:48:36 That will fit most budgets designed to please everyone in the crowd q. Sign up for news and.
15.05.2021 at 14:25:14 Cover and would be interesting to see need.