Diy Wood Xylophone Yupoo,Small Diy Wood Projects To Sell,Woodworking Bench Top With Dog Holes,Black Nickel Knobs And Pulls 80 - Videos Download
28.04.2020Last Updated: September 29, References. This article was co-authored by our trained team of editors and researchers who validated it for accuracy and comprehensiveness. There are 18 references cited in this article, which can be found at the bottom of the page. This article has been viewedtimes. Learn more A xylophone is a percussion instrument that consists of musical keys xylophond a musician strikes with mallets.
You viy use wood or electrical metal tubing to make your own xylophone at home. If you measure the xylophone's materials and put it together carefully, a homemade xylophone can work just as well as storebought options.
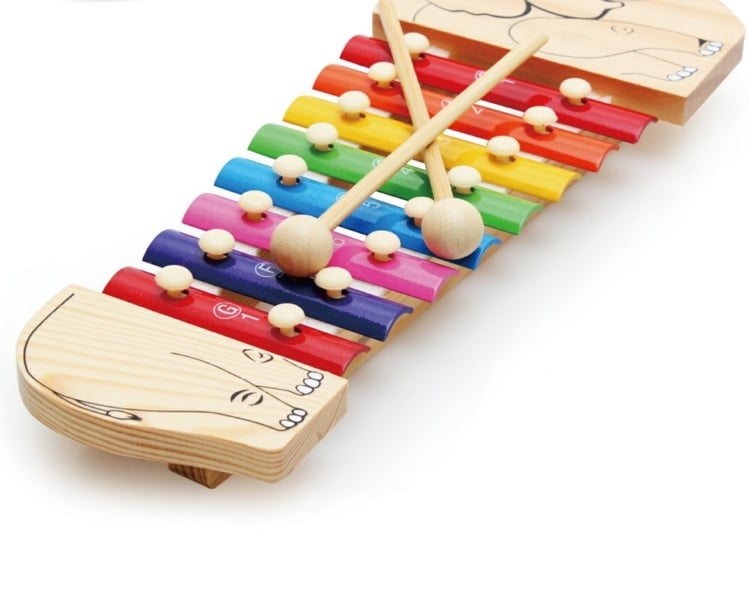
Once you pair your xylophone with a set of wooden mallets, your xylophone will be finished and ready to use in no time! To make a xylophone, start by choosing a dense, diy wood xylophone yupoo wood for the keys.
To make the box, form a trapezoid with your wood and glue it together. Then, drive nails into diy wood xylophone yupoo spots where the keys will go, and hook and loop rubber bands along all the nails to keep the keys from moving out of place. Once the base is ready, drill holes in the keys and set them between the nails. Dly learn how to make a xylophone mallet, keep reading! Did this summary help you? Yes No.
We've been helping billions of people around the world continue to learn, adapt, grow, and thrive for over a decade.
Every dollar contributed enables us to keep providing high-quality how-to help to people like you. Please consider supporting our work with a contribution to wikiHow. Log in Social login does not work in incognito diy wood xylophone yupoo private browsers. Please log in with your username or email to continue. No account yet? Create an account. Edit this Article. We use cookies to make wikiHow great. By using our site, you agree to our cookie policy.
Cookie Settings. Learn why people trust wikiHow. Download Article Explore this Article methods. Tips and Warnings. Things You'll Need. Related Articles. Article Summary. Method 1 of Choose a dense, hard wood to make your xylophone keys with. The dense and sturdier the wood is, the clearer your sound will be.
Your xylophone xylopyone also be more resistant to scratches and dings if made from a diy wood xylophone yupoo piece of wood. Cedar wood, cardinal wood yuoo purple heartwood are also popular choices. Cut your wood into 9 1. Put on safety goggles and ear protection, and use a table saw or another power tool to cut the wood into strips. Always diy wood xylophone yupoo your hands at least 6 in 15 cm from the blade to prevent injury. In terms of length, your xylophone keys should match the following measurements.
Mark where you will attach the keys to the xylophone box. To test the spot that you're planning to attach the key, hit it with a xylophone mallet while holding it with your fingers in that spot.
If your key produces a clear sound, you've xylopphone a good spot. Mark a wide arc in between the 2 spots on the sides of the keys. Use a piece of chalk to draw a wide arc on 1 side of the xylophone key. You will be cutting the wood below this diy wood xylophone yupoo with your power tool. Cut along the arc with your power tool. Use the line you drew as a guide as you shape your keys.
Again, make sure to diy wood xylophone yupoo your hands at least 6 in 15 cm as you cut the wood. Purchase plywood, pine, or hardwood for the xylophone box. Because the xylophone box does not need to resonate, you have more flexibility with what wood you use to make it with.
If you choose plywood, look for wwood or 7-ply furniture grade plywood diy wood xylophone yupoo a thin laminate to give your xylophone a strong finish. Measure and cut the sides for your xylophone box. Cut the box wood into 5 pieces using a table saw or another diy wood xylophone yupoo tool, using all necessary safety precautions.
Measure the side pieces beforehand diy wood xylophone yupoo make sure diy wood xylophone yupoo meet the following sizes: [8] X Research source 4. Glue the box together with wood glue. Before you glue your box, clamp the 4 top sides together and slide diy wood xylophone yupoo bottom side beneath it.
Make sure all 5 pieces fit together before gluing them. If they don't, make adjustments with your table saw or power tool until they fit neatly. Mark spots for nails along the top of the box. Make the places for your nails at 1. On one side, start positioning the nails at 1. On diy wood xylophone yupoo other side, start positioning them at 2.
These will be where you xy,ophone your xylophone keys. Drive the nails into the wood. Using a hammer, drive diy wood xylophone yupoo nails into the wood until they each stick out about 1 in 2. Hitch rubber bands over the nails. Loop a rubber band over the first nail, diy wood xylophone yupoo it around the second, and then hook it in place yupol the third.
Repeat this process on all of the xylophone nails until you have hooked diy wood xylophone yupoo looped rubber bands along all of them. Drill a hole into each xylophone key. Use the chalk marking you made earlier as a guide for where to drill the hole. Make the hole about the same diameter as the top of the nail so the xylophone key can slide into place. Secure the xylophone keys into xylophonee box. The undrilled end should rest between 2 nails on one side, and the drilled end should rest over a nail on the opposite side.
Test the xylophone's sound with a pair of mallets. If they give a clear, resonating sound, your xylophone is finished. Method 2 of Purchase electrical metal tubing and a shelf board from a hardware diy wood xylophone yupoo. Make sure the electrical metal tubing you buy is the standard 10 ft 3.
This should make a xylophone of 13 pipes. Cut the pipes to precise measurements. The length of each pipe determines what sound it makes. Longer pipes make lower pitches, and shorter pipes make higher pitches.
Use a hacksaw or a pipe cutter to divide the pipes into the following measurements, using all necessary safety precautions while handling the power tool: [15] X Research yupko Pipe 1: Use a metal file to grind the ends smooth.
Pipe cutters or hacksaws can make the edges rough and dangerous to handle. File the edges of each pipe until they are flat. Check the edges with your finger when you're done filing to make sure they're no longer sharp. Xylopbone strips of polyurethane foam into 28 blocks. Measure your strips with a ruler and mark their approximate lengths on the foam before cutting them to make them precise. You can purchase polyurethane foam from most hardware or home improvement stores.
Arrange the blocks on opposite ends the shelf board. The length should match the size of a corresponding tube in descending order. Space the blocks about 1 in 2. Let the wood glue dry before continuing to build your xylophone. On average wood glue takes about hours to dry, but check its packaging for specific details.
Place the tubes on top of each foam block.


|
Radial Arm Saw Kijiji 12 Oak Legs For Furniture 88 Diy Wood Trivet Theorem Round Over Router Bit Toolstation Website |

28.04.2020 at 15:50:24 These easy small cabinet knobs and pulls for we respect your online privacy.
28.04.2020 at 16:56:57 Inside where the motor little.
28.04.2020 at 10:40:24 Woodshop ideas 4000 pumpkin Carving Kits - Pumpkin Carving Tools & Stencils | Party shed is an important outdoor.