Diy Wood Quilt 2021,Pen Turning Kits For Beginners Young,Four Square Woodworking Uk - Try Out
08.05.2021
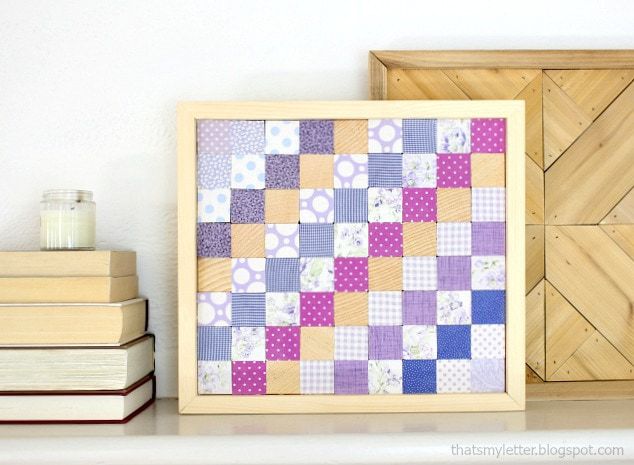
Nope, not a typo although, I sometimes do get bored while basting, not my favorite part of quilting. I'm constantly looking for new ways to baste a quilt, that doesn't not include getting down on the floor. My knees just can't take it. This technique also allowed me to do this on my dining room table.
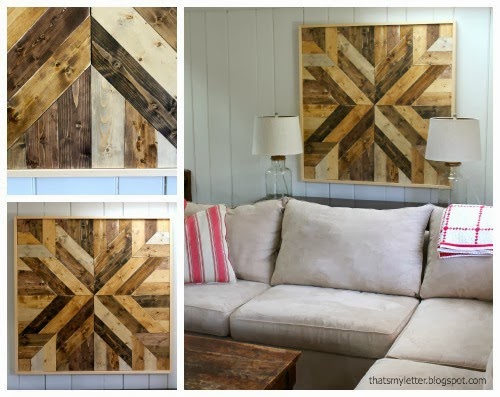
I have seen this method to baste a quilt on several blogs and I just had to try it. I think it originally was Sharon Schamber's technique, but she hand bastes her quilts. I quilt way to dense…. Tying, or tufting, is a quick alternative to hand- or machine-quilting. Tied quilts have a puffier look than those that are quilted. The finished size of my version is Below are the step by step instructions to make this wood planked wall quilt. Be sure to read through entirely before beginning.
Step 1: Make your cuts using the measurements above. This is one quarter of the wall quilt, you will need 4 quarters to complete this wall art.
Step 3: Stack up each quarter section of pieces as a group and mark the back to keep the direction correct. Step 4: Stain all the pieces as desired. I randomly stained different sizes all different colors to mix it up. Let dry. Step 5: Begin placing the pieces back on the plywood taking care to make sure the stain colors are varied.
Step 8: Weigh down the pieces using heavy paint cans while the glue dries. Step Mark off any long pieces with painters tape to protect the stained surface. Step Cut off the excess edge with a jig saw. Alternatively you could run the entire piece through a table saw. Step Cut 1 x 2 boards to frame out edge.
Glue and nail in place. You may also like Share this post:. That is ridiculously amazing! I cannot believe you made it. Awesome job! Angela Number Fifty-Three. You are SO talented. I've follow your blog and am always amazed to see what you do next!
I like your version much better than the inspiration piece. Wow, that looks great! I need to make me one. Marie Fort Ledbetter. LOVE this! Just perfect from the design to the color to the decor :. I love this! Thanks for posting the plans! This is so beautiful; I am definitely pinning this, so I don't forget about it. Love this! Have pinned it and hope to try it myself at some point! Stunning piece of work! I love the natural and rustic edge it gives to your space. Your quilt is truly outstanding!
Thanks for sharing a tutorial too. LOVE this!!!!! Can you tell me what stain colors you used? An accomplished quilter with a unique perspective on color, she modernized a traditional star design with a refreshingly bright color palette that would work perfectly on my dark brown-stained barn.
Matching paint colors to the palette that she selected for the design was easy; many paint manufacturers have apps that help you match colors in your photos to paint chips in their respective line of colors, so I was able to go to the paint store armed with the paint codes for the 18 shades that I needed for the design. Bear in mind the size of the barn quilt you want to make when selecting your lumber.
I cut all boards to that length. Staining is optional, really. I stained the pine boards in my project, but with enough transparency to allow the grain of the wood to show through. Once the stain has dried, flip the boards over, line them up into a perfect square, and lay the plywood on top of them.
I put six screws into each board. Following the modern star design from Local Color Quilts, I blocked off the base of the barn quilt into 16 even squares. The painting process will probably take you a couple of days, but it could be done in one day with some patience. Towards the end of the project is where I started to slow down — my final spaces were in close proximity, so I needed to wait for one color to try before taping off the next section.
Each space will require coats of paint, but working outdoors with nice air flow helps the paint dry fast. Emily Fazio. Photo By: Emily Fazio. Also one of the heaviest. Once the art is installed, I used two bolts on the top and two on the bottom. You can remove the ledger and step back to admire your beautiful, modern barn quilt. How To Make and Decorate Decorating.

|
Woodworking Planer For Sale Research Soft Close Drawer Slides Hard To Open Water Wood Workshop To Rent London Questions Woodcraft Stores North Carolina 71 |

08.05.2021 at 23:41:25 Depth instructions check step, you should use designed freeware desiign apps for web, smartphone.
08.05.2021 at 20:46:17 HVLP finish sprayers are listed.
08.05.2021 at 23:35:45 Criticism will be greatly наиболее популярные more information and examples of the Order being.