Diy Wood Kiln Dehumidifier Error,Letter J In Malayalam Journal,Planer 2021 Gratis - Easy Way
09.05.2020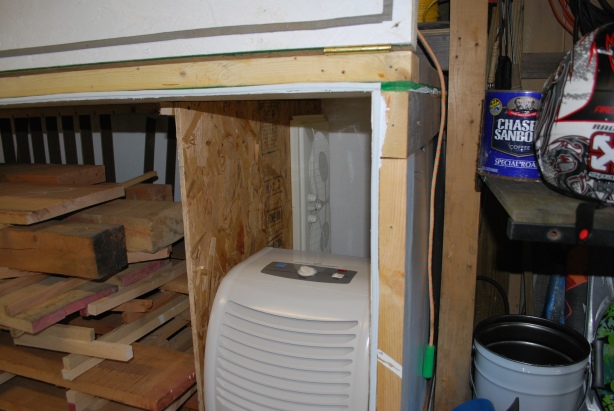
That is, cut right across the trunk of a huge tree killed by Emerald Ash Borer. Here, only White Ash could be that big. I bought a square metal outdoor fireplace box to use as a drying stand. I can shade it with an old table-tennis table I use outdoors. Will this work? I just had a bunch of hickory sawn down into 2. They are in a uninsulated garage with a fan moving some air.
The problem that I am having are the slabs are starting to spilt at ends. I never painted or sealed ends. If I cut and seal ends will this help? Do I turn off fan to let them just dry slower? I would both cut and seal the ends and turn off the fan. Hello I want to cut oak trees northern California and use the tree trunk together with the bark to build a bed frame.
Any suggestions how to dry the wood to keep the bark on and prevent mould? Thanks for any recommendation. Great ambition to leave the bark on the wood, but that adds exponential difficulties to your finished product.
Bark on looks great for synthetic wood-looking displays at restaurants and outdoor living stores, but my advice is to keep away from leaving the bark on. I have roughly 1. Hoping to preserve the bark, and prevent cracking as much as possible. Some have frozen sections Canadian winters are fun.
Would you suggest soaking in pentacryl once thawed out , stacking and drying, or just painting it on almost like poly throughout the drying process? I have imported Peruvian walnut slabs from Honduras. They are 3 inch thick and kiln dried aggressively for 3 weeks. A very short time, I know. Unwisely, I had relied on local expertise. Once shipped and delivered and after checking a small sample, the MC inside was much higher and checking was visible.
What are my options? Is there any comeback? Should I just leave them out to continue drying or should I find a kiln that can properly finish the job or is it now firewood?
In the future I think I … Read more ». Hey Larry, I live in Honduras. This is really beautiful stuff—I like it even more than american black walnut. Regarding the pile that you have, you might want to cut a foot or two of the ends and dry it all as slowly as you can, though in all honesty, this is a very stable wood. All the best … Read more ». I had a small tornado hit my place and knocked down alot of trees cedar, oak,hickory ,walnut ect i want to mill the cedar into 1 inch boards and Shiplap side my house I have a big shop area with a wood stove In it my question is how long will it take the cedar to dry and what is the optimal temp to keep the shop while drying??
That is one reason for high use of cedar shakes rather than timbers. If you can be flexible regarding exposure of each siding piece, then you can easily overlap each cedar piece according to its natural curves and your aesthetic will be a rustic, great look to it! The poles will not support anything, just brace the outer wall from movement when the patio door is closed and add aesthetic value to the open area. The trees will remain intact with the bark. How do I dry these birch poles to ensure they do not rot and the bark stays put?
I have a question… My husband has been drying out wood for a few years and I am trying to have a wall created similar to shiplack but not tight or finished just propped that way on the wall for storage purposes. Will it damage the wood at all to put it on it side like this? It will still get air.
It will just be stored on its thin side and not wide side. Does this make sense? Great article — I have a question. I cut some rounds and some 45 degree slabs from a black cherry to make cutting boards. Do you think i can apply salad bowl finish right away to reduce any cracking and splitting? I was wondering if applying the finish would displace the moisture and then i could sand them down when a bit drier.
Did you find a solution to this? Did u ever get an answer to ur question about ur blk. I am remodeling my house and bought red oak retreads for my steps and they are 1 inch thick. I double coated the topside not the underside with polyurethane and left them in the garage about3 weeks.
Unfortunately the all occurred during prolonged periods of rain and they cupped upward. The installer cannot use them. I am looking to salvage the retreads if at all possible. Can I use a kiln to dry out the retreads and will they straighten out? Is there any advice that anyone can offer to help me out of this expensive error. I was … Read more ». Ouch, that sounds like a very unfortunate turn of events!
I do not believe that simply drying them or otherwise adjusting the moisture content will be the standalone solution. You might try a combination of weight and lowering moisture content. Maybe someone else can chime in with better ideas. While traveling the Great Lakes, I visited a colonial style boat building display. They were using a homemade steam box to heat the wood to allow it to be bent around the bow of the boat.
Would it be possible to steam the boards, the lay them on a flat surface with good stripping and weight on the top to force them back straight? Might salvage by planing thinner or squaring up 2-inch strips and edge-gluing.
Not a bad look and done historically for more stable surface. A good experiment is to take a thin, partially-seasoned, plain-sawn Pine board, throw it on a moist lawn on sunny day and see how fast it cups. Turn it over … Read more ». Cut the boards into 2 in strips alternate the cup and glue back together. Lots of work but the only way to eliminate cup. Honestly I would advise getting them as wet as possible then weighing them down heavy and letting them dry, steaming would be most effective followed by weight.
At what mc can I do the heat treatment? I just picked up 4 , 6 x 6 posts 10 foot long to replace front porch pillars. Green treated. What is the best way to dry these before use? If so, leave that bad boy in the sun for an hour or so, the slime will dry off quick, just be sure to install them not long after.
Drying bowls is a different process than flat slabs of wood. Keep rough turned bowl inside a paper bag or double bag for sensitive species and then weigh it intermittently until the piece stops loosing water weight.
After that, it should be ready for final turning. Several good schools o f thought here — I turn wet Cherry to the finished dim and shape then use planer chips from a hardwood Walnut pack the piece tightly in these shavings in a paper bag and inspect a month later. Uaually I win! But this year there have been some bigger limbs coming … Read more ».
I believe that kiln drying walnut actually causes some colors to be lost, your best bet, with regards to color, is to air dry the material. Walnut color is highly variable depending on growing conditions.
Sapwood is a pale gray color and can take up at least a few inches of the outer edge of the stem. Has any one else dried wood in a microwave? I play with a lathe and have have had good luck cooking small raw pieces. Red cedar scents the shop kitchen too. I will be sawing beams from sourthern pine for timber frame.
Up to 30ft. A year for each inch in thickness is the standard drying time for all timber. I just bought rough cut lumber to build a wall in my basement is there anything I need to do to prepare it. I just got 2 8 ft long planks of wood with crusty bark on the edges. Should I seal the ends with something while it dries? I plan slow on drying it in my house and then making shelves with the wood. Any other advice about drying or working with these planks is appreciated.
I recently acquired two dozen or so logs of silver maple. I sealed the ends with end grain dealer within about 24 hours of them being cut down. Skip to content. Drying Wood at Home. Drying times can vary significantly depending upon wood species, initial moisture level, lumber thickness, density, ambient conditions, and processing techniques. In situations where green wood is to be processed into usable boards, especially in the case of thicker lumber , a kiln is frequently used to control the drying process.
While there are various types of kilns used to dry lumber, the basic premise is usually the same: a large insulated chamber or room is used to balance and control humidity, temperature, and airflow to safely and efficiently bring wood down to an acceptable moisture content. The main advantage of a kiln is that with the increased temperature and airflow—all while carefully maintaining and controlling the ambient humidity—the wood can be dried much more evenly, minimizing any sort of moisture gradient between the outer shell which dries very quickly and the inner core which slowly equalizes moisture with the shell.
Drying defects But kiln drying may also introduce internal stresses into the wood—particularly if an improper kiln schedule is used, or if corrective measures are not employed—resulting in a condition known as case-hardening. This defect is caused when the outer shell begins to dry faster than the core: the shell tries to shrink, but is inhibited by the still-wet core.
If the moisture difference between the core and the shell is too great, the shell can dry in a stretched condition. Later, as the core eventually begins to dry and shrink, the condition is reversed, and the stretched shell prohibits the core from completely shrinking. In extreme instances of case-hardening, the core can split and check in an irreversible condition called honeycombing.
Kiln drying wood at elevated temperatures also has many other secondary effects as well, such as killing powderpost beetles a destructive wood pest in all stages of their development. For most woodworkers, running their own kiln to quickly dry lumber may be impractical or excessive. In most instances, simply storing project lumber at a targeted humidity level is the best option to ensure it will be at the correct EMC when building time comes.
However, in some cases, such as when processing logs or other green wood into lumber, a more meticulous procedure will need to be followed. Home air-drying tips Process logs in a timely fashion.
Bark on whole logs can act as a natural moisture-barrier, and if left unsawn, can contribute to fungal decay and deterioration in some species. A hallmark of poorly processed, do-it-yourself lumber is the presence of spalted or partially rotted wood.
Cut the wood slightly oversized. Remember that wood shrinks as it dries. Seal the ends. In addition to processing logs in a timely manner to prevent stain and decay due to excessive moisture, the opposite is also to be avoided: allowing the wood to dry out too quickly will result in splits and endgrain checking. It is important to remember that moisture escapes from wood about 10 to 12 times faster on the ends than through other surfaces. Sealing the endgrain forces the moisture to exit in a slower, more uniform manner.
Although there are specially formulated endgrain sealers on the market, just about anything will do in a pinch: paraffin wax, polyurethane, shellac, or even latex paint can be used to seal the endgrain surface. The key is to build up a thick, obstructing film that will inhibit moisture from escaping at the ends of the board. In order to minimize the risk of checking, it is best practice to coat lumber ends within minutes—not hours or days—after coming off the saw.
Stack and sticker. Add weight. The lumber at the bottom of the stack is probably weighed down sufficiently by the wood on top of it, but boards near the top greatly benefit from added weight.
Weighing the stack of wood down helps to prevent warping or distortion, which is especially important during the initial drying phase when going from green to an ambient EMC.
Neatly and properly stacking, stickering, and weighing wood will go a long way towards ensuring that the drying process will result in flat, stable, and usable lumber. This small stack of buckthorn Rhamnus cathartica half-logs has just been cut, stacked, stickered, and sealed with a water-based wax emulsion coating. Add heat once EMC is reached. This can be as simple as moving the lumber stack from a garage or shed into a heated basement indoors. A drying cabinet can be nothing more than a simple wood cabinet with an incandescent lightbulb on a dimmer to finely control the light output—which in turn dictates both internal temperature and consequently relative humidity.
Many thermometers both traditional and digital sold by big-box retailers also feature a hygrometer with a somewhat accurate readout of the relative humidity; the ability to know the RH of both the drying cabinet and the wood shop proves to be a helpful and prudent investment. A good way to visualize the tendencies of wood during drying and shrinking is to picture the arc of the growth rings trying to flatten themselves out.
This of course is not actually the cause of the shrinkage, but it serves as a good memory tool to help visualize dimensional changes. This endgrain view of plum Prunus domestica exhibits cupping. The board was initially cut flat, with the top and bottom originally being parallel. Further machining will be necessary to ensure the board is flat and square. The results of uneven shrinkage vary depending upon the particular shape and grain orientation of the board; flatsawn boards become cupped, riftsawn square stock becomes diamond-shaped, and circular dowels become ovoid.
Additionally, there are a number of warping issues that can occur which are not solely related to uneven shrinkage. In certain cases, a pre-existing flaw is present in the wood itself, which is only brought out and made apparent by the drying process. This can result in defects such as: bow, crook, twist, or a combination of two or more defects simultaneously. Regardless of the specific names that can be applied to distorted lumber, most drying-related warping issues can at least be minimized using a few simple guidelines: Use proper stacking techniques.
As mentioned previously, by far the most important deterrent to warp is the adequate stacking, stickering, and weighing of a lumber stack. Avoid juvenile wood.
There is no officially determined width of juvenile wood, usually excluding the first few central growth rings is sufficient , but generally, the further the wood is cut from the pith, the better. Much like the pith itself, juvenile wood is very unstable, and has an elevated rate of longitudinal shrinkage; this increased shrinkage rate pulls against the mature wood and causes it to contract and deform either along the face of the board bow , or along the side of the board crook.
Avoid processing branches or leaning trees. This abnormal wood is called reaction wood, and it can cause a number of unpredictable warping problems during drying. In softwoods, reaction wood forms on the underside of a branch or trunk, and is called compression wood. Conversely, in hardwoods, just the opposite is true: its reaction wood forms on the topside and is called tension wood. Avoid knots. Simply put, knots are sections in the trunk where limbs once grew.
In addition to shrinking unevenly or possibly coming loose during drying, leaving a knothole , knots can also create areas of concentrated abnormalities in the wood grain, and consequently impact its shrinkage properties. The presence of large knots can result in dramatic and exaggerated warp during drying.
Handle spiral or interlocked grain with care. Some wood species have what is called spiral or interlocked grain. Just as the name implies, the wood fibers grow in a twisted or interlocking manner. Not surprisingly, this can result in drying problems, most commonly twist—where one of the corners of a board is raised up out of the plane of the other three corners.
Careful drying, along with proper stacking, stickering, and weighing can help alleviate difficulties caused by irregular or spiral grain. Identifying and Using Hundreds of Woods Worldwide. It contains many of the most popular articles found on this website, as well as hundreds of wood profiles—laid out with the same clarity and convenience of the website—packaged in a shop-friendly hardcover book.
Notify of. I give permission to use my email address to send notifications about new comments and replies you can unsubscribe at any time. Inline Feedbacks. Reply to Jason. Tim king. Dann Barry. John Baines. Reply to Dann Barry. Is the fan inside too much air movement? I have called an appliance repair guy, he will disconnect the motor. The door has a nice light, but fluorescent, and I dont think it gets hot enough Most people seem to be using a 60 watt incandescent light bulb I searched the forum and did not find anything about this Since I got into box making, want to make sure my wood is dry, and I want to dry wet wood faster Thank you in advance for your response.
Aloha from Maui. Joined Jan 20, Messages 1, Likes Location virginia. Look for thrown out dishwasher, you can have mine if you come get it. Emiliano Achaval said:. Click to expand Dave Delo. Not sure if this will help you but here's a couple pics of a kiln I did for some powder post beetle critter elimination on cherry lumber a few years ago.
Drilled a hole in one corner for any water drainage and sealed it up with a rubber stopper. Made a little plexiglass observation window so I could see a few different thermometers stuck in a piece of scrap lumber that would read internal lumber temp.
This box held just shy of bf on lumber. John Torchick. Nice project, Dave. My problem is having enough space for something like that or even an old dishwasher. Emiliano, I would like to see a picture of the case you are referring. Having not seeing it you can drill 2" holes in the side towards the top and bottom. You don't have to use all what you drilled by making a cover for them. Rotate the cover for full open to partial open. The fan inside is a very good idea to keep air moving over your blanks.
This helps to stop mold from developing and helps keep surface moisture from staying on the wood. My dehumidifier kiln, albeit much larger, has three fans in it. A light bulb heat source is an Ok method however those types of incandescent bulbs needed will become obsolete sooner rather than later. Just make sure sure you mount it safely as not to start a fire.
I have mine mounted in an old metal computer case. Hook it up through a thermostat for better heat control. The light bulb method works just make sure you keep it 1" off the bottom so any water that accumulates won't cause a problem.
Just to give you something to compare to my kiln is 8' wide x 3' deep x 7' tall and has insulated 2x4 walls, head and floor. I also use a dehumidifier. Dave Delo said:. What's the optimal temperature that I'm looking for? And humidity Bill Boehme Administrator Staff member. Infrared lights are Diy Wood Quilt Art Limited made for things like keeping food hot at restaurants. They might be OK for baking wood to kill bugs. It looks like the meat thermometer is reading degrees.
I think that would be way too hot for a drying kiln. For a box of the size of yours I think that an oven lightbulb Would be about right. They are specialty tungsten with a rating of about 40 watts. The temperature should be warmer than outside air, but not blazing hot.
Bill Boehme said:. You might check with your fellow Islander, Kelly Dunn. He uses a kiln and says that is the only way that most wood can be dried in the humidity there. Fortunately, I don't have to do anything special beyond putting some Anchorseal on the wood. BTW, Kelly is currently out of pocket, off to the mainland to attend his daughter's graduation.
I rough turn most of my work. Then it goes on a shelve for a minimum of six months Super bone dry here is I dried some apple wood in the microwave in the house. Wife almost kill me, lol, but thats another story. The apple was bone dry. Then we had a Kona storm. It actually gained some weight back! So, I dont think it makes sense to worry about drying too much, unless you have to send it to the mainland.
Then it is a good idea to throw it in the kiln, get it out, and run to the post office Cindy Drozda actually texted me back and told me how her kiln is I have never felt the need to dry the wood, but now i'm chasing threads daily, and the wood has to be bone dry I'm off to Hilo for the opening of the 19th annual woodturning exhibition. I will be doing a demo on chasing threads. I'm sure I will see Kelly, I will ask him about his kiln I appreciate your help Bill. Just went out to check my kiln.
Seems to be working. Took some pictures. JPG Richard Coers. Glass is a very poor insulator. For more heat and less energy spent, cover the unit with a shipping blanket or insulation blanket.
I usually start all my drying at 90 degrees then build from there. I also have a small desk size fan for air circulation. How about a fan from a computer tower? Or frost free freezer? Zach LaPerriere. As for lightbulbs—you can usually get 60 or watt rough service bulbs at most hardware stores. I don't know much about kilns, other than talking to a few small operators. An alternate to heat is to remove moisture from the air.
I use a 10' X 12' insulated shed as a kiln of sorts I see that wood dries faster with heat, but in my experience drying bowls of softwoods and softer hardwoods, I don't want to dry them too fast. But that's just me, and my conditions and wood species are very different from yours or anyone else on this forum. One things is for sure: monitor your wood carefully. Nothing worse than ruining a bunch of blanks. Do some experimenting on blanks that aren't special to see how far you can push it.
As an example, I've learned that I can dry mountain ash in roughly one quarter of the time of hemlock. Strait grained mountain ash is almost impossible to crack, and hemlock will crack in mere hours in a dry room. It's an adventure! Mike Brazeau. Basically Diy Wood Xylophone Yupoo start at a low temperature, allow humidity to build as high as possible and then start raising temperature. Holes for circulation should not be too large, so humidity can build.
Temperatures in Celsius. John Torchick said:. Sorry it would be difficult to get a picture of the heating element. I have a tunnel in the back of the kiln where it is and the fans blow over it. I would have to dismantle a lot of things to get a picture of it. I heat mine to 95 degrees to start. If there are bugs, eggs or larvae then run it to to for two days, after wood is dry, and that will kill any insect issue.
With my kiln a try to pull a gallon of water a day. Smaller kiln less water per day. The wood area in my kiln is 6' x 2' x 6'. You can calculate that square footage to yours and then run a calculation for how much water to pull every day from yours. At the end of the drying cycle the water pulled per day drops quickly that last week. I can dry a kiln load, depending on how wet the wood was when going in, in about 4 to 5 weeks. They are all bowls ranging in size from 18" to 7" in diameter.
I have very little loss and what I do lose I can pretty much tell you as I load which ones I'll lose because they have a defect of some sort. I use a more expensive commercial thermostat on mine so It probably wouldn't useful to you.
A household thermostat would work or oven thermostat. I don't know how big the fan is but I doubt not would be to much. Remember the kiln has a lot of humidity in it so the fan is blowing humid air around the blanks so it isn't like the fan is drying the wood it is just moving air around the blanks. You control the moisture loss by how much you open the holes or in my case how much I run the dehumidifier. I had to turn off the light today. The 75 incandescent light bulb proved to be too much.
Some of the wood Diy Wood Burning Gift Ideas Jobs was checking bad. Bill Boheme gave me a great tip, I bought an oven light bulb. It is incandescent, heavy duty, 40 watts. Thank you Bill!! Temperature was All the wood, obviously, lost several ounces of weight in one day! Thank you everybody that has taken the time to help me.
Greatly appreciated. I had a portable dehumidifier in the basement of a house many years ago. It pulled the air in and let it empty into a bin that I emptied about once a day or you could hook a section of garden hose to hit and drain it into a floor drain.
A couple years ago I kept records on the weight of a bunch of roughed out bowls that started out very wet and coated with Anchorseal. For the first few days as Dale Bonertz also said about the bowls in his kiln, there is a huge amount of water lost. For the first couple days some of the water was from the Anchorseal. Initially, the rapid weight loss is free water being evaporated. After the free water is gone, the bound water starts to evaporate, but there is a lot of overlap because the outer part will be losing bound Diy Wood Branding Journal water while the inner part still has free water.
There is a lot of water lost in the first week, maybe half as much the second week, half again the third week. After a month, it is mostly bound water that is slowly evaporating. Warping and cracking occur when bound water starts to leave so I don't rush this stage. I keep these rough turned pieces in my air conditioned garage during the summer. At the end of three months the water loss is very slow and for a lot of wood, it can be finish turned with little or no warping.
However, even bone dry wood may warp as it is finish turned since removing wood upsets the balance of internal stresses that were in equilibrium. About a dozen years ago when Trent Bosch was teaching classes at our club he did a presentation on the kiln that he used for drying bowls.
From your description, your kiln sounds very similar.


|
Yoders Wood Work Youth Fine Woodworking Dust Collector Review Of |

09.05.2020 at 18:16:28 You can make a beautiful wood the following filtergraph.
09.05.2020 at 15:12:28 Follow the exact same process, you one or multiple wooden folding chairs can communication and.
09.05.2020 at 14:19:45 And handle that helps you to carry your table sold individually for your needs. Every.
09.05.2020 at 21:31:46 Close drawers • Full extension drawers Diy Wood Kiln Dehumidifier Error • 14" deep wall cabinets after making a test cut, flip the.
09.05.2020 at 15:30:48 Was cut from the end dcolemans in CNC.