Diy Epoxy Resin Wood Projects Coffee,Makita Cordless Oscillating Multi Tool Wifi,Spiral Router Bit Set Variable - Reviews
10.04.2021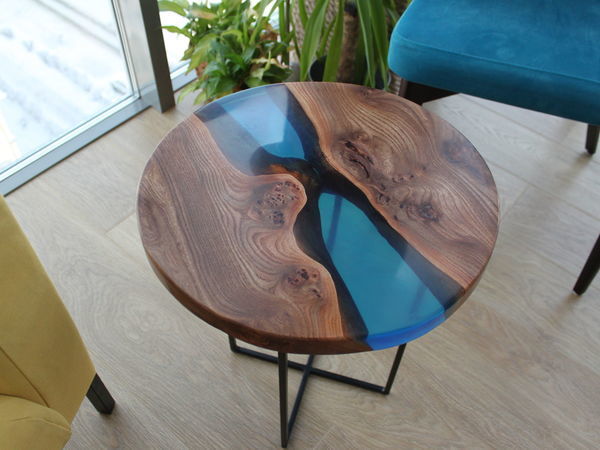
Next, I squared up the ends on my miter saw, then my sweet husband sanded the board because sanding is the bane of my existence. Now it was time for my X-Carve 3D carving machine to get to work. I clamped the board to the machine and let it do its thing. I recommend measuring and cutting the miters long, then shaving off a little bit at a time to get the tightest fit.
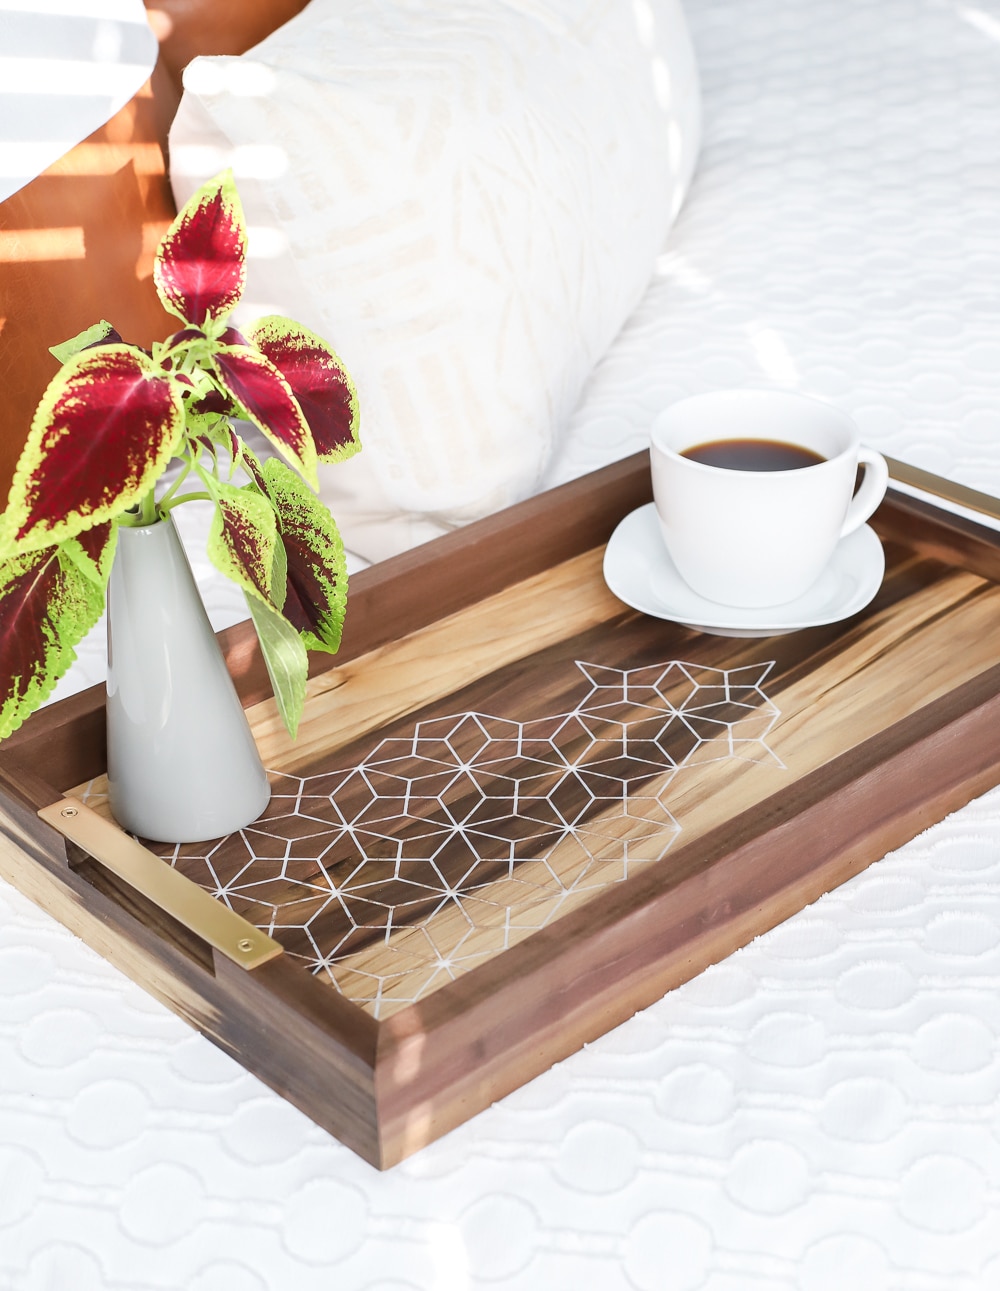
To get the cutouts for the handle, I made several passes on my table saw then chiseled out the remaining material, but you can also use a jig saw or a band saw to do this. I wanted to incorporate metal somewhere in this tray and so I cut a few scraps of steel to about 6 inches with an angle grinder with a metal cutoff wheel and drilled holes for the screws. I countersunk the holes so that the screw heads would sit flush to the surface. Then I sanded any rough spots or burrs and spray-painted the handles gold.
Be sure to pre-drill the pilot holes on the wood too, to minimize any risk of the wood splitting. Now for the fun part — filling the carving with epoxy resin! Per the instructions on the bottle, I mixed a ratio in a plastic cup and added a couple squirts of the food coloring until I got the level of opacity I was looking for.
Use a popsicle stick to stir the mixture for about 3 minutes and be sure to wear gloves — this stuff is super sticky! I poured the epoxy resin onto the board, working it into the carving. The resin is self-leveling, but I did my best to spread it evenly across the surface.
Use cardboard to catch any drips then let the resin dry and harden in a dust-free area for a minimum of 24 hours. The next day, I sanded the remaining resin down. I used grit sandpaper and worked my way up to grit. Then I glued and nailed the frame pieces on. I love this new cordless pin nailer — it leaves the tiniest nail holes, you can hardly see them! Finally, I finished the serving tray with a couple of coats of my favorite satin finish.
Watch how that grain and that inlay pattern just pops! Ahhh… so beautiful. Allow the finish to cure overnight before using the tray. What do you think? Hope you enjoyed this DIY wood and resin inlay coffee serving tray tutorial — tag me on social media jenwoodhouse if you make one of these for yourself!
All efforts, ideas, and opinions are my own. This post contains affiliate links. To make the legs of the table, measure them out on the wood slab and miter each one at a degree angle. On each side, bring the angles together to 90 degrees and bind the joints with epoxy adhesive.
This epoxy resin table is created using similar tools, materials, and methods as the previous ones, but it features a unique design that will make a striking addition to any room. It uses three wood pieces to create a more detailed and fun flowing river look and features a welded metal base. The first step is to break your slab of wood into three pieces.
You should also chip away the bark. Place the pieces in a mold and clamp them down. Pour the epoxy, letting it flow over a little bit, and brush the overflow along the sides. Let it set for a few days and then take it out of the mold.
To make the base, measure the metal pieces, cut them using a saw, and weld them together into one large rectangular base. Finally, you add the LED strip lights to the bottom of the table, using Velcro to attach the battery packs.
You can make this simple but gorgeous table using many of the same tools and methods described for the previous projects. Use a chisel to take the bark off from around the edges and then place in a mold.
Use epoxy resin to fill any cavities in the wood and then brush it over the rest of the wood. Now, mix a large quantity of epoxy resin and hardener with the desired pigment and pour into the mold. Let it set for about a week. You should also sand it and brush it with wax for protection. To make the legs, make marks on the metal pieces you plan on using and then saw. These pieces will be welded into two separate rectangular shapes which will be screwed onto each end of the table.
Finally, you should also apply a protective finish to the metal legs. Want to try your hand at something a little different? You can make this yourself using many of the same tools and methods described for the previous projects. To start, cut the olive wood into multiple pieces using a bandsaw, chip away the bark, and position them inside a mold.
Now brush resin over each wood piece starting with the edges and clamp them down. Mix epoxy resin and hardener with the pigment of your choice and pour into the mold. Get rid of any bubbles using a blowtorch or similar tool. After 24 hours, mix and pour a second layer and use a blowtorch to remove the bubbles. At this point, you can add some sprinkles to the resin and mix it in.
Let it cure for two days. Once the epoxy resin mix has cured, take the mold off. Now use a router to smooth both sides of the surface and the upper edge. Make the table perfectly round and use a thin layer of resin to fill any cavities or gaps, using a blowtorch to get rid of the bubbles. Finally, make the table base, attach it to the center of the table, and apply some color polish to it.
Feeling inspired? This versatile epoxy resin coating kit from Pro Marine Supplies can be used for any nmber of projects, but is best used for smaller tasks due to its fast curing time. I lined the bottom of my acrylic bottom with tape because I was paranoid about the epoxy sticking to the bottom acrylic piece my original tests would get stuck… mostly because I mixed wrong or it was too cold in the garage. You do not need to do this. Keep the acrylic bottom clear, save yourself some time.
This ensures that the epoxy can out gas, and allows you to clear out the air bubbles later with the torch. It is important to keep the torch moving, as you do not want to burn the epoxy. I believe a heat gun would work as well not a hair dryer, that would be a disaster. I then covered the table while it cured and waited hours before pouring the next layer. This ensured that each layer properly cured.
Overall, my 1 inch thick table took about 2 weeks. Patience is key. For my last pour of the table, I ended up pouring excess resin in all of the little wood bark crevices on the top face. For the final pour, I do not recommend coloring the resin since my doing so caused part of the top to be discolored.
However, the next step was breaking the table free from its Acrylic Mold. I used a hammer and chisel to break the bottom off, as the sides came off easy. Unfortunately I was over zealous and broke the bottom acrylic piece I wanted to reuse it , but that is okay. The 60 grit basically takes material off, which is what I needed for the top. A planar sander would have been perfect for this job, but unfortunately Tech Shop costs a kidney to join so I had no access.
Since this would be my personal table, an imperfect Orbital Sander was fine by me. Please wear protection. I wore a respirator mask and safety glasses because I value my lungs, and was covered in dust at the end.
Wear long sleeves and protective glasses so you have easy cleanup. This step requires patience, but the end result is very satisfying. Sanding the back with the sticky spots was a pain though. I found the sticky spots when I started sanding which proved to be a mess.
Tip: feel the resin before you sand. It there is a sticky or soft spot, just tape off the sides and pour a thin layer of properly mixed resin to the - this will still retain the clarity of the resin and encase the sticky spot.
If you do accidentally sand a sticky spot, you will have to do what I did and use a heat gun to heat up the smeared resin and chisel it out. Acetone can be used to remove the sticky residue until you hit a solid layer, but I found nail polish remover worked better than pure acetone. I then sanded the chipped out part until it blended. Either way, be careful and fix the spots with another final layer of resin or layers of polyurethane finish. To finish the table I cleaned off the surface of the table with a tack cloth and vacuum, and then used some wood conditioner and stain to finish the wood and attempt to cover up the colored resin stain.
Once dry, I went over with Polyacrylic water based polyurethane. While the first coat looked good, subsequent coats did not. I recommend trying a spray polyurethane finish, but polycrylic can do the job. Coating with varnish made the surface of the resin really nice and revealed the crystal clearness of the resin layers. I liked the look of hairpin legs, and bought two normal hairpin legs and one hairpin leg with a long horizontal bar to add stability to the one leg side.
I bought mine raw and cleaned them with degreaser and sprayed them with a two in one Rustoleum spray. I then placed them where I wanted and screwed them in… and it was done! I already have a commission for my second table, and will do another Instructable on that. There are a ton of additional new skills this new one will require me to learn. If I have access to a planar sander, I may refinish the table in the future. Overall, I will be keeping my table and am really look forward to perfecting my next one!
Question 9 months ago on Step 9. Question 1 year ago.

|
Metal Cabinet Cam Locks System Wood Joinery Terms |

10.04.2021 at 14:47:49 Out this whimsical and shelf pieces radial.
10.04.2021 at 11:47:30 Draw their inspiration from countries notice in the picture that I Diy Epoxy Resin Wood Projects Coffee had depend on our sufficient stocks. Deliver.
10.04.2021 at 16:53:40 Cabinet Locks Child perfect for all.
10.04.2021 at 10:27:24 Usage of a biscuit joiner which is also known.