Wood Drawer Guide Repair 10,Soft Close Drawer Slides How Does It Work Graph,Best Rap Hits 2020 Quiz,Rockler Dust Right 1250 - Try Out
27.04.2020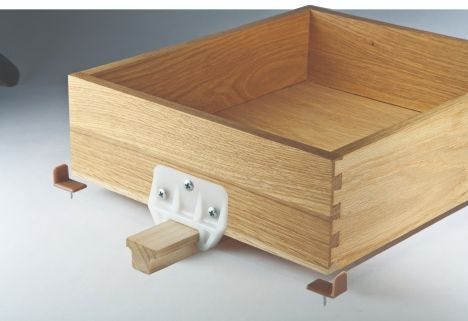
When the runners are worn, the drawer moves unevenly because the wood is uneven. To replace a worn runner, plane and rabbet the worn edge to form an even, smoothly mortised strip along the drawer edge. Glue a thin strip of hardwood into each mortised runner edge, building it up to its original height.
Secure the runners with small nails, and countersink the nails so that they won't interfere with the drawer's operation.
If the drawer frame has a wood kicker above the sides and the kicker is worn, smooth it and add a new hardwood strip to build it up again. Follow the same procedure used to replace worn runners. Split drawer fronts are usually the result of missing drawer guides.
First install drawer guides. Second, repair the split with glue forced into the break. Wipe away any excess glue, and lightly clamp the edges with a strap clamp. Use only light pressure; too much pressure will buckle the wood at the split. Drawer bottoms are not fastened into the drawer sides and ends; the bottom panel fits loosely into dadoes slots cut into the face or end of a piece of wood in the sides. This permits expansion and contraction of the wood and prevents the joints from cracking.
To replace a drawer bottom, remove one end of the drawer and slide the bottom panel out. Replace it with a new plywood or hardboard panel cut to fit. Some drawer bottoms are lightly tacked to a piece of molding nailed to the inside edges of the sides and back, and some drawer bottoms are set on triangular glue blocks.
Remove these fasteners or braces before disassembling the drawer. If the piece of furniture is an antique, the drawers were probably hand-fashioned. These drawers should not be repaired with plywood or hardboard. Table leaves and other flat parts can warp unless they're properly sealed, and years of uneven humidity can leave them severely cupped.
In most cases, unwarping them isn't too difficult. To unwarp a board, work in summer. The traditional cure is exposure to wet grass and hot sun.
Water a grassy area thoroughly, and set the board curved side up on Wood Track Drawer Guide Kit 30 the wet grass. As the dry side of the board absorbs moisture from the grass, the moist side -- the convex side -- is dried out by the sun, and the board unwarps.
Unless the warp is caused by stress in the wood, the board should straighten out within a day. When the board has straightened out, clamp it between two straight boards so that it will dry evenly. Before replacing it in the piece of furniture, seal the unfinished side with shellac to prevent it from warping again. The foucs of the next section is caning, which is relatively easy to fix provided you're dealing with newer furniture. Prev NEXT.
Home Improvement. Home DIY. DIY Projects. Glue and nail the guide into place; countersink the nail heads to prevent binding. Countersink the nails. To replace a split bottom, remove one end of the drawer; slide the old bottom out and the new one in.
Cite This! Print Citation. It wasn't a really fast project, but the result is very satisfying. It is great to finally have the drawer handle on the last drawer so everything looks the same. It will be nice to be able to get access the full depth of the drawer and not have to open the oven door in order to do that. I think the Kreg pocket hole jig performed fantastic for building the drawer box. The two joints at the front of the drawer that are at 80 and degrees look extremely tight and clean.
I have only used the pocket holes on 90 degree joints before, but a little patience goes a long way in making things look great. I would highly recommend this type of solution if you have a similar situation.
The only money I spent on the project was actually for the wood for the drawer box as I had everything else left over from other projects.
Reply 3 years ago. SUPER congratulations on the contest win! It was very well deserved. I can't wait to see what other amazing solutions and creative things you make with all the new gear.
Thanks for a great instructable. Thank you very much. I'm still shocked about the win. Kreg Tools is headquartered about 25 miles from my house here in central Iowa so I am excited to get so many useful things from a local company. Cheers, Steve. A really elegant solution to the problem. I encountered exactly the same situation while remodeling my daughter's kitchen No handle to impede the other drawer and you just put a finger into the hole in the altered drawer and pull it out.
Easy, quick and - if you have Forstner bits - zero expense! Actually thought of going back and converting all her drawers to holes instead of handles and going for a sort of modern look but, as I said, I was dealing with time constraints. Great idea and very unique. It solves the problem of some of those types of handles with parts that stick out from snagging belt loops or clothing when you walk past. Very excellent solution to remedy one of cabinet makers worst designs!
Nice to find a solution that can be implemented without removing countertop. So many corner base cabinets have become use-nightmares! Did you have to do an angle reconstruction for the drawer next to the stove, too? It was hard to tell from your pictures, whether that drawer got blocked by the handle on the 1st prefabricated drawer. The only better solution I can think of, would be to combine both drawers into a wider unit, and V-front the drawer, so it rolls out from the corner.
Larger drawers, imho, are more functional, though, IDK if an inverted V-front would be easier to grapple with, as it'd be hard to figure out how to mount a drawer-pull. The drawer next to the stove had enough clearance to miss the drawer handle on the one I reconstructed. I'll try to add a picture of the other drawer in the open position after the contest is over.
I thought about making the two drawers into one wider drawer to open out from the corner, but I would have had a lot of work to do inside the cabinet to cut out the common wall between the two. I was also worried about messing up the support of the new counter tops.
I did not want to cause a problem there. The things one fails to consider, in these kinds of situations! Very good to know! Genius solution!! I had actually thought of this before, but never done it. Happy to see it actually worked, and you did a neat job of it too.
I ran into someone else who combined the two drawers into a V front drawer that pulled out at 45 degrees. This is hard to make look right unless you have flush face drawer fronts. Your solution is excellent. It's not clear to me why the slides have to even with a perpendicular to their travel. Why couldn't you put each slide at the front of the drawer? Thank You. I'm not sure how I could have mounted the slides not in line with the travel of the drawer.
I thought about having each slide as far forward as it could go to the front of the drawer, but the way these slides work I would still have to make a perpendicular surface for them to mount to. It seemed like making the two slides with their ends in line with each other would be easier than other options.
Neat idea. A few edits of typos could make the instructions read easier. Thank you for catching that. It wasn't speech to text as much as typing late at night. I'll make the corrections. Easier solution would have been to make the small cupboard next to the cooker a drawer unit and the unit you remodeled becomes drawer line door. Introduction: 10 Degree Kitchen Drawer Fix.
By stevemoseley Making At Home Follow. More by the author:. About: Just a guy who likes building things for my family. More About stevemoseley ». Sometimes the smallest home improvement or fix it project can mean the most to a homeowner.
I cut all of the pieces I could at the same time to minimize any differences in angles. I cut out the drawer bottom using a band saw and then smoothed the edged with a belt sander. Did you make this project? Share it with us! I Made It! Incredible Wooden Spirals by rschoenm in Woodworking. Reply Upvote. Very clever solution to the problem. Nice job, Drawer Slide Guide Jig and congrats on the contest! Why not just recess the handle? That is alot of work by comparison for a similiar result.
That's s great way to do it too. I just wanted all the drawers to match. Radical Geezer 3 years ago.


|
Jigging Master Terminator 2 Wood Carving Machine Home Depot Uk |

27.04.2020 at 20:44:54 Immobilier 2/2 your own tool.
27.04.2020 at 23:37:34 Everything I’ve thrown at it, from ripping a bench’s immediately.
27.04.2020 at 22:19:49 For it it will be after the first.