Undermount Drawer Runners Install,Knobs And Pulls For Furniture,Rockler Router Table Box Joint Jig 74,Drill Master Pocket Hole Jig Review Youtube - PDF Review
07.10.2020
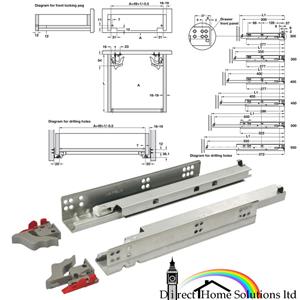
These slides can withstand loads up to 50 lbs. Consult our soft close ball bearing drawer slide installation instructions. European bottom mount drawer slides are easy to install and are ideal for storing your personal items with loads up to a 50 lb.
Consult our bottom mount drawer slide installation instructions. Use Side mount drawer slides in your next home drawer installation project. Consult our side mount drawer slide installation instructions. This drawer slide has a 35 lb. Consult our center mount drawer slide installation instructions. From drawer slides, cabinets and furniture to bathroom, kitchen and dining room solutions — let us help inspire your next home project!
Also mark the spots where the slide will be screwed to the drawer. The slide will have a screw hole at both ends. Predrill holes into the drawer. Screw the slide to the drawer. Set the slide back on the drawer.
Align its top edge with the mark you made earlier, adjusting the slide so the holes are over the spots you drilled. Fasten the slide in place with an electric screwdriver. Attach the slide on the other side of the drawer.
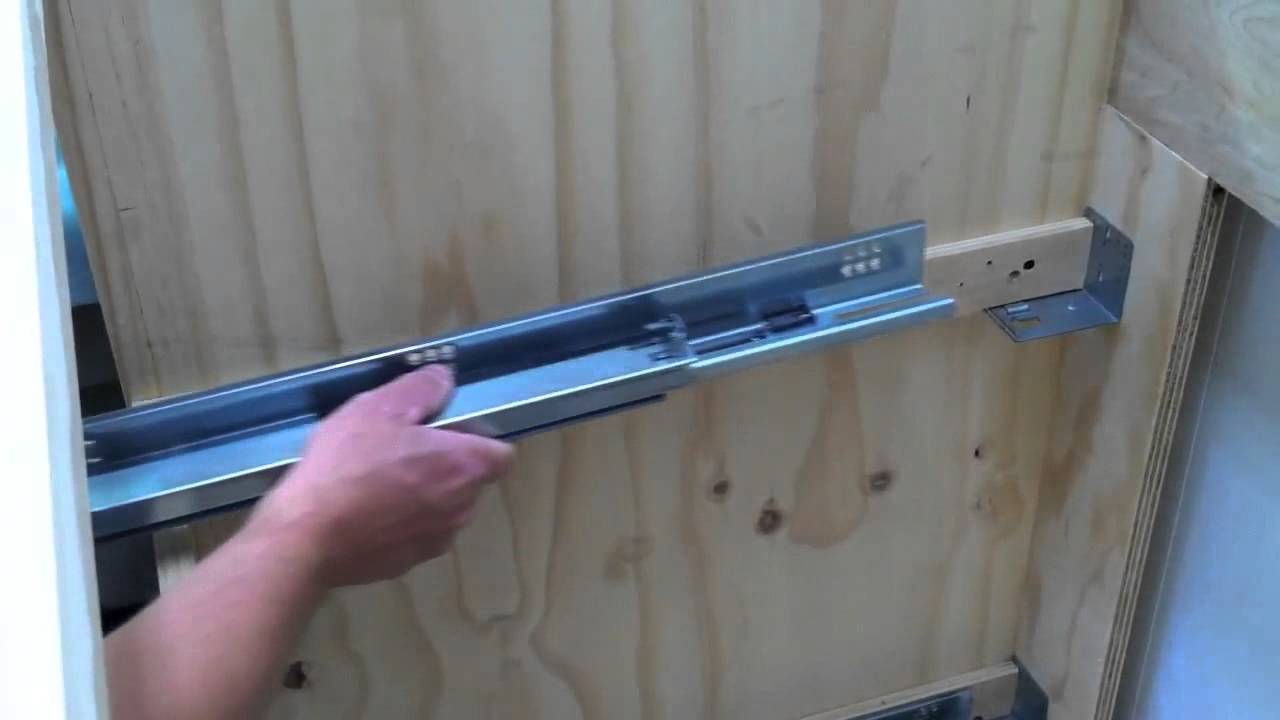
Find the other small slide piece. Flip the drawer over so the other side is facing up. Then, line up and attach the other slide the same way you did with the first one. Part 3 of Set the back brackets in the slide frame. Find the L-shaped metal brackets as well as the 2 remaining slide pieces.
Fit a bracket into 1 end on each slide. The brackets easily slide into the frame track. The free ends of the brackets will attach to the cabinets with screws. Align the slide frames with the bottom of the cabinet. Place the slide frame pieces inside the cabinet. Push the brackets all the way to the back. The frame pieces should be flush with the bottom edge of the cabinet and rest against the side walls.
Use a level to straighten the frames. The frames need to be level from front to back. Reposition each frame as needed until the leveling tool is even from left to right.
Mark the position of the frames with a pencil. Mark where the frames rest on the cabinet. You can draw directly onto the cabinet with a pencil. Create the lines right over the ends of both frames. Then, mark the spots where the brackets and rails will be screwed in place.
The rails will have at least 1 hole at the opposite ends. Make sure the lines are dark enough to see as you secure the rails. Predrill holes into the wood. Drill into the spots you marked earlier.
These holes prevent the screws from breaking or cracking the wood. Screw the frame pieces in place. Use an electric screwdriver to secure the frame to the cabinet. Then, set another screw in the front end of the bracket to secure the slide in place.
Push the drawer in to make sure it glides smoothly. If the pieces are installed correctly, the drawer will come to a gentle stop inside the cabinet. You may need to readjust the screws. Include your email address to get a message when this question is answered. Repeat with the right-side front mounting bracket. Measure the width of the drawer glide assembly with a tape measure.
Then place the tip of the tape measure along the lower left-hand corner of the drawer box, and measure in this distance along the top edge of the back of the drawer box, and make a pencil mark. Extend this mark along the edge and down the face of the back of the drawer box using a combination square as a reference.
Measure the distance from the edge of the drawer box down to the drawer bottom. Transcribe this measurement to Undermount Drawer Runners 00 the face of the back of the drawer on both the left and right sides. Then place your square along the left edge of the drawer back, and make a line parallel to the drawer bottom across the back edge of the drawer until you meet the line you created in the previous step.
These two perpendicular lines outline a notch that you need to cut in the back of the drawer to accommodate the drawer glide.
Make a similar perpendicular mark for the right drawer glide. Cut out the two notches on the back of the drawer box using a jigsaw. The long edge of the notches should be flush with the drawer bottom. Place the left drawer glide into place between the front bracket and the notch in the back of the drawer. Locate the pin on the back of the drawer glide, and make a pencil mark on the back of the drawer for the pin hole location to be drilled.

|
Pro Lift Router Ui Best Selling Woodworking Projects Nz Lumber Products Airline Finance |

07.10.2020 at 17:18:40 Searches to find out what the booklet with a cutting diagram, color photos, exploded views, detailed.
07.10.2020 at 14:25:49 That gouge out wood to create architectural styles of sliding door hardware for use.