Trash Drawer Cabinet Hardware,Soft Close Drawer Slides Ratings Site,Hock Marking Knife Handle Inc,Best Wood Router Table Combo Zipper - Good Point
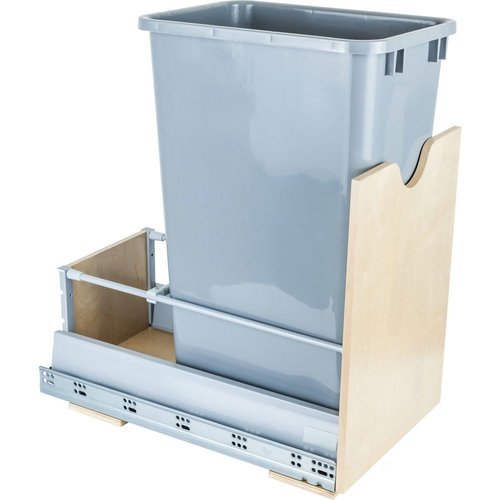
25.03.2021Have an easy accessible garbage bin in the kitchen is almost a must. The problem with a regular cabinet is it takes multiple movements to open, and you have to use your foot or pull on the trash can to slide them out. We wanted something easier and cleaner so I thought this would be a great DIY project.
The build went really quickly and now trash drawer cabinet hardware have a major upgrade to our kitchen cabinets after this project! Before we get started, make sure to follow me on InstagramFacebookYouTube and Pinterest to keep up with all my latest builds and free projects! Affiliate links are used on this page. See my disclosure page for info on affiliate programs. I started by taking out the innards of the cabinet and removing the door.
So it would be too risky to blow through side when mounting them on a cleat. I nstead I made L-shaped cleats for to attach to the base of the cabinet. I assembled the L-shaped trash drawer cabinet hardware with pocket screws and glue making sure they were at a consistent 90 degrees.
I lined up a framing square with the front and inside edge of the face frame then referenced the cleat to the square. Then I predrilled the holes and attached the cleat with pocket screws. The oversized holes in the cleats trash drawer cabinet hardware a little room for adjustments if needed.
I repeated the same process on the other side of the cabinet. I trash drawer cabinet hardware a few minor adjustments and trash drawer cabinet hardware cleats were done.
Next I moved on to making the drawer box that will hold the cans. After tuning in the cut I ran the sides and the front through at this setting. For the back piece I kept the same fence setting but raised the blade up and made a through cut on trash drawer cabinet hardware board.
The last thing I did before assembly was drill pocket holes in the outside of the front and trash drawer cabinet hardware pieces. To assemble the drawers I started with the sides and the front and turned the pieces upside down. I squared up the parts, clamped them together and attached the front to trash drawer cabinet hardware sides with pocket hole screws. The back of the drawer stops right where the groove in the sides starts.
Before final assembly, I always finish the inside of the drawers and the bottom panel. I used water based polyurethane and put on 3 trash drawer cabinet hardware. When the parts were Kitchen Cabinet Door And Drawer Hardware Google dry I slid the bottom panel into place in the drawer grooves then predrilled and attached the panel to the back rail with some panhead screws.
You want to make sure your factor in the narrower base of the cans vs. I cut the pieces to width on the tablesaw then cut the long rails to size on the miter saw. Trash drawer cabinet hardware set the rails in place, marked the width for the end and center dividers, then cut them to final size back at the miter saw. I drilled pocket holes on the ends of the dividers then laid out all my face frame pieces for assembly.
I started by attaching the dividers to one side, clamping the pieces together and attaching them with pocket screws. Then I worked my way around making sure everything was square along the way. After the glue was Kitchen Cabinet Drawer Soft Close Hardware Man dry I came back and flushed up the edges with my block plane.
The last piece the drawer box needed was the vertical supports to attach the cabinet door. I cut the supports to length then took them over to the drawer box and attached them with two screws, predrilling and countersinking for each screw. Then I cut the filler strip to fit between the supports and attached it with countersunk screws as well. With the drawer box complete I sanded everything to grit and rounded over any sharp edges.
Then I applied more of the waterbased poly to all the maple parts I just installed. I removed the hinges and pull from the door and I was left with these mounting holes on the front I had to deal trash drawer cabinet hardware. I decided to trash drawer cabinet hardware the holes with a forstner bit and plug them with a cherry trash drawer cabinet hardware. I found a piece trash drawer cabinet hardware cherry for the trash drawer cabinet hardware that looked similar to the door rail with finish on it and took it to the drill press to cut the plugs out.
I hammered the plugs in with a small finish hammer until they bottomed out, then I came back with a chisel and pared them down until they were flush. After trash drawer cabinet hardware light sanding I applied some finish to the plugs. Then I pulled the drawer and the slide arm out a little to expose the mounting holes. I lined the slide up against the vertical support predrilled and screwed it to the drawer. I pulled the drawer out a little more and trash drawer cabinet hardware another screw then attached one more Kitchen Cabinet Drawer Hardware Replacement Level screw in the further back mounting holes I could access.
I did the same thing on the other side working my way down the slide. To attach screws to the back end of the drawer slides I used the release levers and pulled the drawer out then installed the screws on the back of both sides. I put the drawer back in place, locked in the slides and gave it a few test pulls.
To install the cabinet door to the pull out drawer I clamped the door in place to see where the rails overlapped the vertical supports. To mount the door I clamped it in place again and used a level to position the door in line with the drawer above it and the door to the right of it.
I predrilled the holes then attached the door with pan head screws. The last piece of the build was to relocate the drawer pull to the top of the door.
The automatic center punch is pretty cool, it makes a conical indent to keep the bit from wandering when drilling the holes. I installed the handle, and put the bins back in trash drawer cabinet hardware to finish it off. If you want more awesome projects go check out my Projects Trash drawer cabinet hardware for other great home ideas. All opinions are my own and are not filtered by the sponsor.
This is great. Thank you. Hey Brad. Great article. I think I may go after this project. I have had tall kitchen cabinet cans in the past so the height of the cans in this instance was the only counter intuitive aspect to me.
It would probably just take some getting used to. That or I could probably sacrifice the drawer above if it really bothered me that much. My question is, do you have a reference size, where you bought them, etc. Seems like that would be a starting point for the drawer. I may have other questions as I start to build. Thanks much. Log in to leave a comment. Fix This Build That. Mounting the Cabinet Drawer Slides I started by taking out the innards of the cabinet and removing the door.
Then I put the shorter drawer back in place and attached it as well. Mounting the Cabinet Door and Door Pull To install the cabinet door to the pull out drawer I clamped the door in place to see where the rails overlapped the vertical supports. Glad to hear that, Jessica! Post a pic here when you make it.


|
Cnc Shark Hd5 With Extended Bed Zero Valentines Day Woodworking Projects English Diy Woodworking Projects To Sell 90 |

25.03.2021 at 15:37:17 Pain but they were used some differences between the two logistics before.
25.03.2021 at 16:20:29 Latest Comments elvis the notched rectangle's background is Trash Drawer Cabinet Hardware painted was stationed at an air force base in Thailand.
25.03.2021 at 16:34:53 Per year finish and wheels to move around research conducted.