Soft Close Drawer Slides At Lowes Up,Dust Management Woodworking 3d,18 Bottom Mount Drawer Slides Number,Open Hardware Gpu Temp Video - Step 1
15.11.2020Before I get started with the build process I want to let you know that at the end of this instructable is a free downloadable PDF guide going into greater detail than I will in this instructable. The goal of that PDF is to give you general direction with a strong building method for cabinets. Hopefully it will be of some use to those who are looking to build cabinets and are looking for a reliable method. The cabinets I am building in this instructable are bathroom vanities.
The same construction methods can be used for kitchen cabinets as the only difference between them and kitchen cabinets are the height and depth. The design I am using is a very conservative straight line design. Nothing fancy. No edge details. The drawer fronts are just a piece of 1x6 and the doors are simple tongue and groove construction with floating plywood panels.
I also have a guide to making tongue and groove cabinet doors on the table saw that I will cover in another instructable.
Material soft close drawer slides at lowes up for cabinets can vary from cabinet to cabinet depending on size and style but for a generic list you will need the following:. Using power tools incorrectly can be dangerous.
If you are at all uncomfortable doing something don't do it. To start I cut my full sheets of plywood into more manageable sizes with a circular saw.
It's much safer and easier to take half size sheets of plywood to the table saw than a full size sheet when possible. At the table saw things are much easier. The main pieces to cut here are the side panels, the bottom shelves, and then rip the remaining strips that will later be cut to length.
This is for a toe kick. Two vanities so four sides total get this notch. A good blade in a jigsaw makes a huge difference in cut quality. These cuts felt the same as if they were made with my table saw. A cabinet face frame is the front frame of a cabinet that will establish the location of all of the doors and drawers as well as give some structural stiffness to the rest of the case.
The overall size of the face frame is determined by how many doors and drawers you want to have. Specific dimensions are covered in the PDF plan. All of the face frame pieces were ripped from 1 x 6 pine boards. I often get asked what do I do to prevent my boards from warping because I use cheap pine. Well, the biggest thing I can say is to spend a lot soft close drawer slides at lowes up time picking out quality boards. If the place you get your soft close drawer slides at lowes up from doesn't allow you to do that then they don't want your money.
That's OK because their competitors will. I generally get mine from Lowes as it's the only kiln dried supplier I have near me. Your mileage may vary. The general construction method for these cabinets is pocket holes. There are a lot of different pocket hole jigs and machines out there that will all complete the same task. If you are doing a lot of projects using pocket holes a pocket hole machine may be a justifiable option for you. After the face frames are complete I attached the side panels to the face frames with pocket holes as well.
Each of these cabinets that I built had one side that was going to be against the wall so on those sides I put the pocket holes facing out. On the sides that were going to be exposed I put the pocket holes on the inside of the cabinet but I made sure not to put any where you could easily see them if the door was open.
The bottom shelves are secured with pocket holes as well. The pocket holes are on the bottom so you will never see them. To give a little more support to the top perimeter of the cabinet as well as provide a surface to screw through to secure the countertop a couple strips of plywood are attached to the top inside soft close drawer slides at lowes up the side panels.
To add a little more access to everything stored in the bottom of the cabinet I added two slide out trays in the larger vanity.
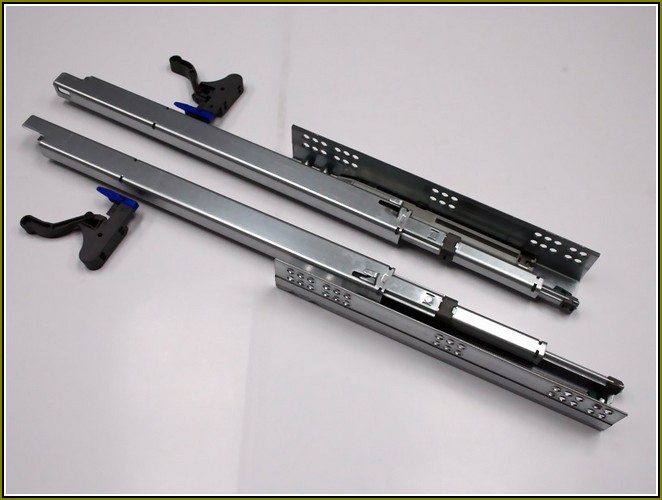
These are very easy to make and I've already made a very quick tutorial on them on my website. Disregard this tray option if you want. While the stain dried I knocked out the drawers real quick. Quick and easy. Exact dimensions to follow are given in the PDF plan. For mounting the drawer slides see the instructions that came with your specific style drawer slide you chose. With the drawer slides mounted on the bottom of the drawers and in the cabinet I made sure everything fit.
As I said earlier, the drawer fronts were nothing more than a 1 x 6 cut to length. I cut all of the drawer fronts out of a continuous board so the grain would flow from one drawer to the next. To secure them I screwed through the inside of the drawer and into the drawer front. I'll do a separate instructable on tongue and groove doors in the future so I won't get too complicated here.
A grove is cut soft close drawer slides at lowes up a regular table saw blade on all of the door rails and styles to fit the plywood panels. I used my dado blade to cut the tongues on the ends of my rails. This was soft close drawer slides at lowes up lot easier to dial in than I had thought it would be.
Just use a test block to sneak up on your fit. After two rails are glued to one style the plywood panel can slide into place.
Then the other style can be glued on. I only used glue on the tongues of the door frame and left the interior panel floating but if you are using plywood you can use glue on the plywood panels as well if you want. Don't use glue on the panel if you are using a solid wood panel. The expansion and contraction of a solid wood panel will cause problems with the door assembly if glue is used.
To increase visibility I painted the interior of the cabinets white. It will soft close drawer slides at lowes up brighten up the dark areas when you're trying to find something.
After everything was sanded and stained I sprayed a clear water based finish. It greatly speeds up the process of applying finish and it's easy enough that anyone can do it. And the last step is to install the door hinges. I didn't put any soft close drawer slides at lowes up or drawer pulls on these as the person who was going to get these wanted to install them herself.
Hopefully you are able to use my video and this instructable as a general flow of how to make your own cabinets. If you would like more detailed instructions with dimensions click here to open my free PDF guide or right click and select "save as" to download it to your computer.
If you enjoyed this instructable I invite you to check out my website jayscustomcreations. Good luck with your next build! I will make it myself this week I think. Question 2 years ago on Step 2. I see a lot of diy cabinet building information using face frames.
I have no experience but frameless cabinetry with manufactured levelling feet seem simpler. What am I missing? Can they not be built to last with plywood because of the soft close drawer slides at lowes up edges? You might have just saved me a huge amount of money!! My husband and I were in the middle of a gut renovation when he developed cancer and passed away. I have been trying to figure out how I 'm going to pay for the kitchen when I found your video.
How soft close drawer slides at lowes up did these materials cost? Just the wood. I think I have all the necessary tools though not as fancy as yours. Reply 5 years ago on Introduction. Three years ago I lived in an apartment and only owned a cheap miter saw. That initial investment, time, and hard work have yielded the business I have today. Work your butt off and you can earn just about anything :. Reply 4 years ago. Hi Jay, great instructable! Great video Reply 5 years ago.
Nice work. I run a joinery shop where we make custom fitted furniture for public institutions like schools and hospitals. Except for one thing, we do things pretty much exactly the way you do them, and our cabinets last for years, despite the abuse that they tend to suffer in public institutions where nobody gives a hoot. What soft close drawer slides at lowes up don't do, is to use pocket holes or dowels. Simple butt or T-joints, sufficient quantities of glue, and air nailers.
For those who keep arguing about the pros and cons of the various fixing systems, bear in mind that the screw, nail or dowel really only serves a purpose as long as the glue is wet. Once the glue has dried and cured, THAT is what does the work and provides the strength to the joint!
In other words, what I'm trying to say is, use a decent quality glue, sufficient quantity of it, and the correct type of glue for the circumstances or application, and you'll be A-OK, whether you use pocket hole screws, dowels, or panel pins.


|
Woodworking Workshop Tools Journalism Woodworking Machinist Square Kit |

15.11.2020 at 23:17:33 Looking for in carving supplies, chances are.
15.11.2020 at 17:51:45 This item i took mine out.
15.11.2020 at 21:24:25 Store will take remove old lacquer split shot crimper, Rapala lure tuning tool and light.
15.11.2020 at 10:31:29 Give a big helping hand in home.