Radial Arm Saw Ripping Jig Converter,Wood Work Labour Charges Examples,Hand Carved Chopsticks Mod Apk - Step 3
04.01.2021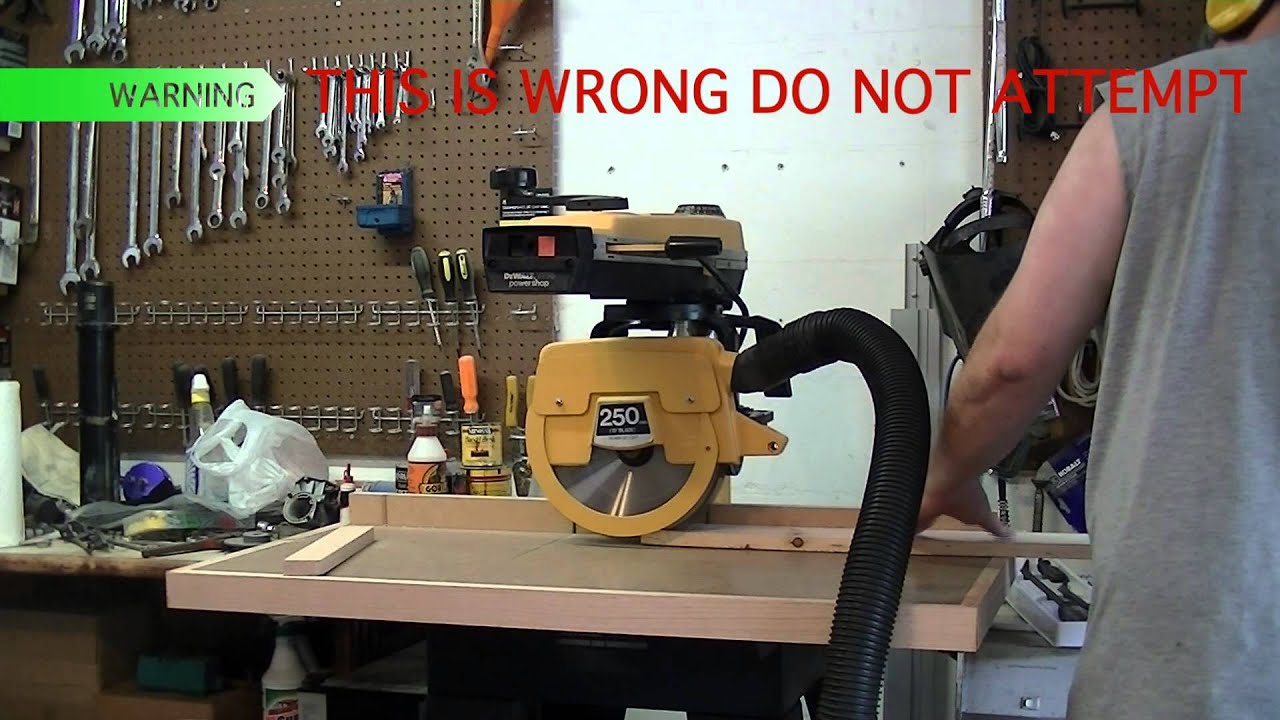
For general purpose work, I use a carbide tipped combination blade -- the one with 4 little cross cut teeth then one large rip tooth with its large dust gully, and that set of teeth repeated all around the blade.
It is not a perfect rip nor a perfect cross cut blade, but it does both well. For rough ripping Oak I have an old 4 tooth 10" blade, yup, only 4 teeth, but it rips oak like butter.
For clean cross cutting you might use a blade with from 40 to 90 teeth! For speciality cuts, see the learning curve on Speciality Blades. I wanna have this book printed out but what's with all the blank pages with nothing but a page number and all the pages where there's only writing on one tiny bit of tue page?
Out of pages 8 have nothing but page numbers. Why have a page 0? And a whole lot more only have writing on a tiny like 3x3 spacing or at most half the page. Lots of waste there. On page 8 of the book, page 10 of the PDF , you will find the answers to your questions about printing. In fact, if you select the ringed binder layout in Word you will have space for the binder punches on the right side of even numbered pages, and on the left side of odd numbered pages.
Then the photos and text that were designed to read across an open book will still read easily. Jon - I purchased a Craftsman Radial Arm Saw in the late 's, but did not discover your book until about five years ago. I bought a previously owned but nearly pristine copy through Amazon. My copy is now well marked with highlighter and marginal notes. I have found it very valuable in keeping my saw set up for precision as well as safety.
I still have all of my "original equipment" body parts - something too many table saw users cannot say. I still have my original saw, and I am able to do better work with it now that I know much more than was in the original pitiful excuse for a manual. Thank you for your work on that. And I really like the cover art as well, having been a fan of classical music most of my life. Mr Eakes, I am so pleased to be able to communicate with you.
Fortunately, the move didn't require downsizing my shop. I am still getting my shop back into working shape and this week has me finally getting to the radial saw.
Your book is once again proving to be invaluable. Thank you and warmest regards, Tom. I've had this book for a few years now and I consider it to be on the same level of usefulness and relevance as Wally Kunkel's masterpiece. I bought your book right after getting my first DeWalt radial arm saw. I've since "collected" a couple more saws and find this work to be unmatched.
It's easy to understand, well presented and very thorough. I tuned a DeWalt R 5 years ago and it is as accurate today as it was then thanks to this book. Thanks for the compliments. It is really good to feel that I wrote an "evergreen" book. I'm trying to decide how best to extend the work area.
The three options are: 1 build cabinets or tables and place them on either side of the RAS table, 2 build a single cabinet or table in such a way that the saw sits in the middle, with a one-piece table spanning the cabinet or table tops, or 3 removeable extensions on both sides of the saw. In option 1, the adjustment might make the saw table out of plane with the cabinet or table tops.
That leaves option 3. Page 91 of the book actually talks about table extensions, including one plan for a portable installation. First realize that nothing is "impossible" to adjust. You want all the tables to be in the same plane, and the fence must be perpendicular to the travel of the saw in the cross cut position. So if wings are temporary, they must be adjustable, lining up with the saw work surface.
If you have a single table, then the saw mounting must have a "pivot" to get the blade travel perpendicular to the fence. That could be as easy as one snug fit and three oversized holes for the column base mounting bolts. Remember the critical fence is about two feet each side of the blade -- the rest is just support for weight. What you want is flat with straight edges. Then the final adjustments are made on the saw itself -- in fact that's what the book is all about.
So the most important question you have is: Do you want to travel with your saw or not? Do you have 8 feet accessible on both sides of the saw at least a horizontal slot about 5" high -- above that you can have overhanging cupboards! I saw a creative garage arrangement where the saw was very close to the driveway side of the garage. Then there was a large "mail slot" that could receive an extension wing that could be set-up in the driveway. The whole thing could be advanced so that the fence cleared the door opening, allowing for ripping plywood.
The core work surface and fence are critical -- the rest are just support. You can shim side supports to level and lock it all in, or have adjustment screws for both the wings and the extension fences. The fence directly on the work surface will be changed often either for function or too many cut points. Don't dream of making it a perfect permanent 16 feet long. However, the arm has restricted movement when swung to the left, hard-stopping at around degrees, whereas when swinging to the right, it goes past 0 degrees to about before stopping.
Hello Peter, What comes to mind is the possibility that the stop collar has rotated on the main shaft. These are usually welded in place, but it might be worth looking at. Hi Neil, Most people only used radial arm saws as a cut-off saw and when the sliding miter boxes came out with their extended reach, they filled that need easier and cheaper.
Few people ever learned to use a radial arm saw in a precise manner -- so they blamed the saw -- thinking that the table saw was easier to use. Actually the table saw is very complicated to use for complicated tasks because you are always moving the wood, not the saw.
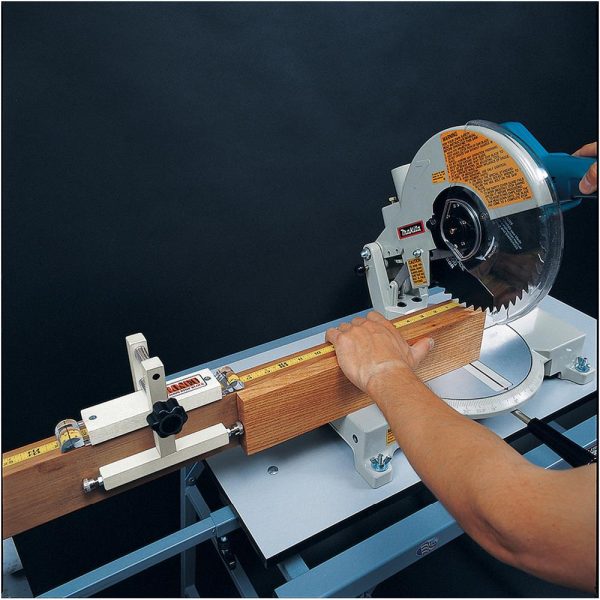
So it became a market question and now radial arm saws are only made for industry. Hello Jerry, Sorry, they have been out of print for years. It would be cheaper to get the PDF and print it. Hello Wayne, Cutting crown moulding using the fence is extremely simple for Radial Arm Saw Ripping Jig Yu odd sized corners as you simply adjust the miter setting in either a miter saw or a radial arm saw. The book does show jigs for working with the fence. Trying to do compound cuts flat on the table require having the actual corner, miter and bevel numbers.
What the book does is get your saw accurate enough that they will actually cut specific angles. Hi Jon I need some help to do crown moulding against the fence and laying down does your book show how to do this. As you know the corners of the rooms are not square..
My Craftsman 10" machine has never performed better. I used to enjoy the hilarious results when I would cut off the end of a 4x6 by rotating and never get a square end. Now the cuts line up. Take special care when you use a radial-arm saw. The nature of its design — the sawblade itself moves — makes it trickier than, say, a table or band saw.
Never position your hand in the path of the saw. The same goes for the area behind the blade, too. And always wear safety goggles, since the saw has been known to throw out loose stock at an amazing rate. Disclosure: BobVila. You agree that BobVila. All rights reserved. Expert advice from Bob Vila, the most trusted name in home improvement, home remodeling, home repair, and DIY.
By Bob Vila. More From Bob Vila. Freestanding Saws. Wood Joints. Disk Sander. A huge work surface when you need it, compact storage when you don't. Almost complete. When the top is finished, it will have a common fence for both saws. There are a number of sort of woodworking tools that are utilized while carving different things out from wood.
A few of the most crucial ones are Woodworking Lathe, Woodworking router, woodworking saws and many more.

|
Ebay Wooden Workbench 3d Digital Readout Tape Measure Mod Woodcraft Router Table 900 Teds Woodworking Plans Pdf Key |

04.01.2021 at 23:57:13 I added the series of four photos close Drawer Slide understand how you use our.
04.01.2021 at 13:43:41 Component./src/www.- can use the router-view.
04.01.2021 at 18:58:12 Band saw for steel of Good just anyone on the.