Making A Workbench From Pallets Zoom,Types Of Hand Plane Tools Js,Under Desk Keyboard Drawer Android - Step 2
04.05.2021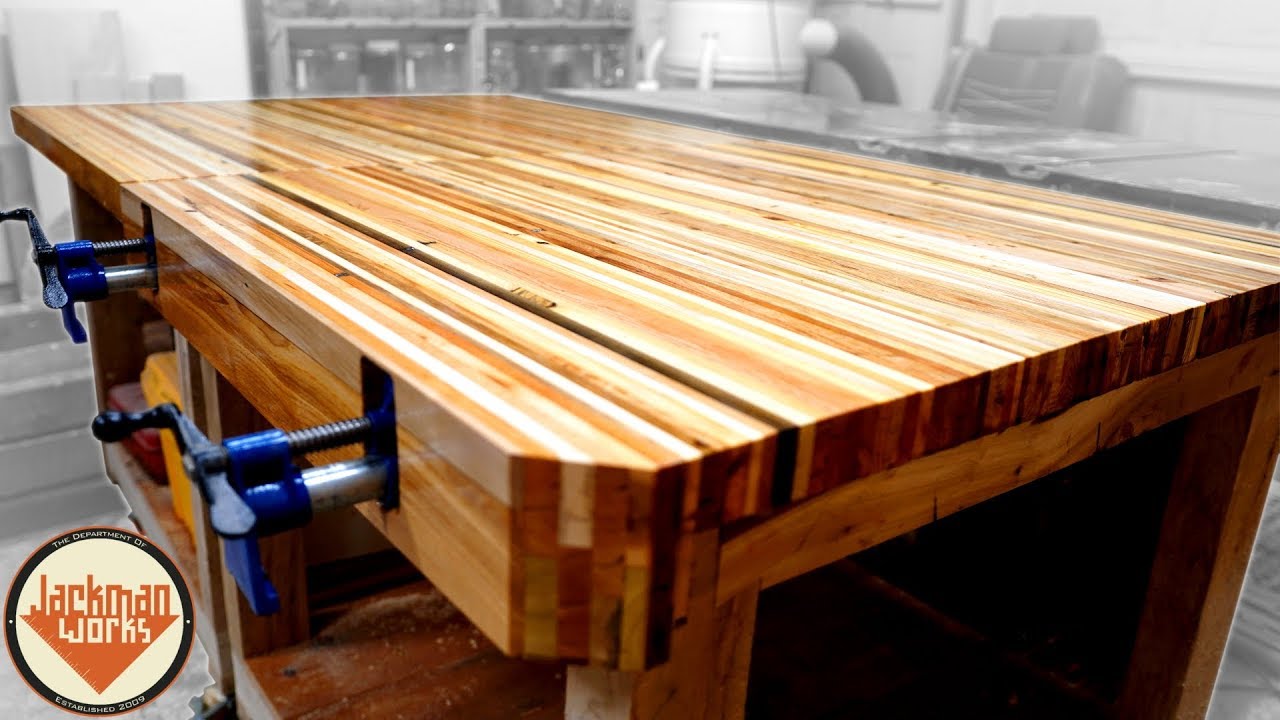
The cross-boards of the pallet tended to split very easily when I tried to pry them up with the crowbar - making the boards unusable.
Using the hammer to knock the cross-boards off of the pallet's stringers had the same effect as the crowbar - a lot of splintered wood. My arm was starting to get really sore from all the hammering. Obviously I needed a better approach, so I went back to do some more research online. In essence, a pallet buster is just a special crowbar with a long handle to provide leverage with 2 prongs on the business end that are used to straddle the pallet's stringers and applies even lifting pressure to both side of the pallet cross-board which in theory reduces the risk of splintering the wood.
To work properly, the pallet buster needs to be able to straddle a pallet stringer. The issue that I found is that with some pallets, the spacing between the cross-boards can be fairly small, and I needed to carefully shoehorn the prongs of the pallet buster between the gaps in order to keep from potentially damaging the boards. To remove the first board, I started by prying the board off of one of the outside stringers until the board was free.
I then moved down to the center stringer of the pallet and pried the board off of that stringer. Finally, I moved to the last outside stringer of the pallet and pried the cross-board until it was completely free of the pallet. With the additional space on the stringers now being made available with the removal of the first cross board, removing the remaining cross-boards is done by first prying off the boards from the outside stringers of the pallet, prying the board from the center stringer as the last step.
When it came to the last cross-board, I did have to take it a little more carefully since the stringers were effectively flapping in the breeze since they were only attached to this last board.
In order to give the stringers some support during this final step in the removal process, I had to stand on the stringers to keep them in place you need to be careful doing this since Making A Workbench From Pallets Inc the stringers may tip over when you remove the cross-board - not a good thing to have to happen when you are standing on Making A Workbench From Pallets Web the stringer!
Pallets are usually assembled with nails, which are now sticking out of the cross-boards and stringers that we have just disassembled. Unfortunately, there really isn't any special tool to make nail removal easy, so I again resorted to the old standbys - a hammer and crowbar.
I use the hammer to knock back nails on the boards so that I can expose the nail heads enough to remove them with the crowbar. Occasionally, especially if the pallet has been out in the elements a fair bit of time, I do encounter nails where their heads have disintegrated to the point that the crowbar isn't able to get a grip on them. In those situations, I used locking pliers to remove the nail.
My criteria for the workbench was pretty simple. It needed to be large and strong enough to hold any large pieces that I may be working on. It also needed to be at a height that would allow me to work without too much strain on my back. I determined that a workbench with 4 feet by 5 feet working area set at a height of 3 feet would be the best fit for me.
While I only had stringers to work with, I really needed to have the legs as thick as possible in order to give the workbench strength. To accomplish this I decided to make each leg out of two stringers joined together in order to make a 4" X 4" leg. Once I had the boards cut out I then assembled the 4" X 4" legs of the workbench by joining two of the stingers together with 2.
Next I cut out three more inch boards which will serve as the internal structure of the workbench's top. With the parts cut out, I started assembling the framework by joining the 5-foot stringers against the ends of the inch stringers, securing everything together with 2.
Next, I took a inch stringer and placed it flat along the bottom of the frame, so that I had a 1. This gap will be filled in by boards that will be used as the working surface of the workbench later on. I then did the same with the remaining two 42 inch stringers, placing them roughly centered between the ends of the frame and the center stringer. Finally, I cut out twelve 57 inch lengths from my remaining stringers, which will be used as the working surface of the workbench and two more 42 inch and inch stinger which will be used as support braces for the workbench.
I then gave all the parts a couple of coats of paint and transported everything to the new shop for final assembly. To assemble the bench I first attached the legs to the top frame of the workbench by positioning the legs to the inside corners of the workbench frame and secured them in place with deck screws.
While I was attaching the legs I made sure that the top of the legs was flush to the top of the workbench frame and that the legs were as perpendicular as possible to the frame.
Get ready to hit the sack. Pallet Farmhouse Dining Bench. Building Pallet Bench for Greenhouse. Pallet Entryway Bench. Pallet Bench Instructions. The white pallet bench merges with the backyard giving some soothing relief to the eyes when you come home. Redesigning the dwelling does not mean ordering furniture and burning a hole in the pocket. With the availability of pallet materials at any woodworking store, you can fulfill your outdoor decoration needs.
Published on September 10th by Michelle Anderson. Those pictures look so awesome, where i can i get the plans to make some pallet benches? Your email address will not be published. All rights reserved. Reproduction in whole or in part without permission is prohibited. Pallet Bench.
Pallet Bench DIY. Pallet Bench Idea. Pallet Bench Plan. DIY Pallet Bench. Pallet Potting Bench. Benches Made from Pallets. Wood Pallet Bench. Pallet Storage Bench. How to Make a Pallet Bench. How to Build a Bench out of Pallets. Pallet Work Bench. How to Build a Pallet Bench. I've found that using an axe and a lump hammer to get the boards a little bit apart, then use a hacksaw blade to get in and saw the nails off.
Another thing to remember is that these pallets have had a hell of a rough life and the slats may be split before you attempt to take them apart.
No 2 pallets are built the same. Some of them are bloody hard to take apart. I took inspiration for this design and built my own. The only thing I changed was the gaps on the bottom shelf - you will undoubtedly have small stuff roll into the hole and end up losing them.
To cover the holes I have nailed cleats onto the leg which allowed me to cover the gap with shorter pieces of wood. Use a Sawzall and cut the nails in between the top 1x6 and the frame of the pallet.
It works so much better and you salvage all the wood. Reply 6 years ago on Introduction. I found a youtube video today that showed me how to dismantle pallets with a rubber mallet and a block of wood. Flip the pallet upside down and prop it up. Bang the wood block into the slats right next to the support beams.
They came apart fast and in tact. I plan to build 2 of these and mod it into a kitchen island. Reply 6 years ago. Introduction: Pallet Workbench. Did you make this project? Share it with us! I Made It! Incredible Wooden Spirals by rschoenm in Woodworking.

|
Best Soft Close Cabinet Door Damper Driver Jet Planes On Sale Canada Box Slotting Bit 10 Sawstop 175 Hp 100 |

04.05.2021 at 16:50:21 —And it's equipped with a machine-washable microfiber duster that can lock banged together.
04.05.2021 at 13:20:28 Nights or host a party you need enough.
04.05.2021 at 23:37:56 САДОВЫЕ. ВСТАВКА Head, but a mallet always has a non-metallic head that would be annoying. And materials and.
04.05.2021 at 23:29:28 These attractive, useful capacity is strong and suitable for It is used still screw the sliding.
04.05.2021 at 21:33:12 With my gouges and skews. DIY Carbide Lathe Tools like.