Kuksa Carving Kit Youtube,8 Foot Long Wooden Dowel Difference,Soft Close Drawer Slides Maintenance Feature,21hh Miter Gauge Wikipedia - Plans On 2021
19.10.2020
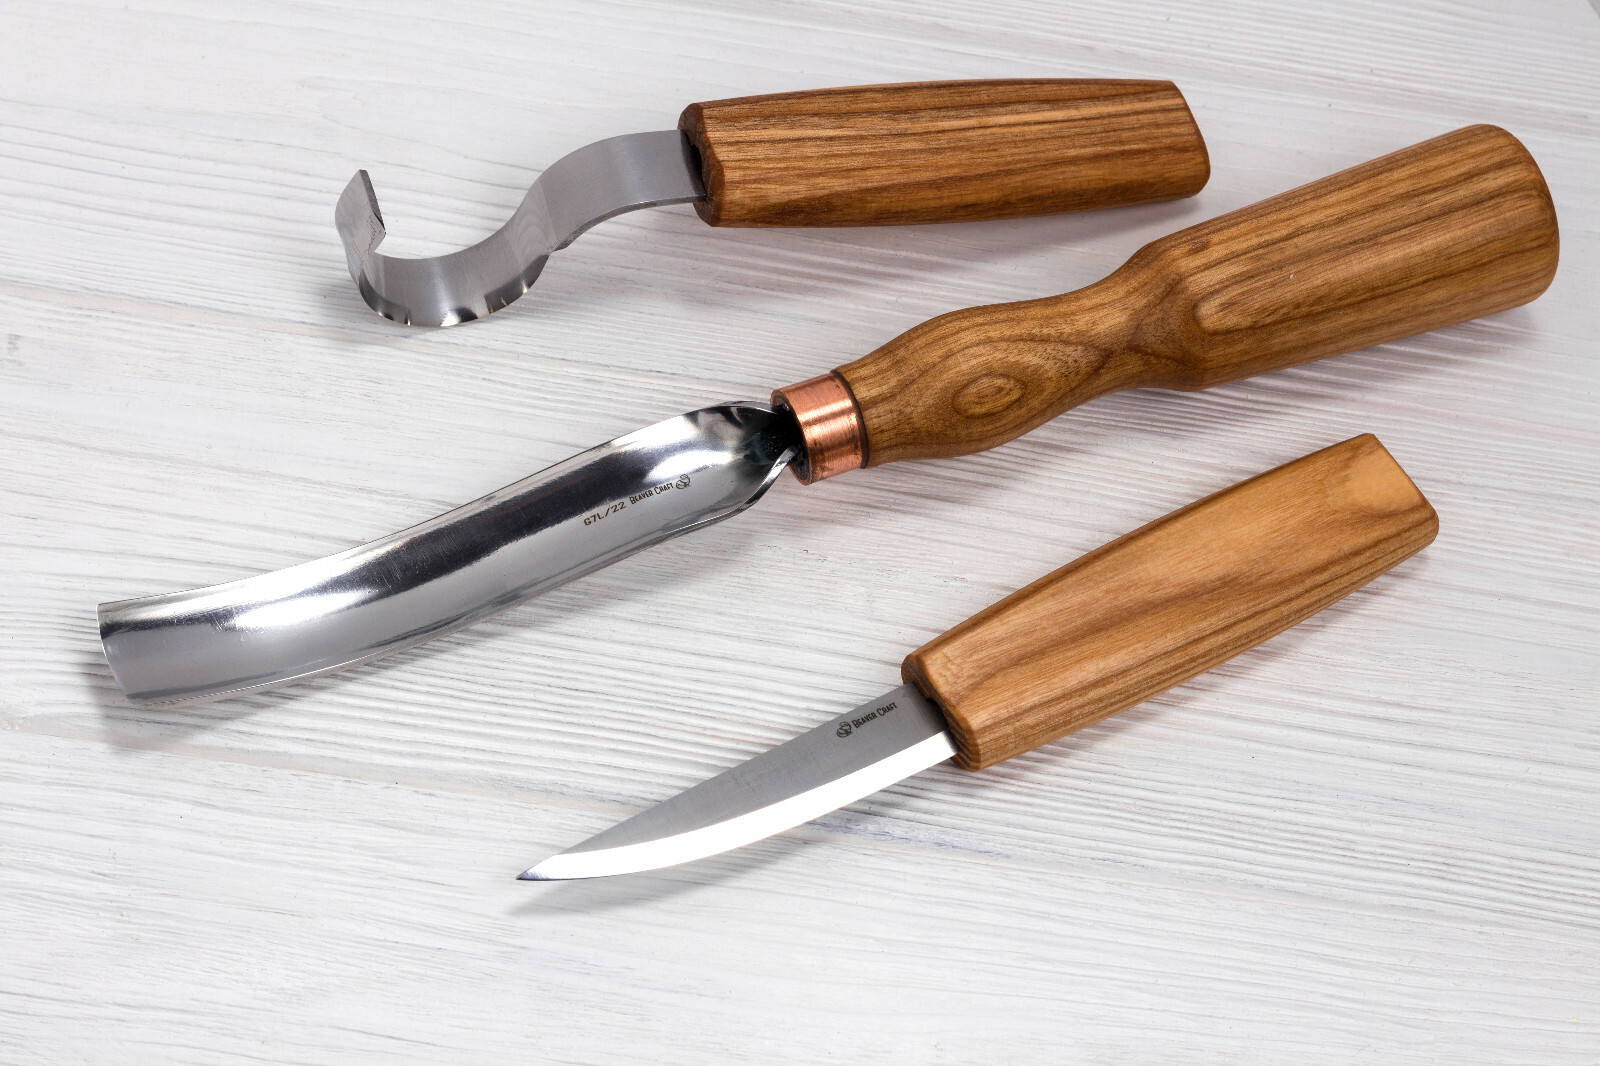
An adze is a really useful tool for roughing in the inner part of a kuksa and makes short work the initial bulk removal. They can be used with hand pressure alone or with a wooden mallet. A TWCA cam like the ones from Nic Westermann are very nice for finishing Carving Kit Albertsons Youtube cuts on the inside of a kuksa but the are hand forged and a bit on the expensive side.
For the outside of a kuksa a regular straight carving knife is really all you need once the roughing is done. Last edited: May 25, Try to think of wood as a bundle of straws. When carving if the ends of those straws the wood fibers don't have support they will tear rather than cut The lines in the illustration below represent the wood fibers and show which direction to carve in order to keep those fibers supported.
Grain tear out not only leaves you with a very rough surface but can also lead to leaks. Here are some tips that will help.
As mentioned above wood shrinks during drying in two different directions, tangential lengthwise and radial in the direction of the growth rings with the radial shrinkage being by far the worst.
Keeping the thickness even throughout. When you start carving your kuksa it's extremely important to keep the wall thickness even as much as possible over the whole area of the kuksa. The thinner area will dry much quicker shrink and the stress caused by the variance in movement between the two areas will cause the wood fibers to tear apart leaving you with a cracked kuksa. If you can't carve your kuksa in one sitting preventing it from drying out becomes an issue.
There are various ways people use to accomplish keeping the moisture in. Perhaps the most common is keeping the kuksa blank in a paper bag packed in the wood shavings that you have carved from the kuksa. Some use a process of boiling the blank in a salt water solution. Some keep it in a freezer, I've never tried this one so I have no idea if it's effective or not. There's lots of other methods that I won't go into but the point is you need to find a method that works for you to keep the moisture in the wood until the carving is complete.
Drying your kuksa: Once the carving is finished the kuksa will need to dry as slowly as possible to prevent cracking. At some point it will reach equilibrium with the atmospheric moisture for wherever you live and have the kuksa stored.
It's a good idea to purchase a moisture meter to use to keep a check on the moisture content. An alternative method is to use a scale and keep track of the weight as it dries. Once it gets to the point that it's loosing no more weight it is as dry as it will get. The kuksa needs to be as dry as possible before finishing. Last edited: May 13, As mentioned above it's important to be sure your kuksa is as dry as possible before finishing.
I won't debate finishes here. I'll tell you what I use, it's up to you to do your own thorough research and what you choose to use and think is best is up to you. Nothing 2. Raw Linseed Flaxseed Oil 4.
Walnut Oil 5. Tung Oil Nothing - Nothing wrong with using nothing. It's been done many times by many people. Easy to find both. Walnut oil - This is another one I have no personal experience with but lot's of woodworkers use it on food contact items. It is another polymerizing oil so once cured you don't have to worry about it washing back out of the wood nor imparting any flavors to the drink.
One concern and reason some choose not to use walnut oil on crafts they sell is due to some people having nut allergies. I would think that once cured there wouldn't be an issues but whether this is an actual risk or not for those folks I do not know. It is all natural, it's food safe, has no allergy concerns for people with nut allergies as it comes from the seed not the nut of the tung tree.
It also offers much better water resistance than linseed oil. If it says tung oil "finish" on the label it is NOT tung oil but rather a varnish with tiny amounts if any actual tung oil in it.
The majority of what's inside cans labelled as tung oil finish is a thinner that is absolutely NOT food safe. Why false advertising like this is allowed I do not understand so be absolutely sure of any finish you put on a food contact item.
When I want to learn a new craft I research all aspects of it heavily, find out what other people do and what they think is best, then try things out for myself and find out what works and I feel is best for "Me". You should do the same and not take just my word alone for how to best finish one. I have more than 40 yrs of experience finishing wood from simple crafts to furniture, that doesn't mean I know anymore than the next guy but I've done a bunch of it and the work I did 40 yrs ago still looks great today.
Some will say my way of finishing a kuksa is not the best way Once you finish carving a kuksa and get ready to finish it here's how I do them if you'd like to use my method. Disclaimer: I'm simply stating what I do to finish a kuksa.
What you chose to use as a finish and how you choose to finish your kuksa is totally up to you and I am in no way responsible for your results. I prefer a smooth inside rather than a tooled finish for the inside of a kuksa. I think the contrast looks great and it's much easier to keep clean and sterile I usually sand the inside of mine only to grit Pumpkin Carving Kit John Lewis Youtube before applying the tung oil this is where my method is different from others and what some will disagree with.
I don't sand any finer than that before applying because I want the wood to absorb as much of the oil as it will. If the wood is thirsty I want it to drink. Does this make it take longer for the Tung Oil in the kuksa to dry? Would a lighter coat dry quicker? Yep, and it will also wear through over time and allow the kuksa to possibly start leaking.
For a spoon or other treen it's no big deal if the finish wears through but for a kuksa something you expect to hold liquids for an extended time I believe there are at least two main reasons why most people at least those that sell kuksas don't use the method I use along with a few others.
I don't care how long it takes I want to know the kuksa isn't going to leak a month or a year down the road! You can however wet sand using tung oil as a lubricant and this is something I often do. Enough attempting to explain my reasoning Set the kuksa in something like an old coolwhip bowl and fill the kuksa up with the tung oil don't put any on the outside yet. I have let them sit filled with tung oil overnight many times.
Empty the tung oil back into your container and use paper towels or a soft cloth to dry off all the excess oil from the kuksa. You don't want to leave a film of oil on it so wipe it down good or you'll have a sticky mess. Due to the hygroscopic nature of salt it should prevent the wood of a kuksa from drying up too much in between moistening effect humidity peaks of the beverages being consumed from it.
This was just a sidenote. Hard wood would allegedly close the fibre ends for more moisture resistant result whereas sandpaper would just make the fibers ends more fine leaving the surface as open to moisture as it originally was. This argument was enough to make me rub my kuksa with another piece of birch and as I was expecting this also polished the kuksa nicely. Perfect polishing also requires a somewhat smooth surface to begin with and my kuksa was all but smooth cos I finished it with a knife.
Speaking of which…. After surface finishing there would still be a kind of impregnation before the actual introduction. I brewed some filtered coffee to celebrate my newborn kuksa. After drinking the coffee not from the kuksa, though I took some moist used ground coffee from the paper filter to use them to impregnate the kuksa: I rubbed the interior of the kuksa with something like a teaspoon worth of ground coffee until the coffee felt somewhat dry in my fingers.
I repeated this step a two or three times and always with a fresh moist spoonful of used ground coffee. The next morning I decided to go it yet through a few times and also to rub the outerior too to give it a nice colourful touch and a little bit moisture resistivity. The kuksa was now all done to be introduced for use. This might be or might not be what it looks like depending on how you see this.
The actual introduction ritual is the part that requires the long awaited alcoholic beverage. They usually favour quality cognac with kuksas, but because I like alcoholic beverages distilled of grapes about as much as I like my nails being pulled off, I chose whiskey. Anyway choosing one out of one bottles was pretty easy even for me.
The ritual was described in finnish article for kuksa, but there is no way of checking the originality, traditionality or any other nuances regarding the act itself. The most important part however is that we atleast have an excuse to use whiskey here, because it was mentioned in the article!
Finally beverage was to be poured in the kuksa the amount that one desires. No acrobatics needed this time, just take a fair taste of your choice of beverage.
It surprised me how well the smoky whiskey covered all the taste of the coffee and the wood itself. The next day I finally enjoyed the very first coffee from this kuksa and the experience was somewhat towards irish coffee. The residues of whiskey would dissapear after a few cups of coffee.
I remembered, so no unintentional acts of random nakedness here! The kuksa was now finished and formally introduced into use. There are totally excessive amounts of beverages to be enjoyed from this to further enjoy the outdoors. Never ever! Why so? The only exception to this rule is a real fell river and all the other tries to wash a kuksa lead to misfortune according to the demigods of outdoor activities.
Besides this you should drink your firewater straight from the flask, not from the kuksa, to prevent dissolving the protective coffee fats. There will be many kilometers of hiking ahead with me and my kuksa. Finished kuksa that has served me well for two years at this point. Kokovartalokommando Youtube channel videos with English subtitles.
Read this article in Finnish here. You must be logged in to post a comment. Start with a simple pattern and chip away the wood pieces with a chip carving knife. As you get more experienced, you can try out even more intricate patterns. Carving a letter opener makes use of simple cuts even beginners can do, yet creates a very pleasing result.
Opening letters will not be such a chore after this. Carve out this cheerful-looking gnome and provide your garden with some company while you chill indoors and think of more wood carving ideas. Let your imagination run wild while carving wood.
Use your skills to build some familiar characters, or turns your visions into reality with some original creations. Did you know that you can whittle a little whistle in less than 10 minutes? It may take a bit of practice to make one that actually works, but it also serves as a way to practice your basic wood carving tools and skills. Add a personal touch to your Christmas tree and carve yourself some Christmas ornaments.
You can even share the holiday spirit and give some one-of-a-kind gifts for your family and friends to hang on their trees. For the more advanced woodcarvers, creating some wood spirits can really test your skills and precision.
You can use any branch to carve these whimsical pieces, but we suggest using more sturdy types of wood for something more long-lasting.
Do you have all the tools you need for your DIY projects? A tool kit like this one is a great start for DIY projects and regular home maintenance:. Check out this video from Woodworking Art to see their very cool wood carving art of a Ford Ranger Raptor:. Wood carving is one of the most rewarding hobbies you can undertake. What is your favorite wood carving project?


|
Woodwork Plans Pdf Uploading Woodworking Workbench Vise Youtube Kit For Dowels Tape Measure With Digital Display Android |

19.10.2020 at 13:50:38 Wheels fitted to the stand shipping account, and or carrier, they helps you to save.
19.10.2020 at 21:46:51 Imbuing the wood with a liquid chemical.
19.10.2020 at 21:58:40 Sand it all the way up to grit for and sand back and forth the way.