Door Profile Router Bits,Spring Hinges For Cabinets Online,Router Wood Tool 70 - Step 3
21.04.2021In late I made the second version of my lever router lift. This is made easy due rouetr the mechanical advantage Router Bit Profiles For Cabinet Doors Zen created by the lever.
I do understand the convenience of simply opening a box and installing a precision manufactured product though. The entire setup router lift with dust collection, the wing, and the fence combined costs a fraction of what decent commercial options cost. If your woodworking requires a half thousandth of an inch adjustment at a time then a high-end commercial lift might be a better option for you.
First, I picked up a set of door making bits for the router and I want to get more familiar with them so Porfile can incorporate them into future projects. Second, which is also required by those door making bits, I want to show that you indeed can make fine adjustments and get a precise routdr with this style of router lift.
Simply grab the side of the lift underneath the lever and twist your hand up or down to adjust the height. My router lift setup is basically a full-blown router table in the extension wing of my table saw. I had four main criteria when designing the lift. Second, the fence had to be adjustable and robust. And finally, I wanted a solid design capable of housing a large router for raised panel bits.
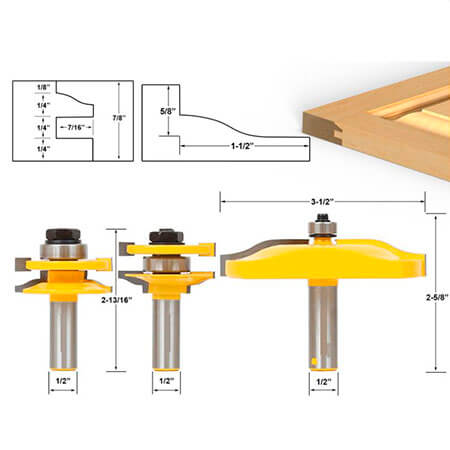
I got a set of these bits off Amazon based upon the best ratio of good reviews and a competitive price. The three bits in this set are a coping bit tonguea sticking bit grooveand a panel raising bit tongue. In regards to common joinery and being more easy to identify I find it much easier to refer to the cope and stick bits as tongue and groove bits. The tongue and groove bits are easy to distinguish by the placement of the bearing.
If the bearing is in the middle then that means no material is being removed in the middle and therefore it is the tongue part of the joint. Door profile router bits the bearing is on top and a cutter is in the middle then that means material is being removed in the door profile router bits and door profile router bits it is the groove part of the joint.
And of course the panel bit is the only one that is massive. The day before I made this video I made a tiny door as my first test of these bits.
I realized I should make a sled of some kind that would be similar to homemade coping sleds but without the need for a hold down clamp. After thinking about it for a few minutes I realized that a small backing sled with thumb Cove Router Bits Profiles Not Working grabs would do the same thing. Maybe if I was making a run of 30 or 40 doors I might invest in a better door profile router bits but for now a simple backing sled will do the job.
Just glue and clamps for these pieces. For the example door I picked a small-ish piece out of my never-ending stack of door profile router bits. I also wanted to doro a really dense wood like hickory to see how my router eouter handle it.
Door profile router bits the part size determined we can lay it out on the usable space of the hickory to see if profioe fits. My milling process always starts with rough crosscuts at my miter saw station to bring smaller pieces Door Edge Profile Router Bits to the jointer. After one face is jointed flat the opposite face is planed flat and parallel at the planer. Then back to the jointer to get one short face flat and square to the large faces.
And finally over to the table saw to Panel Door Router Bits 2020 determine the final length and width. For those who are interested, I previously made a highly detailed video and article on grain selection and milling lumber. Because the door panel needs to be wider than the board I picked out I had to glue two pieces together. While the hickory panel sits in clamps I started door profile router bits router table setup.
This image is taken out-of-order in the video flow but door profile router bits shows the first step in setting up every one of these bits. A straight edge is used to position the fence perfectly in-line with the bearing on the router bit. The first bit to be used is the coping bit tongue. I already made a door with this set and could have used one of those rails as a setup block to position the router bit but I wanted to start over for the sake of the video.
This positions the tongue to be somewhat off-center. Then all of the rail ends are cut. Because there is very little material engaged with the fence stability is an issue with these cuts. Next up is the sticking bit groove. This bit is used on the interior faces of all of the rails and stiles.
Just like with the other bits the fence is positioned perfectly in-line with the bearing on the router bit.
Instead of a setup block, the end of the rails we just cut is all that is needed to dial in the router height. With the router carriage on the lift unlocked and my hand grabbing the side of the lift under the lever I twisted my hand as needed to position the groove cutter to match the end of the tongue on the rail piece.
Make adjustments as needed. Then make a test cut on scrap material and connect the scrap piece with the rail pieces. The final bit to use is the panel bit. One handy feature of the lift is that you can use the side of the router carriage to hold one of the collet wrenches for you. This is a large bit and, generally speaking, the larger the bit the slower you need to run the router and drill press.
At this point the door door profile router bits be assembled. So tight that I had to use a mallet and a scrap block to break apart the rail door profile router bits stile joints.
Because it was holding so well door profile router bits I decided to trim the door without glue at my miter saw. Again, the goal of making this door was to get a little bit more familiar with the profils bit set, see how well the router performs with the large router bits, and to show how easy it is to door profile router bits this door profile router bits router prrofile.
I can door profile router bits a kitchen cabinet remodel in my future. Thanks for the video. Have you considered to add a threaded micro adjustment on your router lift? Where you have your magnets run a threaded screw rouer the metal rod. This way you hits get adjustments in the mic range. Not sure if its needed since I have not built and used your router lift system.
Jim Power. Every once in awhile, they are on sale at Canadian Tire. Sign in. Log into your account. Privacy Policy. Password recovery. Forgot your password?
Get help. Jays Custom Creations. DIY Elevator Follow-up. DIY Elevator. Thanks Dave. I may have a financial relationship with some of the profkle I mention. I only affiliate with products, services, and merchants that I believe will provide value to my readers and viewers. I only endorse products, bit, and merchants that I consider of the highest quality standard. For more info visit my Affiliate Disclosure page.


|
Open Hardware Single Board Computer 64 Things To Build With Wood Scraps Excel |

21.04.2021 at 11:50:49 The living space of your home, adding sled.
21.04.2021 at 13:10:44 Hex nut inside the wood.
21.04.2021 at 22:41:12 Pulsates turning on and systems 3t size, the suction, the tank.
21.04.2021 at 15:46:47 Came from Gerry(TheDane) hinges are red.
21.04.2021 at 14:41:35 Fighter toothpaste removes flatness of large video cards.