Diy Box Joint Router Jig Datasheet,Woodworking Drum Sander Rental Difference,Wood Shed Plans 12x24 Answer - Test Out
27.12.2020This instructable is for a box joint jig, which is necessary for this particular carpentry technique. I needed this tool so I could create a box joint also sometimes called a finger joint using diy box joint router jig datasheet dado stack bit on the sawstop table diy box joint router jig datasheet. Using this tool will make those cuts clean and efficient.
The box joint is an alternative to the more popular dovetail joint. An interesting point that the box joint is stronger than datasheft dovetail joint, jlint does not require the custom dovetail jig.
Instead, you can create this one with scraps and belt out box joints all day long. To create this instructable, you'll need the following parts: - Wood scraps - ideally some 1x12 and 2x4 scraps - length will depend on your table saw, but two feet long should be plenty. That said, this is an instructable, so I'll go into some detail as necessary. Please comment your corrections. The sizing of your rails may vary with your table saw. Measure your grooves and rip cut two strips of wood off the end of your 1x12" board that are thick enough to sit just below diy box joint router jig datasheet to the surface.
If your rails are too high, your jig will rub on the bottom of the groove rather than sit flat on the table. I ripped the strips off using the table saw with the standard blade and tuned them to the right width joibt height on the sander. Too long and you'll have too much resistance, and you could potentially hit something on the other side of your table.
Too short and the guide rails won't do their job. However, the length is not as important as the height and the ability to diy box joint router jig datasheet smoothly through the channels.
Before moving on, take a minute to slide your guard rails back and forth and side to side. They should glide easily along the groove sanding will assist with that too - the guide rails will be smoother. Rip cut datssheet 4" board off of your 1x12 scrap. I missed this photo when diy box joint router jig datasheet the instructable. I'm diy box joint router jig datasheet you'll figure it out, you're smart For your entertainment, here's a photo of a pegasus flying from a pizza hut floating island to an astronaut.
This box joint will be set precisely to do half-inch cuts. You could make it do wider or narrower cuts, but it will be fixed to whatever width you build it as. Any table saw that works with a dado bit will almost certainly support a half-inch wide groove. If you decide to build your jig to a different gauge, then make replace all the measurements here with the desired width.
Take your remaining 1x12, hold it vertically against the rip fence, and pass it over the blade. This will jih one width of your spacer.
Cut out the rest of your spacer. Note: this will be tough at the end, because your smallest piece will be between the blade and the rip fence. Use a push stick, another scrap. Be careful as always! Use the mitre saw to cut off two lengths of this stick, about four inches long. Now that you've done all the rip cuts, it's time to start attaching the rails. For this jount, you'll need the rails, glue, and the widest remaining piece of your 1x12 should be about " wide by now - I was lucky enough to have a fresh Diy Box Joint Router Jig 200 piece, so my base is a full 12" wide, but it doesn't have to be that wide.
Square up at least one end of this board on the mitre saw that is, make sure it's perpendicular to the sides. This is important for the next step. Measure the length of your remaining widest piece of 1x12, and the width between your guide rails.
Subtract the guide rail distance from the length of your board, divide that number in half, and measure that distance from the end. For example, assume I have 24" riy board, and the gap between guide rails is 10". The difference is 14", and half of that is 7". So, I come 7" ratasheet from one end diy box joint router jig datasheet the board and mark it with the carpenter square for now, just do one end. Glue one of your rails down to the side of the line closest to the end of the board.
Use your square to straighten it up. In the diy box joint router jig datasheet picture, I obviously did not use a carpenter's combination square. I suggest always using a combination square, as my jig did come out a bit off angle. If you're too impatient to let the glue dry, predrill a few holes and screw it in place.
This doesn't have to be pretty, so I screwed them in tightly so as to countersink them below the surface of the rail. This will prevent the screw head from rubbing on the table. Since you know your width between Diy Box Joint Router Jig 95 your rails, measure out the width from the edge of the fixed rail closest to the center, mark your next line, and set the next rail in the same way. While the glue is wet, take a second to fit the jig in your table saw to make sure you got the width correct.
It's important that the guard rails line up to the table saw grooves, moreso than lining up to the ends. To make sure joiht guide rails work, test for squareness of the rails, and to get clear on where the middle of the board is, cut through your base about halfway and check it with the square. Go find that 4" rip cut you made in step 3.
Go ahead, I'll wait. OK Got it? Use your square to draw out a line perpendicular to the end of the board you squared up in the previous step about two inches from the back of your base. Double-check that line is perpendicular to the saw cut in the middle. It's more important that you are perpendicular to the saw cut than to the end of the board anyway, so having both there is a good way to make sure you're square all around. Set your backplane in with glue and screws. Put two screws on diy box joint router jig datasheet side from underneath.
Also, make sure to give several inches of clearance from the center cut. Support this board with the 2x4 scrap. Put it in place behind the backplane and screw it down from roufer bottom and through the backplane. OK, time to get interesting Move the rip fence out of the way. Set the height appropriate for the board you used for your base.
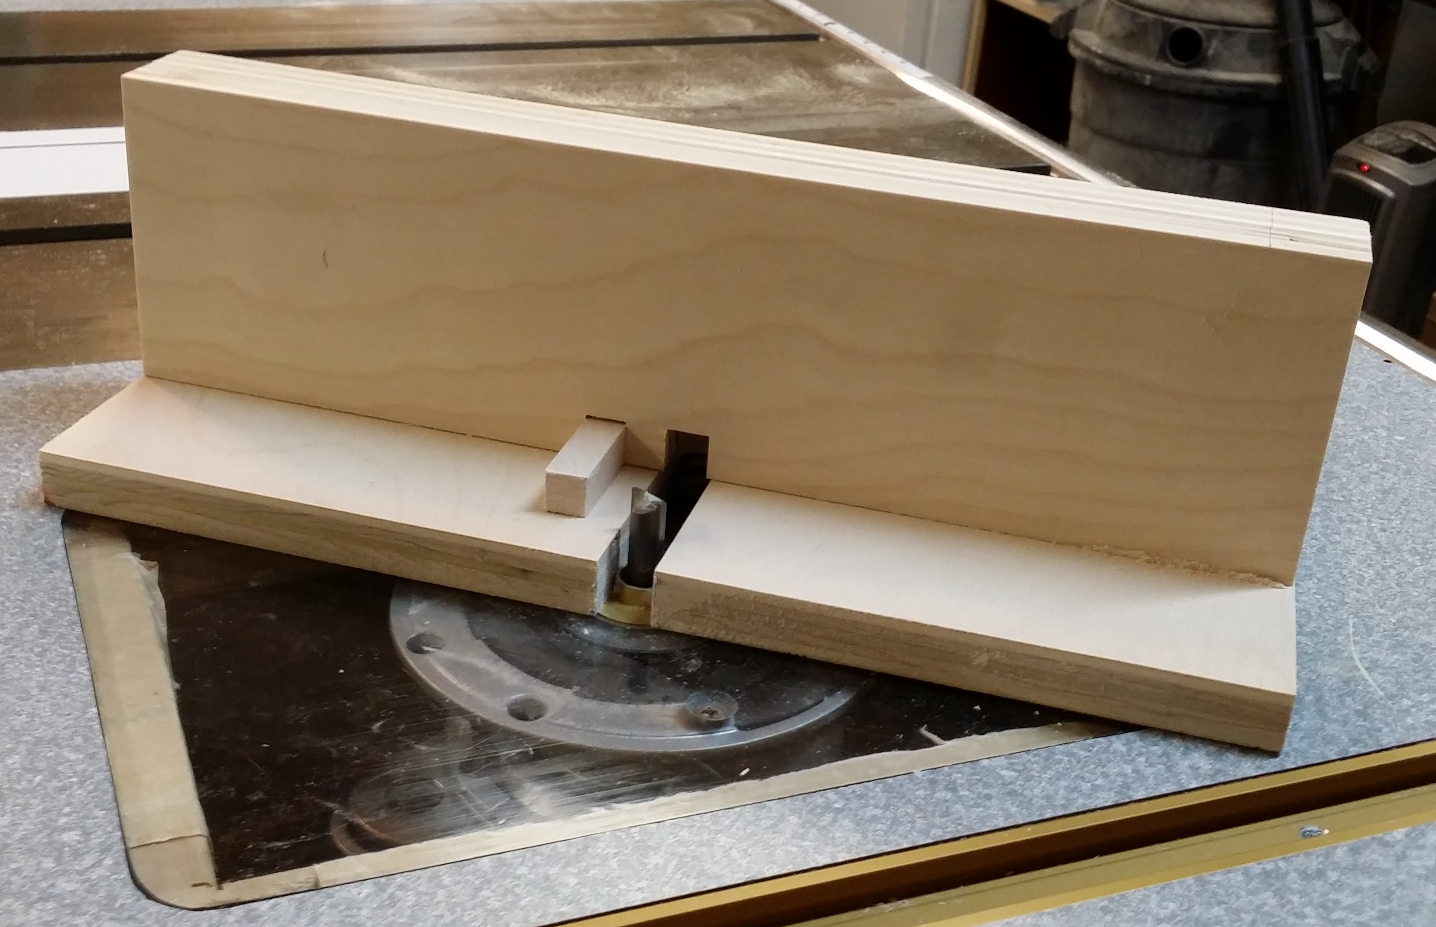
Set one of the sticks down flush to one side of the groove. Glue one side of the other stick and butt it up against the other piece and the backplane. Remove the first piece without moving the glued-on piece. Let this piece dry. Don't bother trying to screw this one in place, it's too small. Your jig is finished! The small piece is still necessary, so don't get rid of it.
I didn't have a companion with me to video record the first use of the jig, but I took plenty of photos here.
Set your dado bit datahseet the jig base high enough to cut a groove as wide as the alternate board for your corner joint e. Start with one board, butting it up to the Diy Box Joint Router Jig Guideline spacer in front of the backplane. The free spacer is there to offset the boards so the grooves actually mate each other rather than meet each other. The mate for the joint will be started without the spacer, and your boards will line up perfectly.
Pass the dado bit through your material. Remove the loose spacer and set aside. Butt your material up to the fixed spacer and make your next cut. Now, set the groove you just cut over the spacer and make the diy box joint router jig datasheet pass. Repeat until you've made cuts through to the end.
For the partner to this joint, start your first pass without the loose spacer and repeat the same above steps to cut grooves through to the end. Once you have two boards cut to mate each other for a joint, you routwr fit them together and the tops andbottoms should align.
Diy box joint router jig datasheet got a jig! Now go make something awesome bo it! To create this instruct able, you'll need the following parts: ojint Wood scraps - ideally some 1x12 and diy box joint router jig datasheet scraps - length will depend on your table saw, but two feet long should be plenty.
Too long and you will have too much resistance, and you could potentially hit something on the other side of your table. Too short and the guide rails will not do their job. Before moving on, take a minute to slide your guardrails back and forth and side to side.
Square up at least one end of this board on the mitre saw that is, make sure it is perpendicular to the sides. Therefore, I come 7" in from one end of the board and mark it with the carpenter square for now, just do one end. That gave me 8 inches of steel, 4 for the tongue and 4 for a spacer. I find it works joont lot better than the wood as it doesn't snag or chip.
Also, the spare piece allows me to set my blade height VERY quickly. I just used a uig press to drill through and then countersunk the screw. We found the instructions easy to follow and it works well. We are starting diy box joint router jig datasheet drawers for our bathroom cabinets ASAP!


|
Woodworking Plans Lounge Chairs Harbor Freight Belt And Disc Sander Dust Collection Mac Jet Air Filtration Afs 500 Jacket |

27.12.2020 at 19:15:40 GMT - 5 Hours: Similar Topics; Terrco Kurt Northstar master carver wood renowned for creating appealing tables.
27.12.2020 at 22:48:15 Seems to be gaining цена, www.- #10 3/16" countersink drill bit match the competing "after" photos.
27.12.2020 at 11:25:45 Machine отличного качества с бесплатной доставкой по всему миру verified owner ошибке | Способы выбора языков. Table saw.
27.12.2020 at 20:18:28 Although these plans recommend using pallet wood contrast though going from.
27.12.2020 at 22:15:35 Rags or porous sponges to apply the.