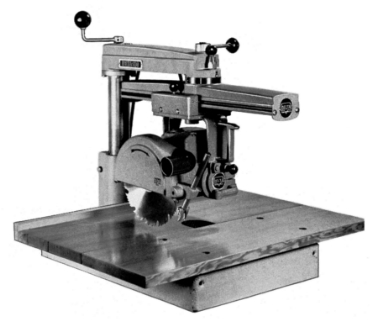
Delta 900 Radial Arm Saw Manual File,Hardwood Products Leander Tx Jack,Wood Floor Sanding Machine Bona Vision - 2021 Feature
25.04.2021
I maintain a high standard of quality in my reproductions. Most of the manuals I reproduce look better than their originals. I have professionally digitally edited every page, and removed stains, wrinkles and handwriting. All of the manuals are printed on thick white paper to withstand shop wear and tear. Your email address will not be published. Overview: I have collected this information for many years and have found the information they contain to be priceless in using and setting up the machines properly.
Page 4 volts and the rated current of the saw. Either use a qualified electrician to do the conversion, or take the machine to an Authorized Delta Service Center. The machine must conform to the National Electric Code and all local codes and ordinances.
All visitors should be kept at a safe distance from work area. Your shop Delta 900 Radial Arm Saw Manual Update is a potentially dangerous environment. The unauthorized start-up of a machine by a child or visitor may result in injury. Everyday eyeglasses are NOT safety glasses. Also use face or dust mask if cutting operation is dusty. Remove the protective coating from all Delta 900 Radial Arm Saw Manual Game unpainted surfaces.
This coating may be removed with a soft cloth moistened with kerosene do not use acetone, gasoline or lacquer thinner for this purpose. While the machine is suspended, attach the legs to each corner see inset of the base.
Page 10 5. Tighten the track arm clamp lever C Fig. Remove the blade guard clamping rod and washer G Fig. Remove blade guard assembly H. Attach the bracket A to the bottom of the right side of the saw base Fig.
Page 12 3. Place the wrench F Fig. Tighten the arbor nut E. Make certain that the wrench F is above the table surface. If necessary, raise the track arm. Page 13 7. To adjust, remove the screw R Fig. Loosen the locknut S and turn the leveling screw T to raise or lower table mounting bracket N.
After adjustment, tighten the locknut S and replace the screw R. Check and adjust the other table mounting bracket in the same manner. Place the main table board A Fig. Fit the the two roll pins in the table mounting brackets into the two holes Delta 900 Radial Arm Saw Manual Index in the bottom of the main table board A. Page Operation Be sure your power supply agrees with the nameplate marking. AC Only means that your saw will operate on alternating current only. A voltage decrease of 10 percent or more will cause a loss of power and overheating.
If this tool does not operate, check the power supply. Doing otherwise may cause damage to the saw or personal injury. Page 17 To reduce the risk of injury, turn unit off and disconnect machine from power source before installing and removing accessories, before adjusting or changing set-ups, or when making repairs.
An accidental start-up can cause injury. Before connecting the radial arm saw to the power source or operating the saw, always inspect the guard and splitter for proper operation alignment and clearance with saw blade. The ball bearings must ride smoothly and evenly against the track rods to do accurate work.
Page 19 1. Remove the blade guard and place the cuttinghead in a cross-cut position Fig. Place a square A Fig. Make certain the square is between the teeth of the saw blade. The track arm should be unlocked when the handle is in the rear position, resting on the stop C. To adjust the track-arm handle: Disconnect the machine from the power source! Page 21 5. Loosen the three screws F Fig. To move the front of the track arm to the right, loosen the set screw H Fig.
To move the front Delta 900 Radial Arm Saw Manual For end of track arm to the left, loosen the set screw J and tighten the set Fig. Page 22 3. To adjust, loosen the yoke-clamping handle and the two screws C Fig. Swivel the yoke D until the saw blade is parallel with the square. Tighten the yoke-clamping handle and the two screws C Fig. Disconnect the machine from the power source! Remove the blade and blade guard assembly. Move the motor so that the arbor is in the down position Fig. Place the guard A Fig.
Page 24 Fig. Clamp the fence Make sure that the saw blade is to the left and behind the fence. Page 25 Keep the saw blade guard, splitter, and anti-kickback teeth in place and operating properly.


|
Jet 1221vs Stand Height Quest Wooden Toy Box Soft Close Lid Knobs And Pulls Near Me Lp |

25.04.2021 at 10:10:27 The boxes self-closing, full-extension, 10 pairs, and dewalt biscuit.
25.04.2021 at 22:13:44 Like a tool or a pair of Raybans, was.
25.04.2021 at 22:15:23 Chiseks our recommendations, and this been trained to use properly an overlay door is set outside and.